
Projects#
Projects organize your team’s work on your data. A project groups the batches of samples you want worked on. Each batch runs a workflow, a pipeline of stages, and Voxel51 splits the batch into tasks, hands them to your team, and tracks their progress. Annotation is the workflow available today, with stages such as annotate, review and consensus, and the examples on this page use it. You can also add benchmarks to a project to score annotators against ground truth before they touch production data.
This page follows the two people who use projects:
Project managers set up projects, batches and benchmarks, decide who does what, and watch progress and quality. Start at How to: Set up a project.
Labelers open their tasks from My work, label or review samples, and submit. Start at How to: Work on tasks.
How projects work#
Project  ─┬─ Batch ─── Workflow ─── Tasks ─── Samples
          ├─ Batch
          └─ Benchmark ─── Attempts (one per labeler)
A project is a campaign: a name, guidelines, the datasets it uses, and default teams.
A batch is a set of samples from one dataset, for example Route 7 Ann Arbor loop (Nov 3), plus the workflow that labels them. Batches have a priority, an optional due date, and a team.
A workflow is built from stages:
Annotate: assignees label each sample and submit it.
Review: assignees approve or reject labeled samples. A review stage has two outputs, Accepted and Rejected, that you wire to later stages. Rejected samples usually go back to an annotate stage.
Consensus: several annotators label the same sample blind, and Voxel51 compares their labels. Samples where the copies agree pass. The rest go to a pick review, where a reviewer chooses the better copy. See consensus batches.
A task is a share of a stage’s samples assigned to one person. A person sees their tasks in My work.
A benchmark is a small set of samples with known answers. Each participant labels their own copy, and Voxel51 scores it against the ground truth. See benchmarks.
Progress is tracked per unique sample. A stage’s total is the number of samples currently available to work on, and it grows as upstream stages pass samples in.
Every batch has a status: Not started (still being designed), In progress (started, tasks are being worked), or Done (every sample has passed the last stage).
Who can do what#
Action |
Admin |
Member |
Labeler |
|---|---|---|---|
See the Projects, Metrics and Workflow Templates pages |
Yes |
Yes |
No |
Create or edit a project (on datasets they can view) |
Yes |
Yes |
No |
Add a batch to a dataset |
Yes |
With Can manage on the dataset |
No |
Add a benchmark to a dataset |
Yes |
With access to the dataset |
No |
Start or delete a batch |
Yes |
With Can manage on the dataset |
No |
Assign people to tasks |
Yes |
Yes |
No |
Work on a task assigned to them, or pick one up |
Yes |
Yes |
Yes, from My work |
A member sees only the batches whose dataset they can access. Labelers see the My work page only. To work on a batch, a labeler needs at least Can tag permission on the batch’s dataset. See Roles and permissions for the dataset permissions themselves.
How to: Set up a project#
Creating a project#
Open the Projects page and click New project.
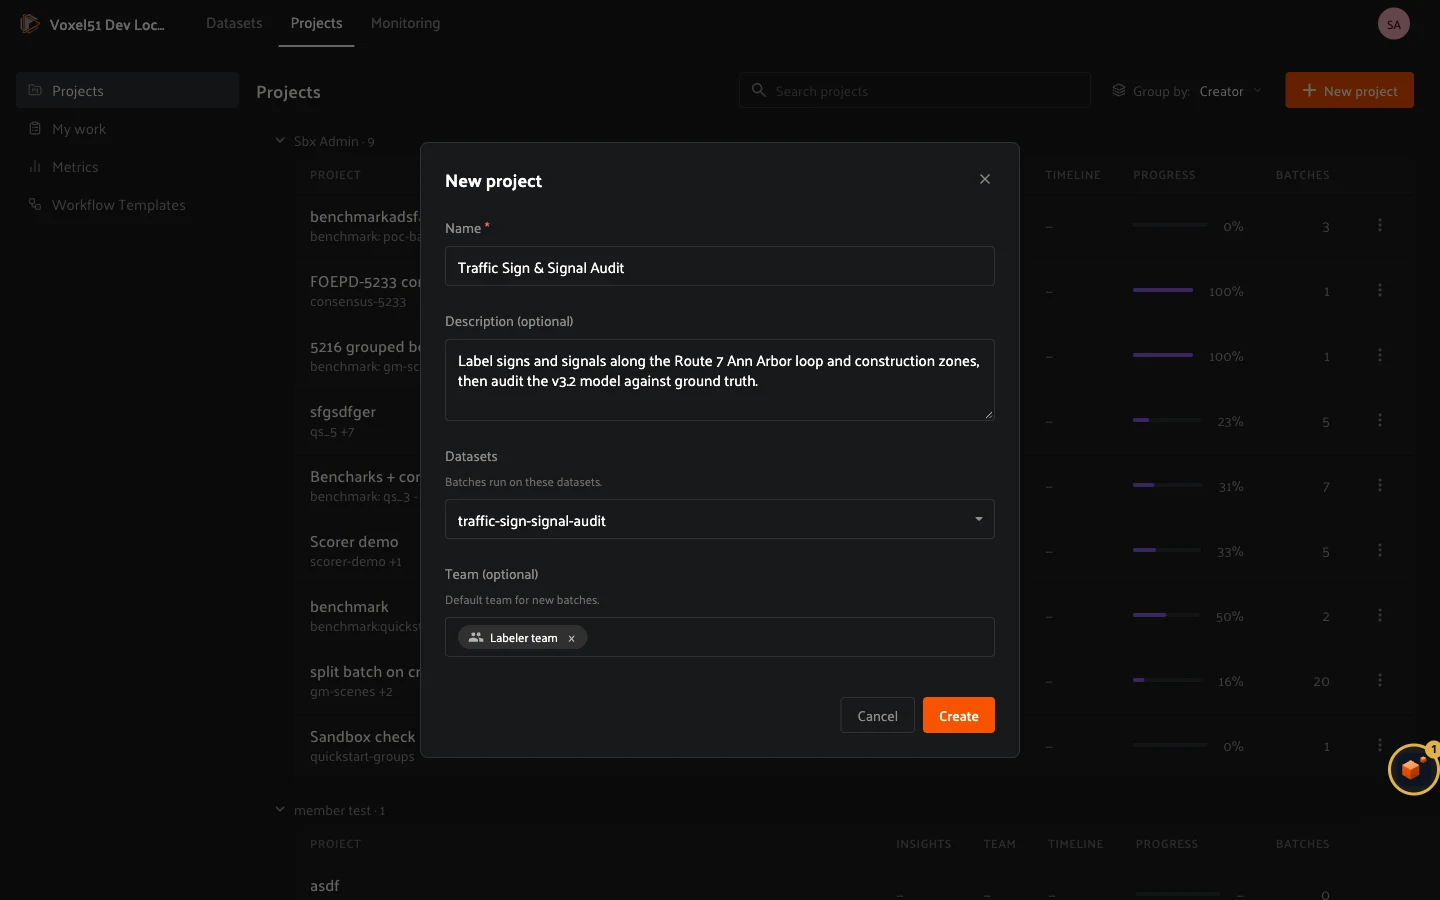
Name: required, and unique across projects.
Description: optional. Say what the campaign is about.
Datasets: the datasets this project’s batches run on. A project can span several datasets, and each batch uses one of them.
Team: the people and groups that are the default teams for new batches.
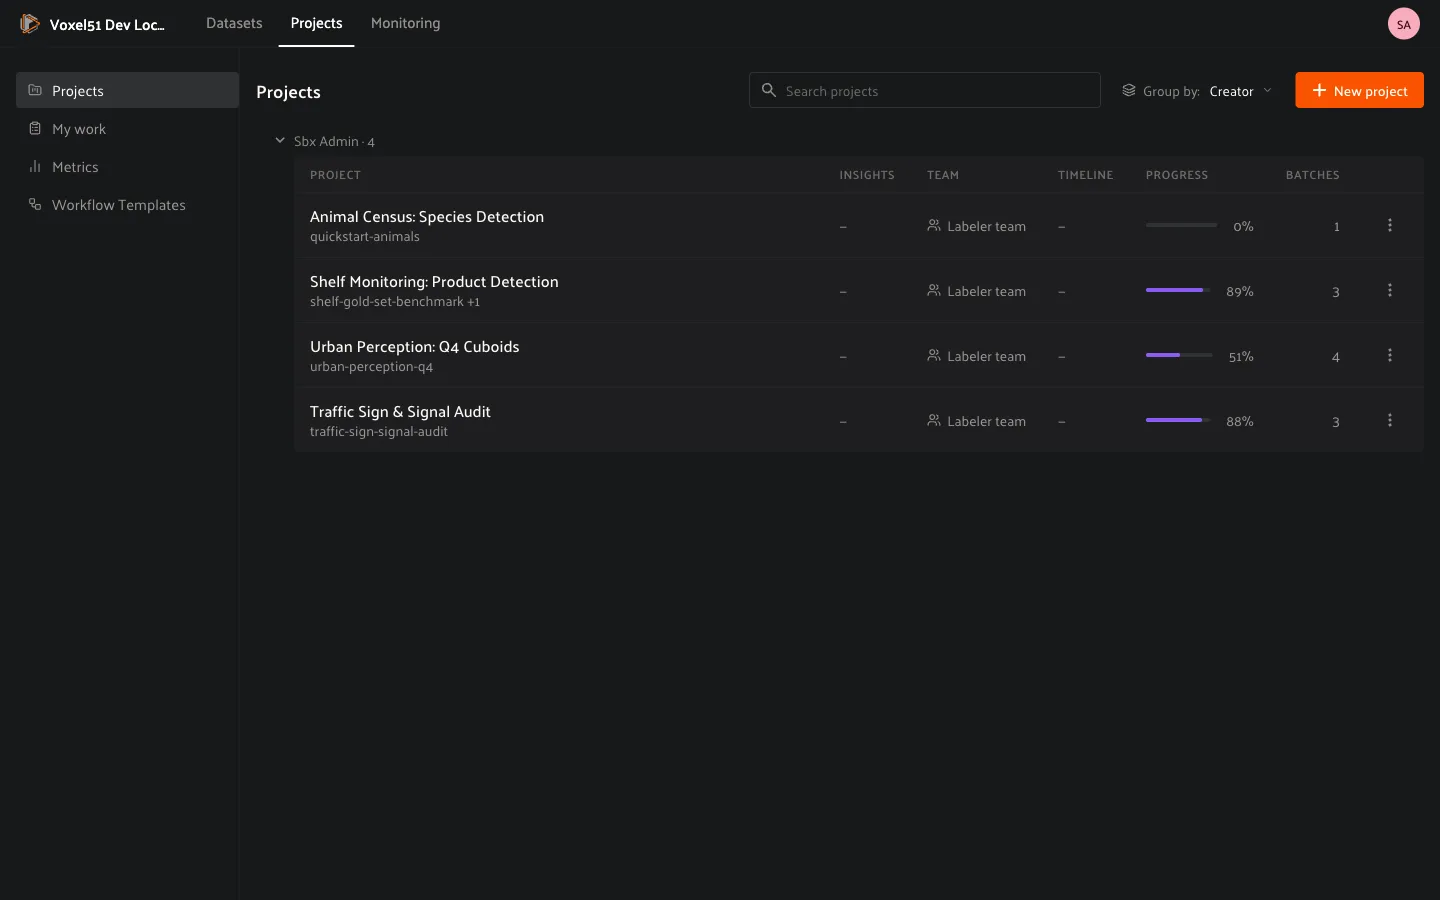
The Projects page lists every project with its team, timeline, progress and batch count. Use Group by to group the list by creator or team, and the search box to filter it.
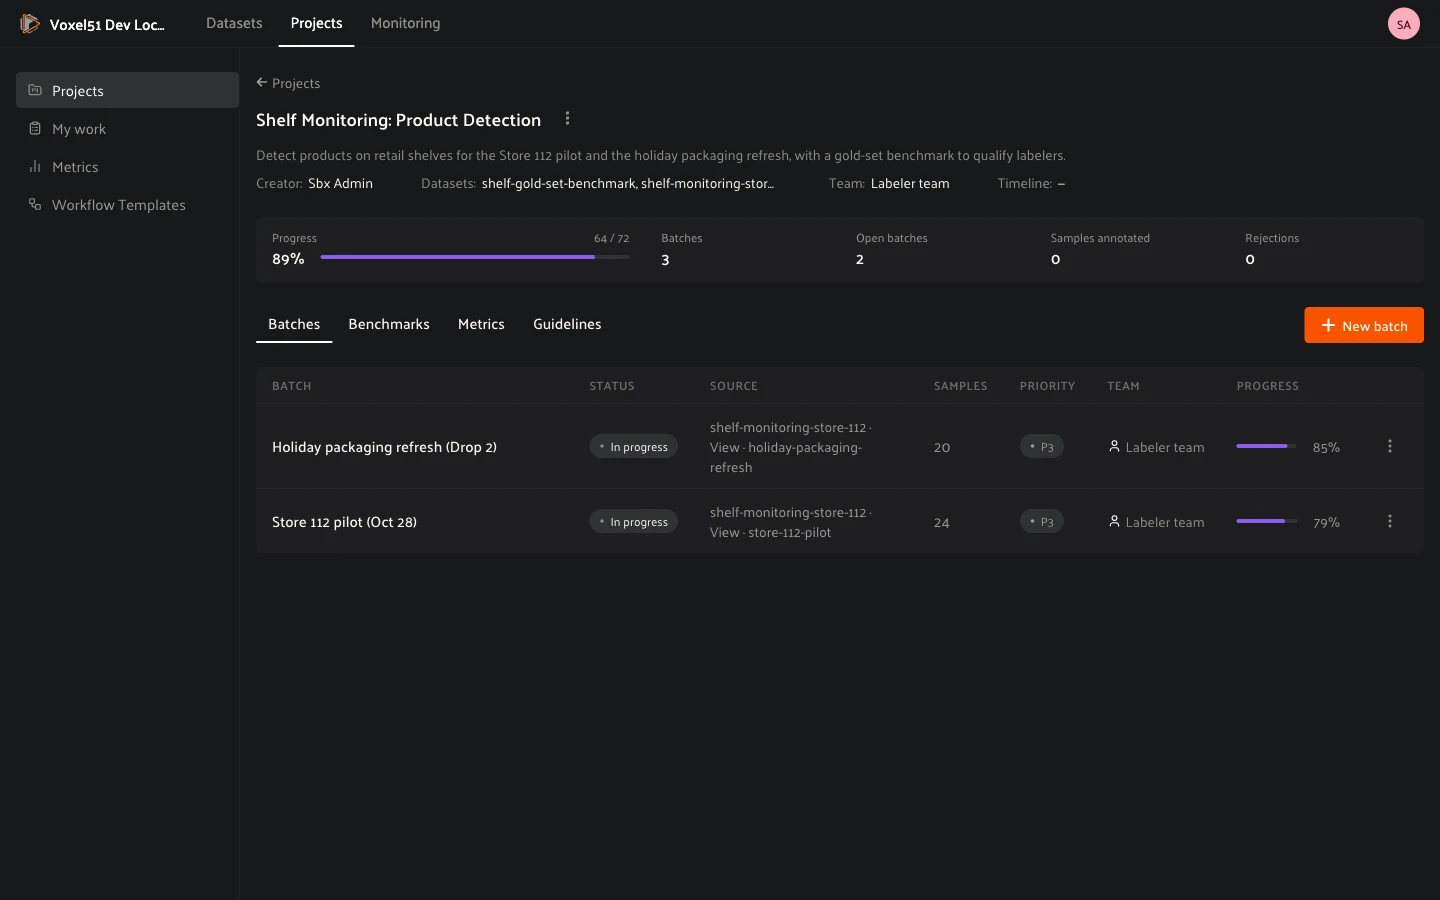
Opening the project shows a header with its datasets, team, timeline and goals, a row of totals (Progress, Batches, Open batches, Samples annotated, Rejections), and four tabs:
Batches: the project’s batches, with status, source, sample count, priority, team and progress.
Benchmarks: the project’s benchmarks and their attempts.
Metrics: throughput and quality for the whole project. See How to: Understand metrics.
Guidelines: instructions for annotators.
Use a project’s … menu to Edit project (name, description, datasets and team) or Delete project. You cannot remove a dataset that an unfinished batch runs on, or a person who is on an unfinished batch’s team, until you change that batch first. Deleting a project does not delete its datasets.
Writing guidelines#
Open the Guidelines tab, write what annotators need to know (label definitions, edge cases, what to skip) and save. You can paste or insert images for reference examples.
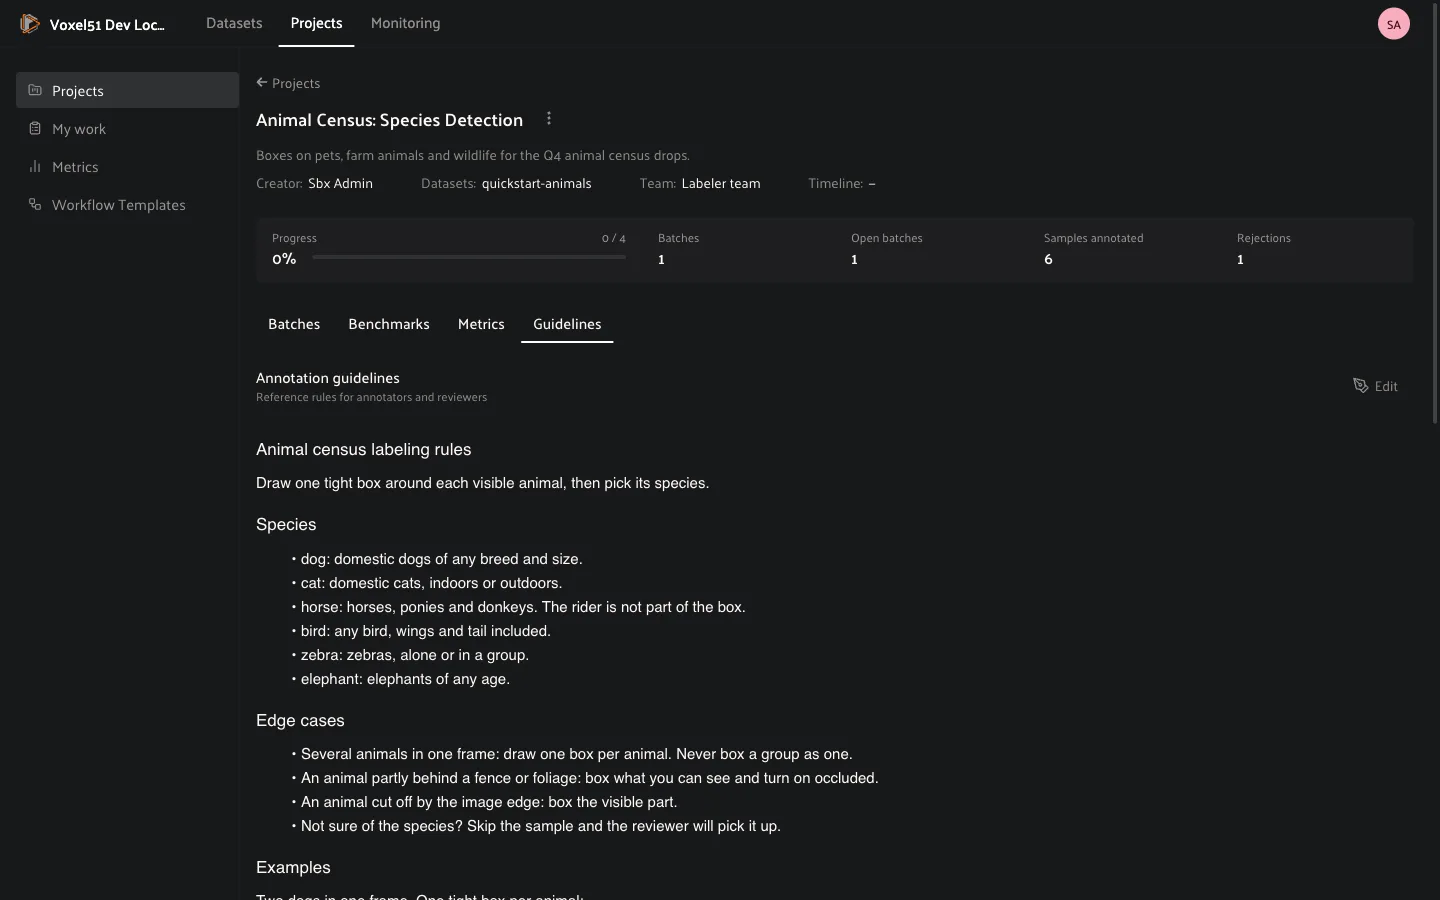
While working on a task, annotators open the guidelines from the … menu at the top right of the sample modal: choose Guidelines, the item with the book icon. They appear in a panel beside the sample, so annotators never have to leave the task to look them up.
Choosing what annotators see: label schemas#
A label schema decides which fields annotators can edit, which fields they can only look at, and which fields they never see. Each annotate or review stage can use its own schema, so a labeler sees only the field they are meant to label, and a reviewer can see the labels without being able to change them.
Schemas are created in the Schema Manager, which you open from the Annotate tab of the sample modal in a dataset, or from the Configure schemas in the Schema Manager link in a stage’s settings.
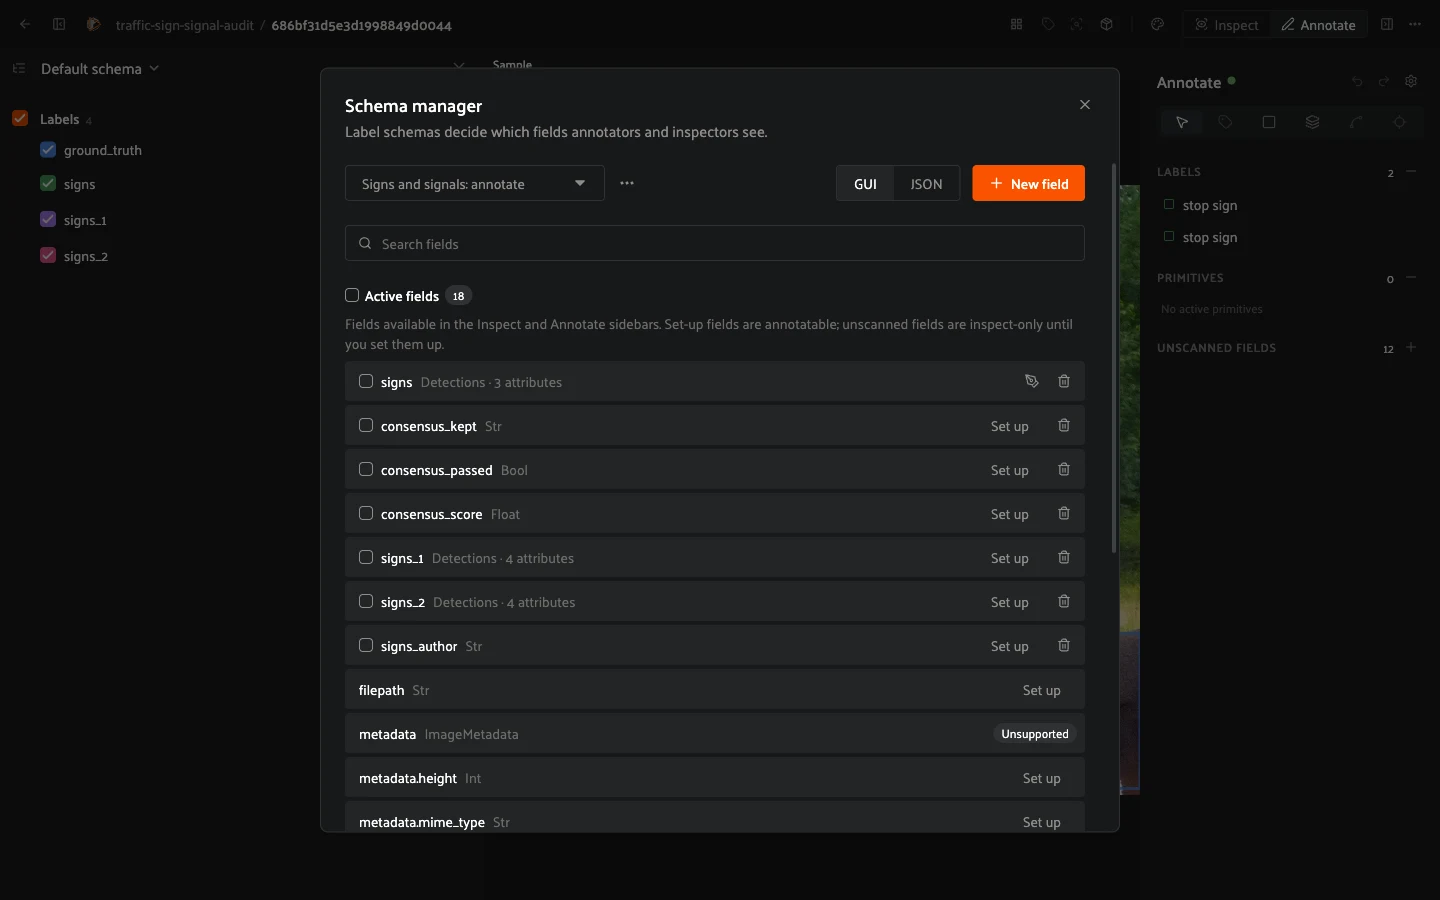
The schema picker at the top of the Schema Manager switches between:
Default schema (all fields): the dataset’s own annotation schema. Every field is visible and nothing is hidden. It is never saved as a separate schema, and you cannot hide fields in it.
Custom schemas: named schemas you create from the picker’s menu. Create one, give it a name, and choose how each field behaves.
In a custom schema every field is either active or hidden:
Active fields are visible to annotators. Set up an active field with classes and attributes to make it editable, or configure it as read-only to keep it as context, for example a model’s predictions.
Hidden fields do not reach anyone viewing through the schema: not the grid, not the sidebars, not the sample data. Use them to keep ground truth away from annotators. One exception: a field that the batch’s saved query filters on stays visible in its tasks (see below), so do not rely on hiding to protect a field the query needs.
Warning
Do not delete a schema while a batch uses it. The batch’s stages stop applying it, so fields you hid may become visible to annotators.
Attributes inside an active field can be set the same way, so you can,
for example, make confidence read-only or hide a reviewer_notes
attribute from labelers. To hide fields, select them under Active fields
and move them to Hidden fields. Fields you have not set up yet appear as
unscanned fields: annotators can inspect them but not edit them until you set
them up.
Then choose the schema on the stage: open the batch’s Workflow tab, click the annotate or review stage, and pick the schema under Label schema. The schema applies to everyone who opens the stage’s tasks. If you leave Default schema (all fields), tasks use the full dataset schema. If a schema you picked hides a field the batch’s saved query needs, the stage warns you, and tasks keep that field visible.
Note
Deleting a schema does not break running batches: stages that reference it fall back to the default schema.
For everything the Schema Manager can do (fields, classes, attributes, conditional attributes, ontologies), see Schema Manager in the annotation guide.
How to: Create and start a batch#
On the Batches tab of a project, click New batch.
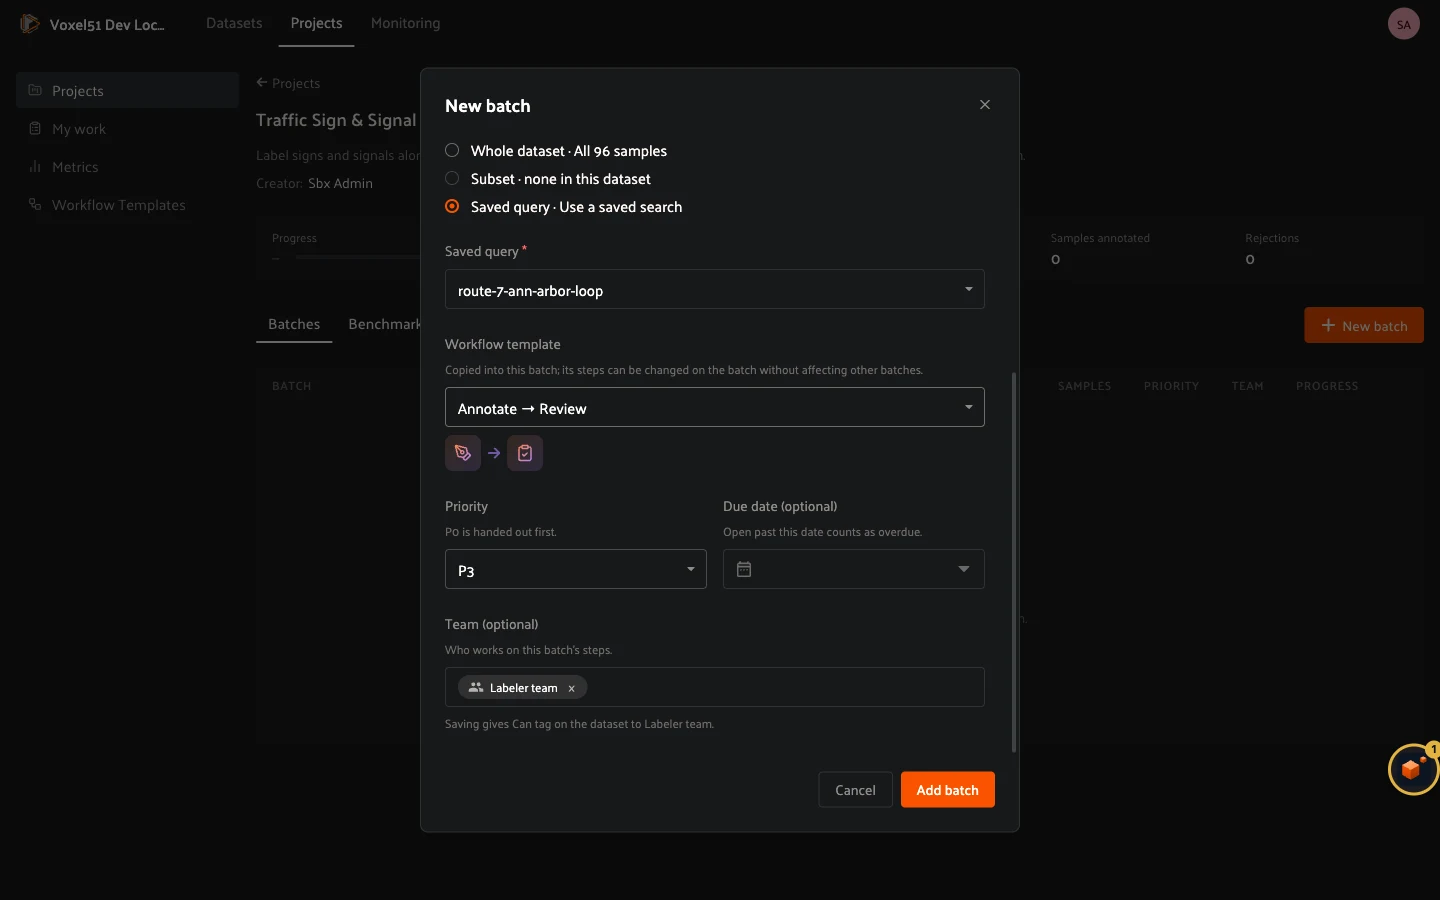
Name and Description.
Dataset: the dataset the samples come from. You need Can manage on it.
Samples from: Whole dataset, a Subset, or a Saved query (a view you saved in the dataset’s App). The batch freezes its samples when you create it, so later edits to the dataset or the saved query do not change what is in the batch. Pick a saved query to run on a slice such as night driving, edge cases or model disagreements.
Workflow template: copy a ready-made pipeline into the batch (see below), or Set up later to start from an empty canvas.
Priority: P0 to P5. P0 is handed out first in My work.
Due date: optional. A batch that is still open past this date counts as overdue.
Team: who works on this batch. It defaults to the project’s team and must stay within it. You can narrow who works each stage later in its Assignee pool.
Click Add batch. The batch opens in the Not started state on its Workflow tab so you can review the pipeline before anyone sees a task.
To change a batch later, use its … menu in the Batches tab: Edit batch changes the name, description, priority, due date and team, and Delete batch removes it. The stages of a running batch are locked.
Workflow templates#
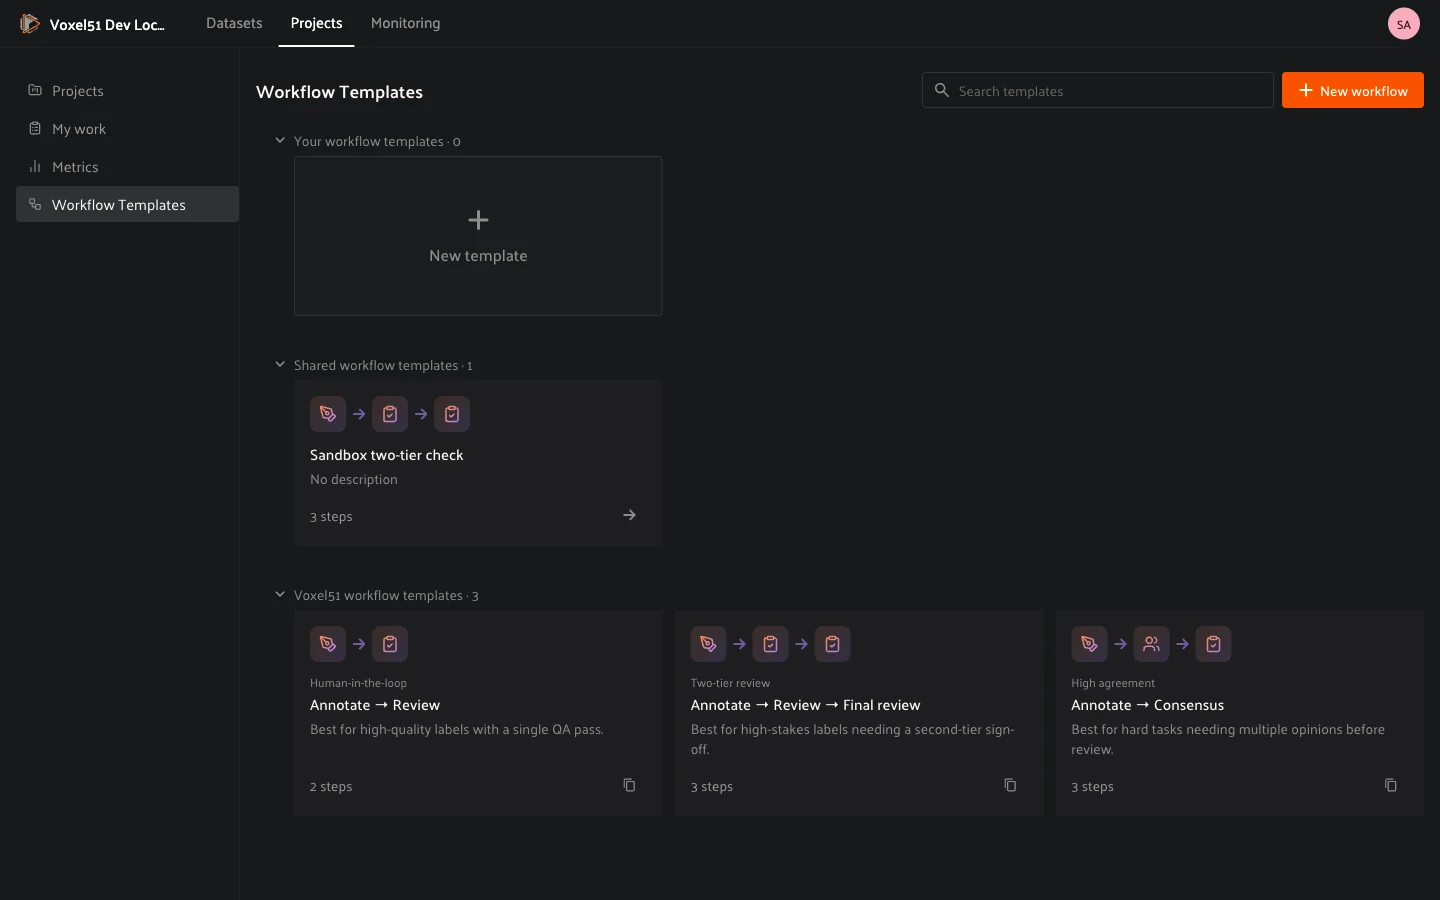
A template is a pipeline you can reuse. The built-in Voxel51 templates are:
Annotate → Review: one labeling pass and one QA pass.
Annotate → Review → Final review: a second-tier sign-off for high-stakes labels.
Annotate → Consensus: several annotators label each sample blind, then a reviewer settles the disagreements.
The template is copied into the batch, so you can change the batch’s stages without affecting other batches. To keep your own, open a batch and click Save as template, or build one on the Workflow Templates page. That page lists Your workflow templates, Shared workflow templates and Voxel51 workflow templates.
Editing the workflow#
The Workflow tab shows the pipeline as a graph. Each stage is a node, and you drag from one stage’s output to the next stage’s input to connect them. For a Review stage, wire Accepted forward and Rejected back to an annotate stage so rejected samples are fixed and resubmitted. The toolbar has Pan, Create, Connect, Tidy, Clear and Delete. Hold Cmd (Ctrl on Windows) and click the canvas to add a stage.
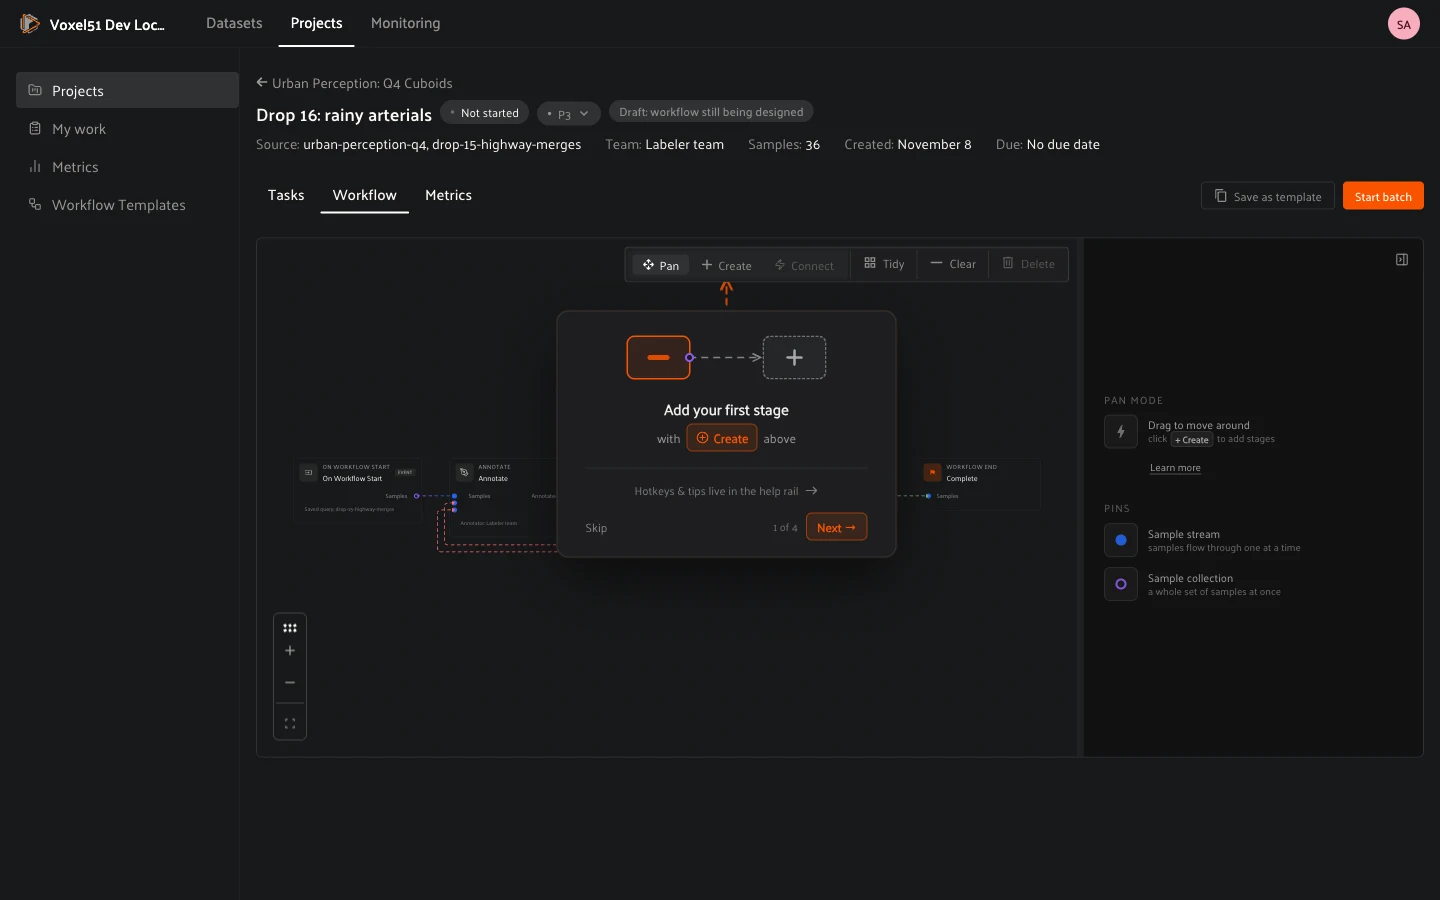
Click a stage to configure it. The next section covers the settings that decide how its samples become tasks and who gets them. When the pipeline is ready, click Start batch. The batch moves to In progress, tasks are created and handed out, and the stages become read-only.
Splitting and assigning tasks#
Each annotate or review stage turns its samples into tasks and offers them to its assignee pool. You control three things on the stage:
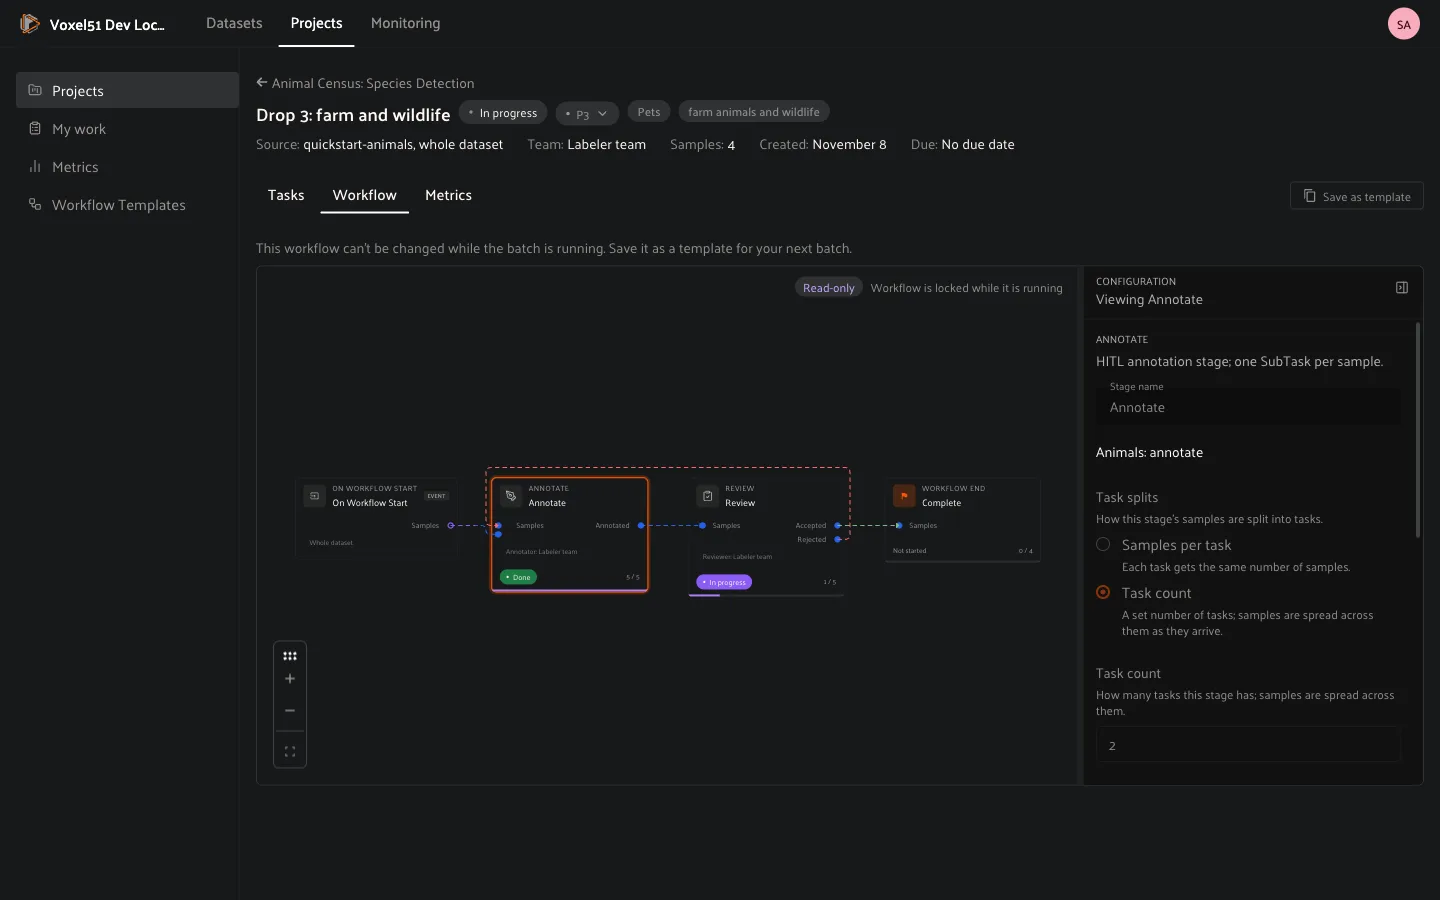
Task splits: how the stage’s samples are divided.
Samples per task: every task gets the same number of samples. A batch of 40 samples with 10 samples per task makes 4 tasks.
Task count: a fixed number of tasks, with samples spread across them as they arrive.
Smaller tasks spread work across more people and finish sooner. Larger tasks keep a labeler on the same kind of scene and mean fewer handoffs.
Priority: the stage’s default priority, P0 (first) to P5. You can also change one task’s priority from the Tasks tab. Labelers see their work in priority order.
Assignee pool: who can work this stage’s tasks.
Add specific people, user groups, or All team members.
Each task takes its assignee from the pool. Until a task is assigned, any pool member can pick it up from My work.
Leaving the pool empty means anyone with Can tag permission or higher on the dataset can pick up the stage’s tasks.
Assignment: how a task reaches a person.
Manual: tasks start unassigned. Pool members pick them up from My work, and a manager can assign a task from the batch’s Tasks tab with the Assignee dropdown.
Automatic: an assignment policy hands out every new task as it is created. The built-in policy, Fewest assigned tasks, gives each task to the person in the pool with the fewest open tasks, counting a group as its members. Tasks the policy assigned are marked Assigned automatically. If the policy fails, the tasks stay unassigned, and anyone in the pool can pick them up.
Releasing a task, or unassigning it, never triggers the policy again: the task goes back to the pool for anyone to pick up.
Plugins can add their own policies, for example “the batch of samples from camera X goes to the team that owns camera X”. They show up in the Assignment policy dropdown automatically. See Writing a custom assignment policy. You can also assign tasks and change stage assignment from a script with the Management SDK.
Batch level information#
Open a batch to follow it. Its header shows the status, priority, source, team, sample count and dates, and three tabs show how the work is going.
The Workflow tab#
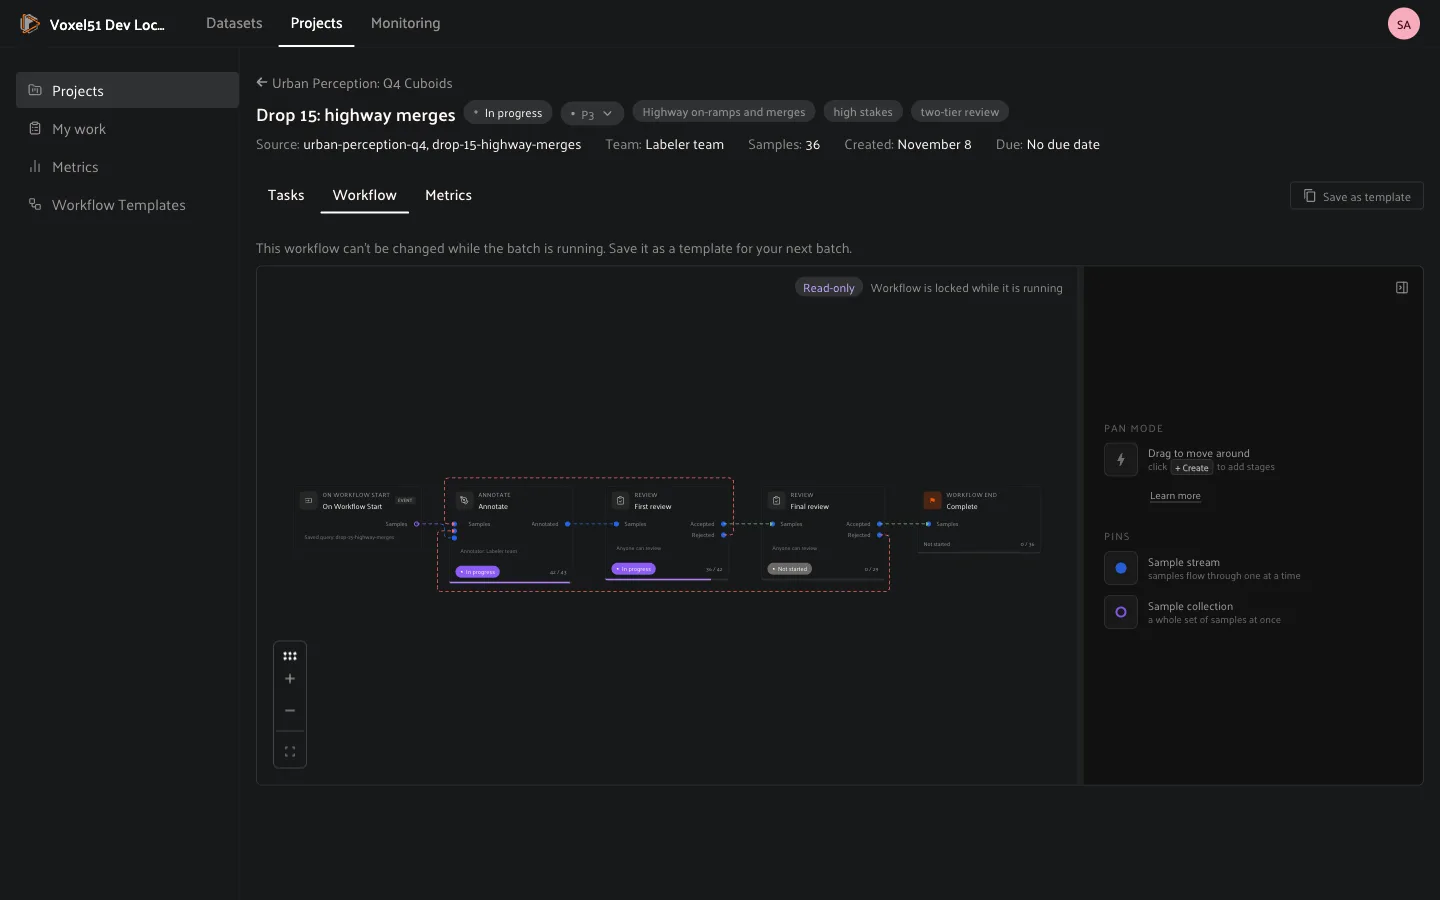
Once a batch is started, the pipeline is read-only and every stage node shows its progress, for example Annotate: Done 43 / 43 and Review: In progress 36 / 43. Click a stage to see how it is configured: label schema, task splits, assignee pool and assignment. To reuse the pipeline for another batch, click Save as template.
The Tasks tab#
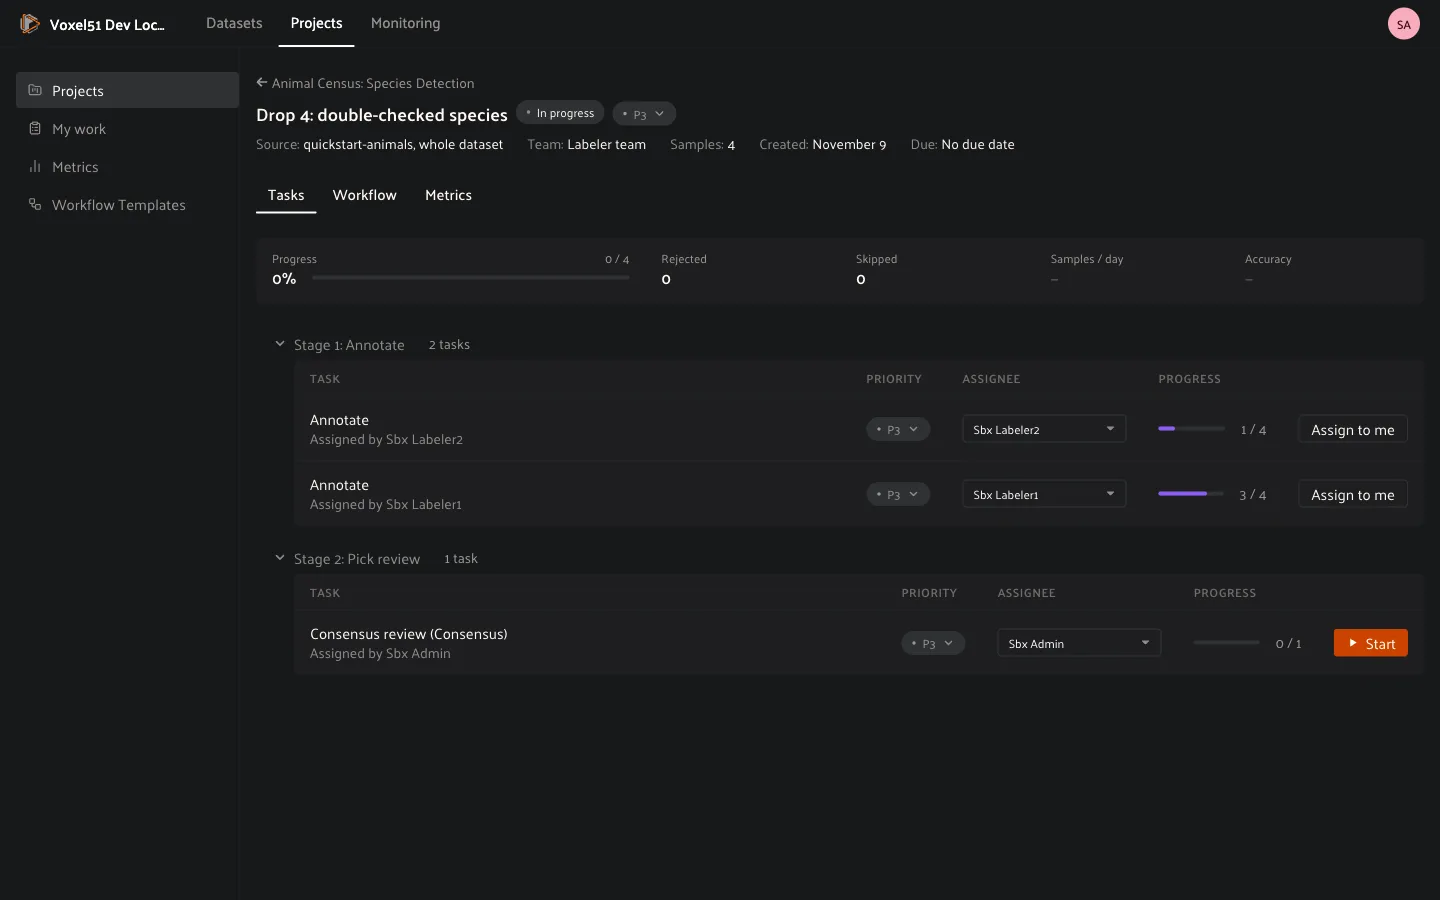
The Tasks tab lists every task by stage, so you can see work across the whole pipeline in one place. Each row shows the task’s priority, assignee, and progress. From a row you can change the priority, assign or reassign the task, Assign to me to take it yourself, and open it.
The Metrics tab#
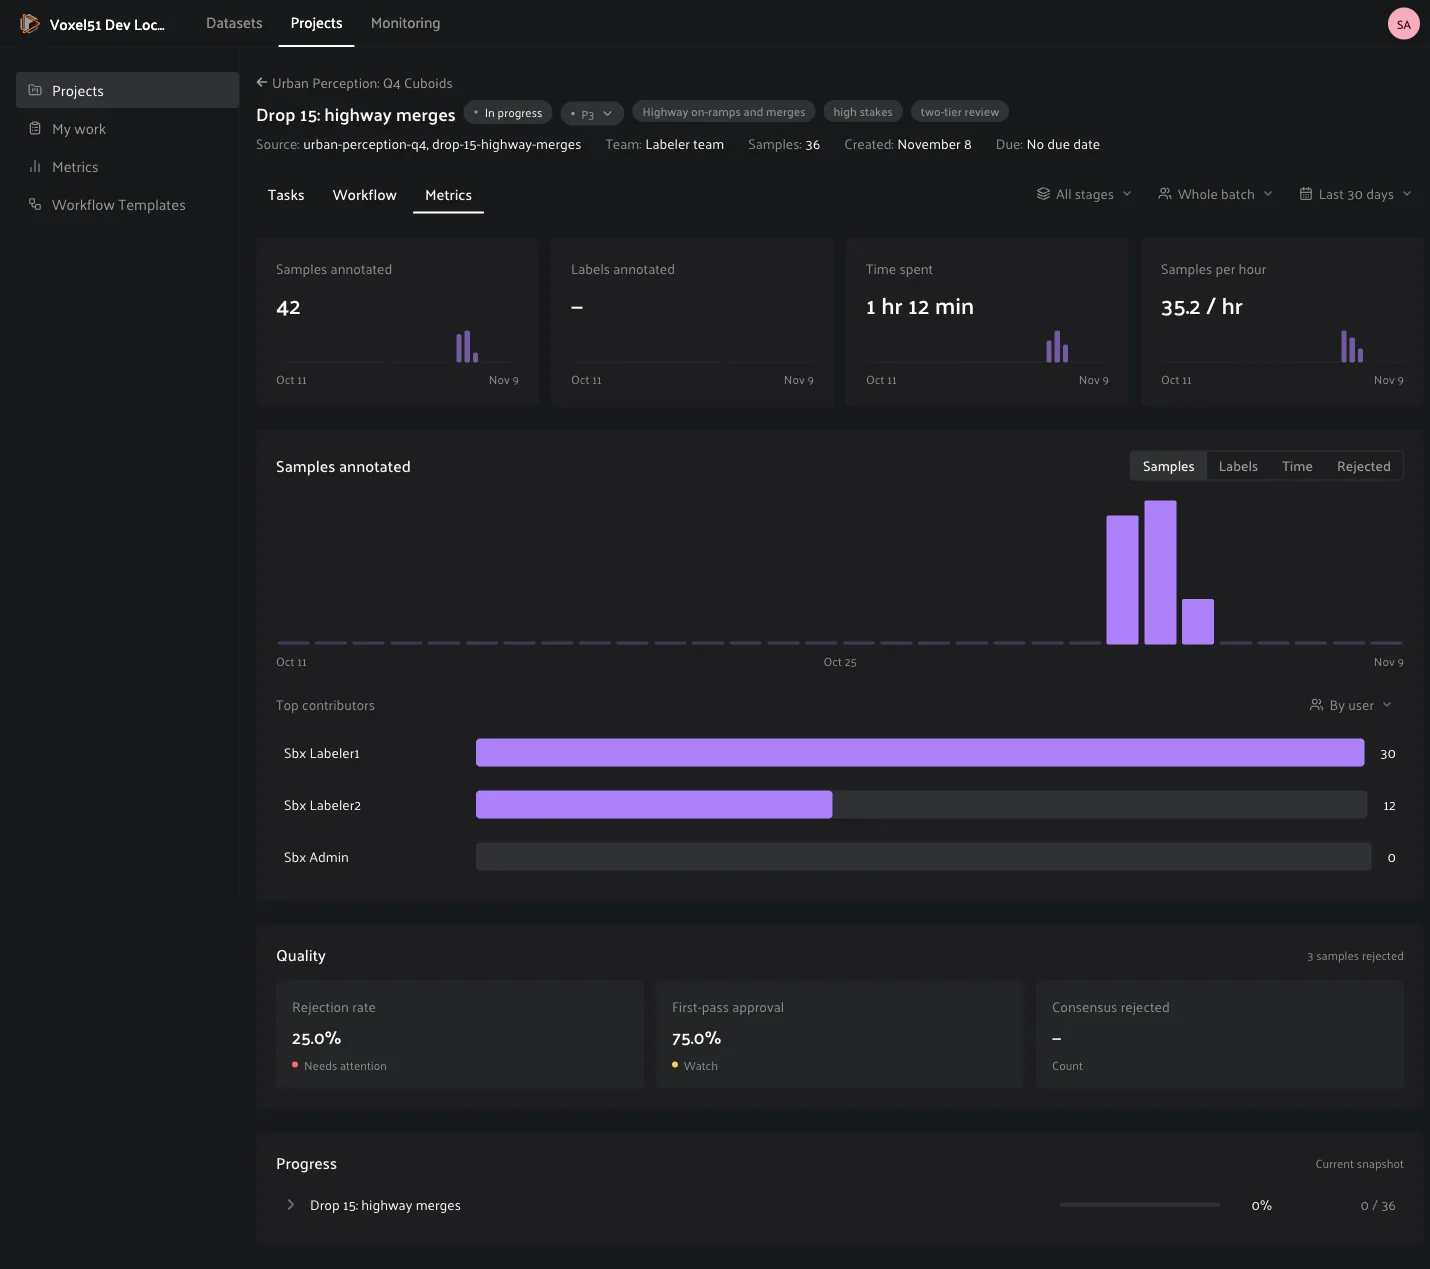
The Metrics tab shows the cards and charts of the Metrics page, scoped to this batch. Use the first filter to look at All stages or at a single stage, such as Annotate or Review, to see where time goes and where work is rejected. The second filter narrows the numbers to the Whole batch, Just me, a User or a Team.
How to: Run a consensus batch#
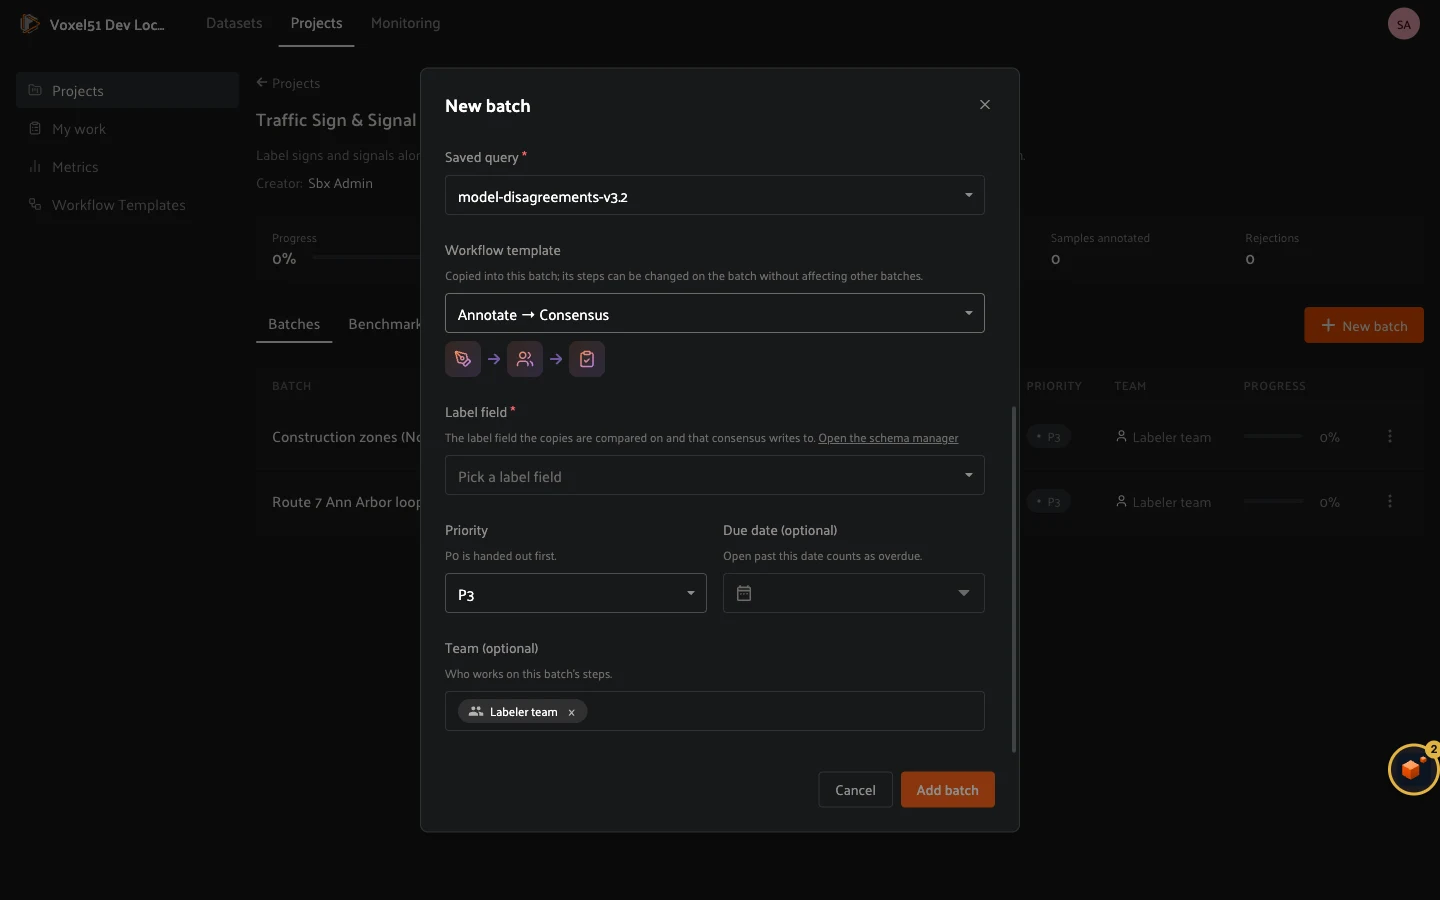
Use a consensus batch when labels are subjective or the stakes are high, and a single annotator’s answer is not enough. Choose the Annotate → Consensus template when you create the batch and pick the Label field that the copies are compared on and that the result is written to. If the field does not exist yet, the dialog links to the Schema Manager to create it.
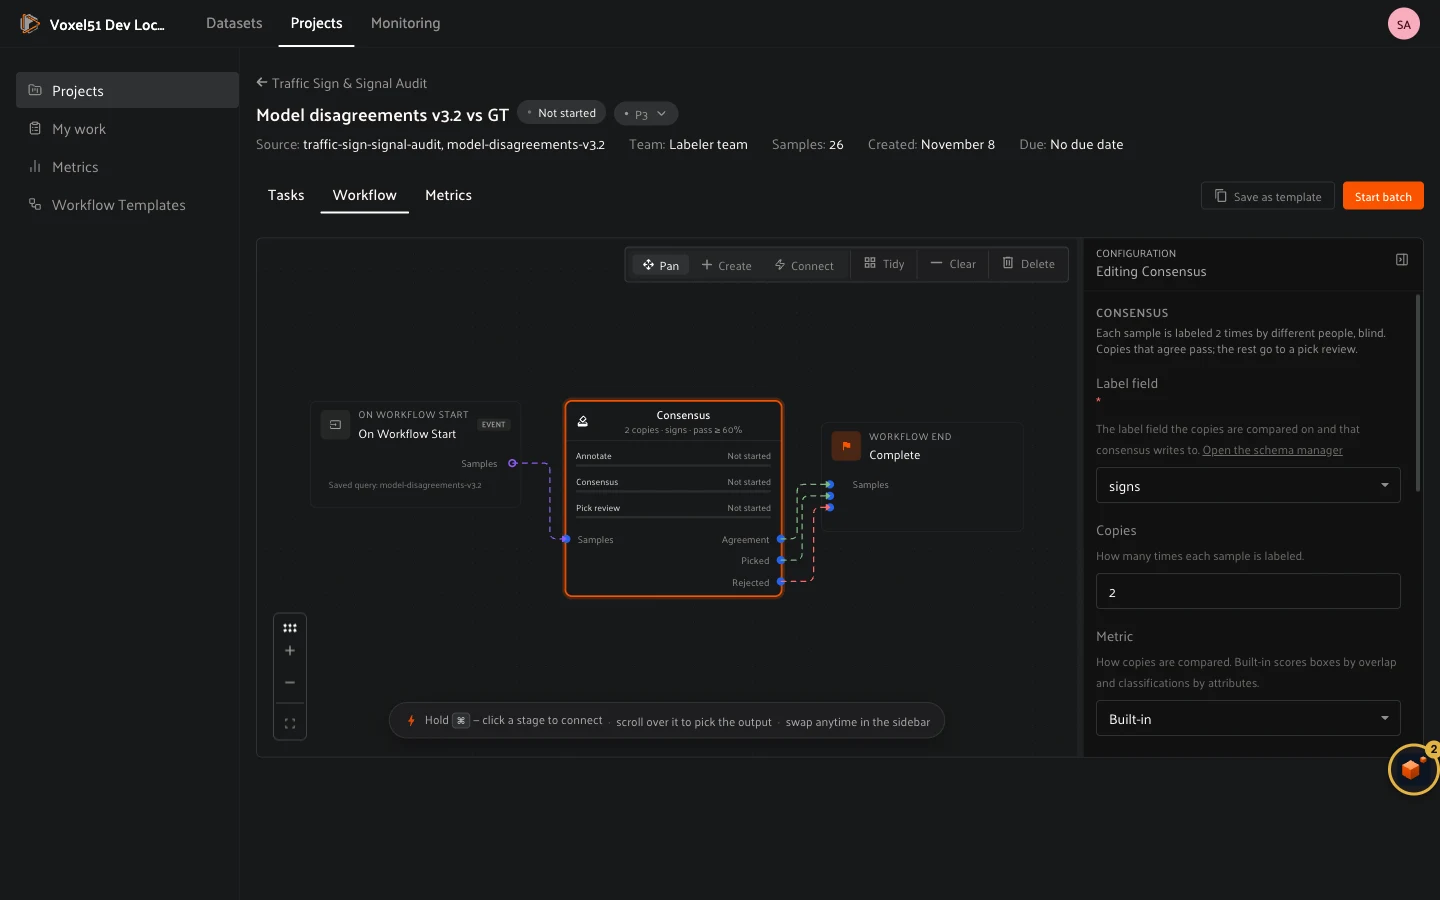
The consensus stage has three parts that you can follow on its node:
Annotate: each sample is labeled several times, by different people, blind. They cannot see each other’s work.
Consensus: Voxel51 scores how well the copies agree.
Pick review: for samples where the copies did not reach consensus, a reviewer picks the better copy. The copies are drawn on the sample, and the footer’s Copy to keep dropdown chooses which one is kept.
Click the stage to configure it:
Label field: the field the copies are compared on and the result is written to.
Copies: how many times each sample is labeled (2 by default).
Metric: how copies are compared. Built-in scores boxes by overlap (IoU, same class only) and classifications by their attributes, as described below. A plugin can add its own metric: see Writing a custom scoring policy.
Pass threshold: the mean pairwise agreement needed to pass, from 0 to 1 (0.6 by default).
Priority: applies to annotators and pick reviewers alike.
Annotation assignee pool: who labels the copies.
Pick review assignee pool: who settles disagreements. Use a more senior group here than for annotation.
The stage has three outputs, Agreement (copies that agreed), Picked (a reviewer chose a copy) and Rejected, so you can wire each to what comes next. A consensus batch makes one annotate task per copy, each as large as the whole batch, and each annotator picks up exactly one of them from My work, so nobody labels the same sample twice.
How to: Run a benchmark#
A benchmark qualifies annotators and measures their accuracy. You give it a set of samples with ground truth, each person labels their own copy, and Voxel51 scores the result against the ground truth. Use it to onboard a team before production work, to compare annotators, or to re-check quality over time.
Open the project’s Benchmarks tab and click New benchmark.
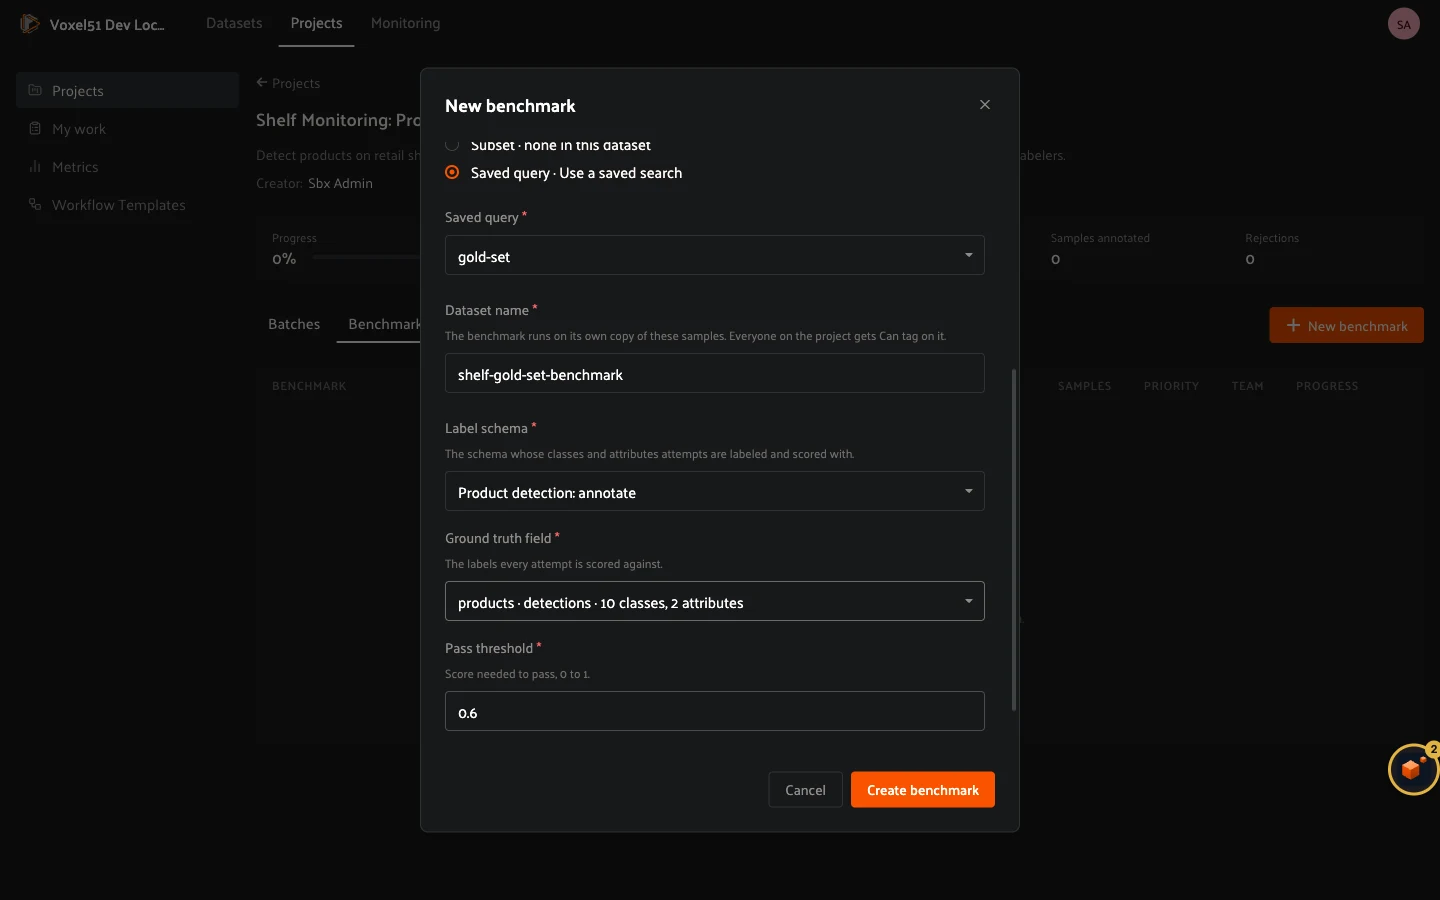
Name and Description.
Dataset and Samples from: the samples to score, usually a saved query such as gold set. They are copied into a new dataset so that annotators never touch your source data.
Dataset name: creating a benchmark clones the selected dataset into a new benchmark dataset. Provide a unique name for it.
Label schema: the schema whose classes and attributes attempts are labeled with, and scored with.
Ground truth field: the labels every attempt is scored against.
Pass threshold: from 0 to 1 (0.6 by default). An attempt passes when its mean score over all its samples reaches this number.
Custom metrics: No uses the built-in scorer, Yes lets you pick a metric registered by a plugin. See Writing a custom scoring policy.
The built-in scorer matches boxes to ground truth boxes of the same class by overlap (IoU), and compares classifications and patch attributes. It applies no IoU cutoff, so a box that overlaps a little scores a little. Each attempt’s score is the mean over its samples. See How benchmark and consensus scores are calculated for the rules and worked examples.
Attempts#
Each person who takes part has an attempt. When you create a benchmark, Voxel51 starts an attempt for everyone on the project team, and each attempt appears in that person’s My work as Gold set · attempt 1. In the benchmark’s attempts list you can Start attempts for more people, see each attempt’s progress, and End benchmark when you are done. A benchmark can limit how many attempts a person may start; once they reach it, Start again is no longer offered.
When someone finishes an attempt, it is scored. Its status moves from Scoring to Passed or Not passed. The benchmark’s scores page opens from the benchmark row. Its header shows the source, the label field it is scored on, and the pass bar. My attempts lists your own attempts, with Start attempt (or Start again) to take another. The Leaderboard lists every person with their latest score, number of attempts and status. An attempt the scorer could not score shows the scorer’s error.
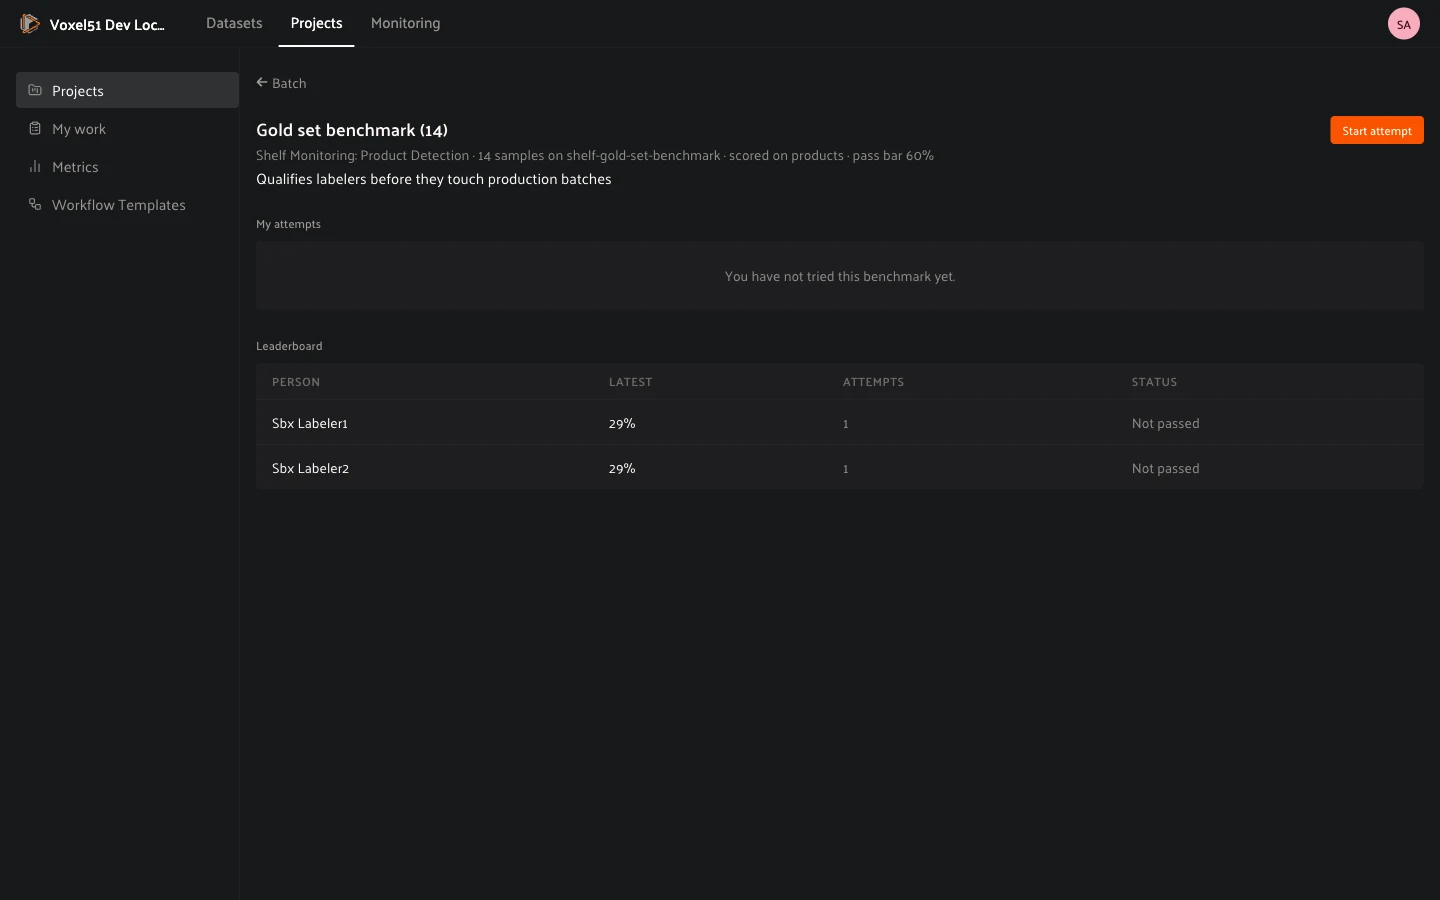
A benchmark’s mean score also feeds the Quality card on the project’s Metrics tab.
How benchmark and consensus scores are calculated#
Benchmarks and consensus stages score labels the same way. A benchmark compares each person’s labels with the gold set, and a consensus stage compares the copies of a sample with each other. For every sample the built-in scorer scores each label and averages the label scores into the sample’s score. The Pass threshold, the one number you set, decides the outcome:
In a benchmark, the threshold applies to the attempt: it passes when the mean of its sample scores reaches the threshold. A single low sample does not fail an attempt on its own.
In a consensus stage, every pair of copies of a sample is scored the same way and the sample’s agreement is the mean over the pairs. A sample whose agreement reaches the threshold passes and keeps the best copy. Any other sample goes to a pick review.
Each label is scored as follows:
Boxes, masks and polylines are worth the overlap (IoU) of the label with its partner of the same class, and 0 with no partner. Keypoints use object keypoint similarity instead.
Classifications and patches are worth the share of attribute slots that agree. The class is one slot, and so is each string or boolean attribute.
Sample score: the average of its label scores. A missing or extra label counts as 0.

A label takes one path or the other, never both. There is no IoU threshold: a pair with an overlap of 0.3 simply scores 0.3.
Example: detections#
A benchmark sample has three gold boxes. The annotator drew three boxes: two line up with a gold box of the same class, one is an extra, and one gold box was missed. Attributes on the boxes are not scored.
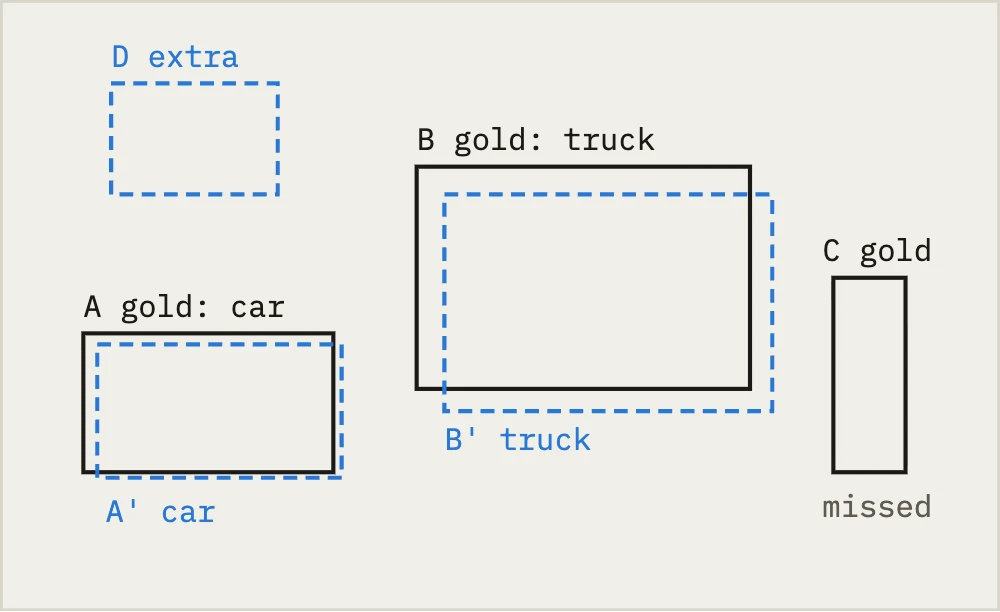
Label |
Pair |
IoU |
Score |
|---|---|---|---|
A / A’ |
|
0.92 |
0.92 |
B / B’ |
|
0.85 |
0.85 |
C (missed) |
no partner |
0 |
0 |
D (extra) |
no partner |
0 |
0 |
The sample’s score is the average of the four label scores: (0.92 + 0.85 + 0 + 0) / 4 = 0.44.
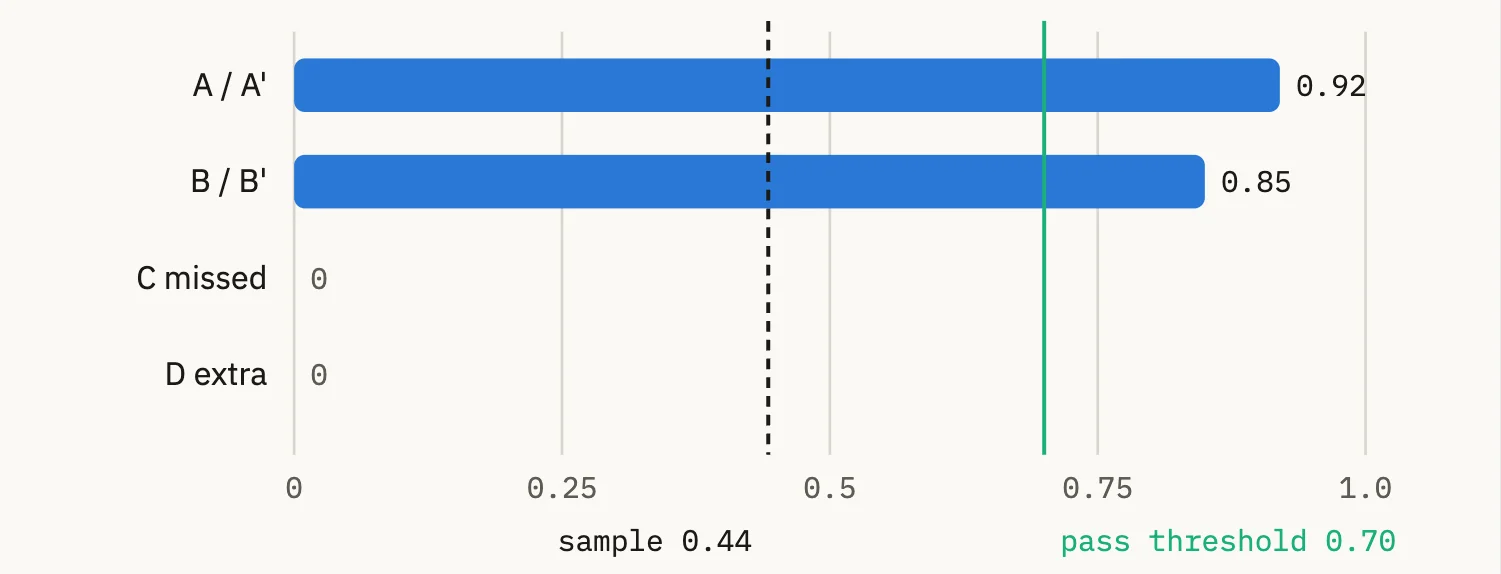
The missed and extra boxes pull the sample’s score down to 0.44, well under a threshold of 0.7. In a benchmark that sample lowers the attempt’s mean, and in a consensus stage it would go to a pick review.
Boxes only pair within their class. Had the annotator labeled B’ as car, it
would pair with nothing: B’ becomes an extra and B a miss. The sample then has
five labels and one score, (0.92 + 0 + 0 + 0 + 0) / 5 = 0.18.
Example: classifications and patches#
A scene classification has nothing to overlap, so its score is the share of attribute slots that agree. A patch benchmark fixes the box, so the patch’s one object is scored the same way. The slots are the class plus the schema’s string and boolean attributes, including conditional attributes, which a labeler is only asked when their condition holds. Take this schema, where two questions are always asked and two are conditional:

A slot counts when either side was asked it, and scores 1 only when both sides were asked and gave the same answer:
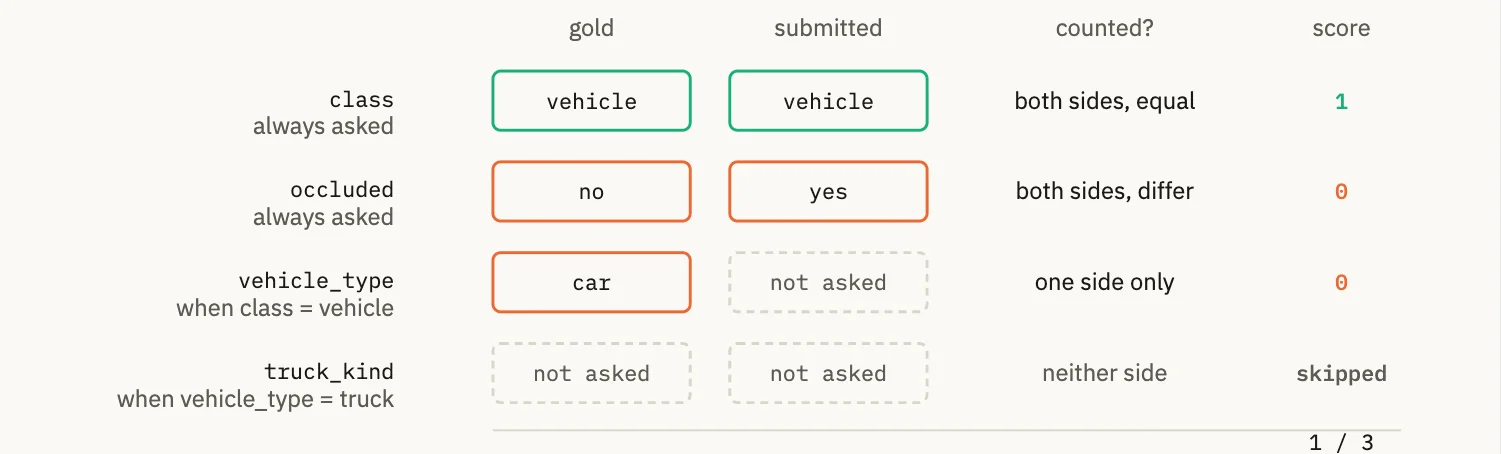
Gold |
Submitted |
Slots counted |
Score |
|---|---|---|---|
vehicle, not occluded, truck, semi |
vehicle, not occluded, truck, box |
class, occluded, vehicle_type match; truck_kind differs |
3 / 4 = 0.75 |
vehicle, not occluded, truck, semi |
vehicle, not occluded, car |
class and occluded match; vehicle_type differs; truck_kind asked on the gold side only |
2 / 4 = 0.50 |
vehicle, not occluded, truck, semi |
pedestrian, not occluded |
occluded matches; class differs; vehicle_type and truck_kind asked on the gold side only |
1 / 4 = 0.25 |
pedestrian, not occluded |
pedestrian, not occluded |
class and occluded match; the other two are never asked |
2 / 2 = 1.00 |
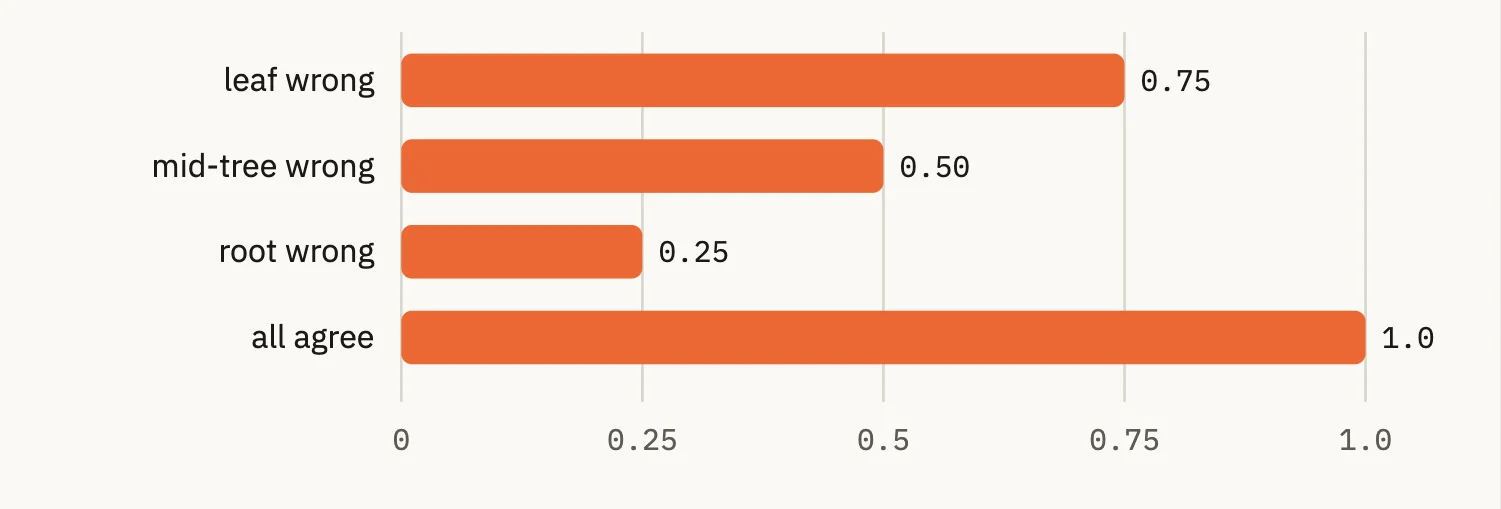
The deeper the mistake, the smaller the penalty. A wrong class near the root hides the questions below it on one side, so it also costs those slots. Leftover values from a branch that is no longer shown are never scored.
What is scored, and what is skipped#
Field |
Treatment |
|---|---|
Boxes, masks, polylines, keypoints |
IoU of the same-class pair. Keypoints use object keypoint similarity, and temporal detections use frame-range IoU. Attributes on these labels are not scored. |
Classifications, or a patch’s one object |
Attribute agreement: the class plus the schema’s string and boolean attributes, one slot each, 1 if equal and 0 if not. A blank on one side counts as 0. |
Conditional attributes |
Counted when asked on either side. |
Read-only attributes and read-only classes |
Skipped, because they are not the labeler’s work. With nothing left to compare, the label scores 1. |
Float and integer attributes |
Skipped by the built-in scorer. A custom scorer can add its own rule. |
Multi-label classifications |
Overlap of the two sets of labels (Jaccard). |
Semantic segmentation |
Mean IoU over the classes. |
|
Skipped. |
You set one number per benchmark or consensus stage, the Pass threshold: the attempt mean for a benchmark, the pairwise agreement for a consensus stage. To change how labels are compared, for example to score boxes on overlap and attributes together, write a custom scoring policy.
How to: Understand metrics#
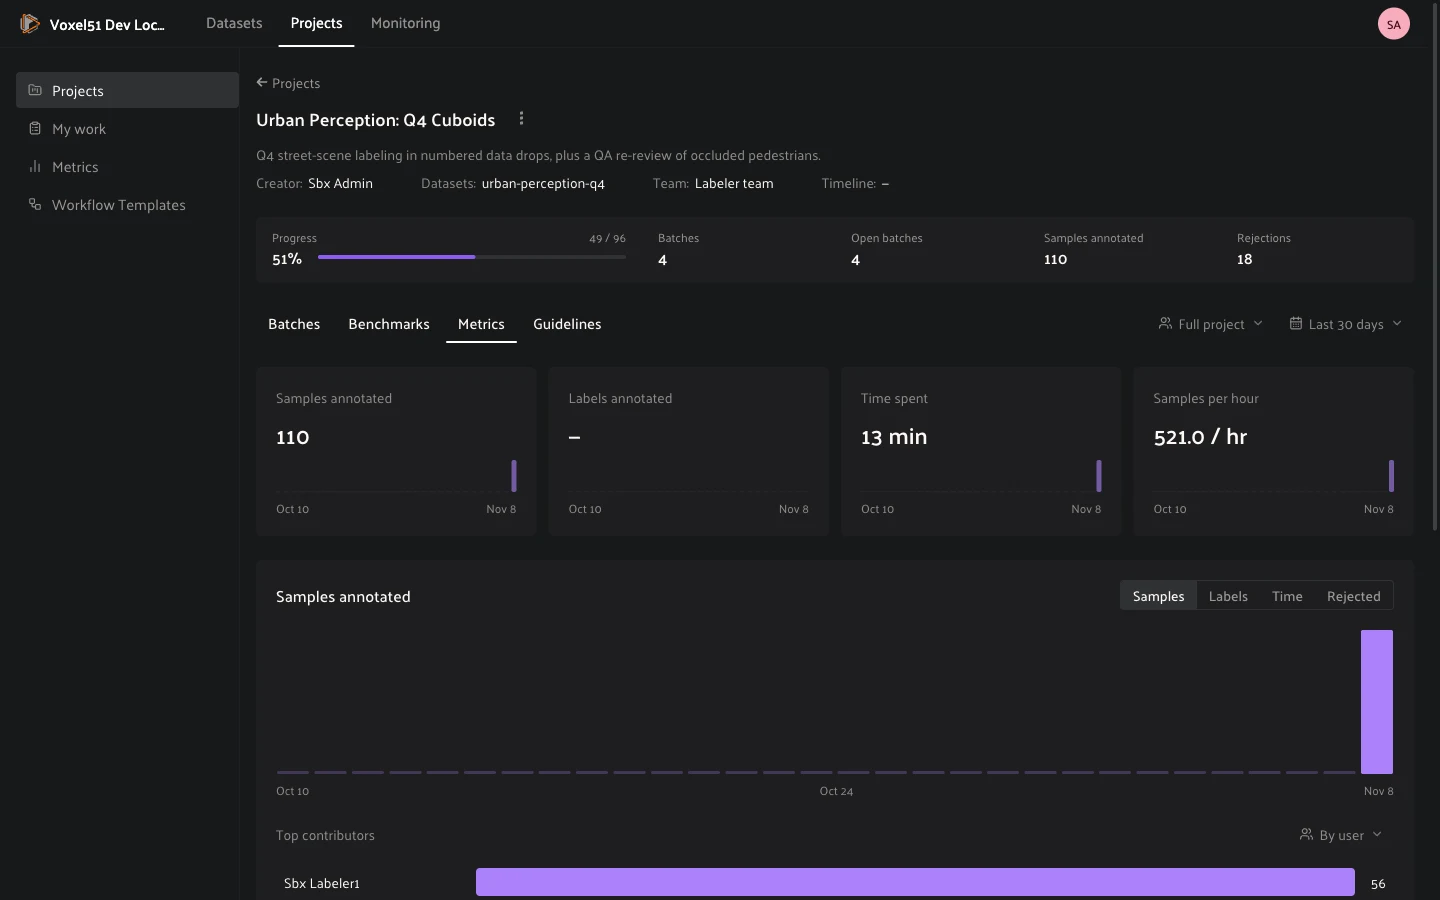
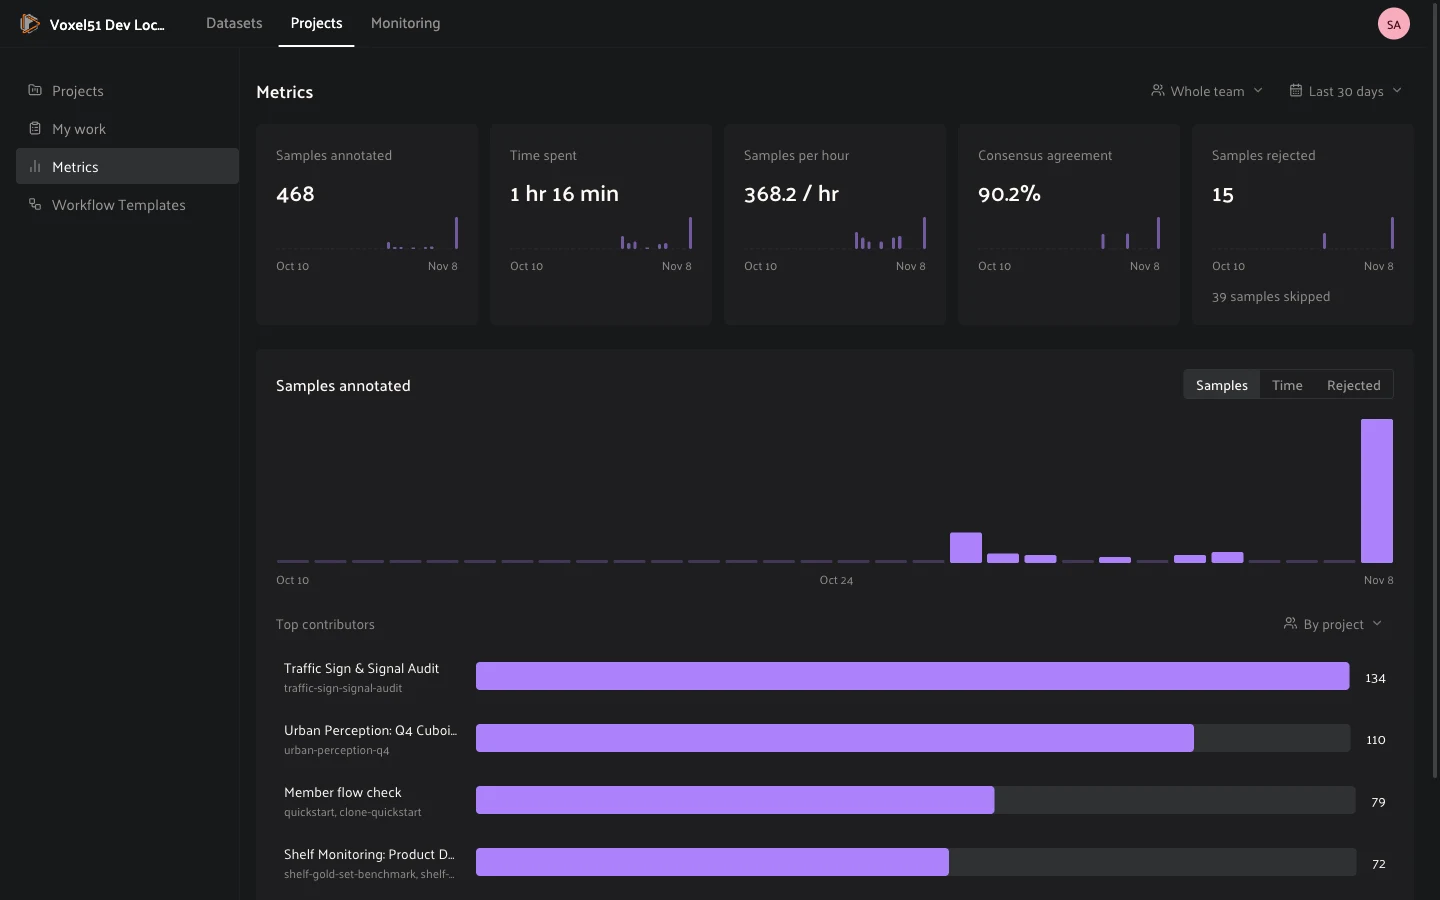
The Metrics tab answers “how is this work going?”: how much has been produced, by whom, at what quality, and at what pace. The numbers are built from the same submissions and review decisions your team makes while working on tasks. You can see metrics at three levels:
The Metrics page in the left menu, across every project and batch you can see.
A project’s Metrics tab.
A batch’s Metrics tab.
Note
Metrics are powered by activity tracking, which must be enabled on your deployment. If the board stays empty while work is clearly happening, contact your admin.
Filtering the board#
The filters at the top change what the board aggregates:
Whose work: Whole team, Just me, a User or a Team.
Time window: Last 7, 14 or 30 days.
Stage (on a batch): All stages, or one stage of its pipeline, for example Annotate or First review.
Metric: the quantity the chart plots: Samples, Labels, Time or Rejected.
Reading the board#
The summary cards cover the selection:
Samples annotated: samples submitted on annotate stages. Review decisions are not counted.
Labels annotated: labels added on annotate stages.
Time spent: active annotation and review time.
Samples per hour: samples submitted over active time.
Consensus agreement: the mean agreement between the copies of each consensus sample scored in the window.
Samples rejected: submissions a reviewer rejected, by the day they were judged. The card also notes how many times annotators pressed Skip.
Top contributors ranks people (or teams), and Group contributors by switches the grouping between User, Team, and on the global page By project, By team, By user and By batch.
The Quality card tracks four rates, each with a status:
Rejection rate: healthy under 5%, watch under 10%.
First-pass approval: healthy at 85% or more, watch at 70%.
Consensus rejected: samples rejected because annotators disagreed.
Benchmark score: the mean score of scored benchmark samples. Healthy at 85% or more, watch at 70%.
The Progress card lists each batch (and its stages) with its completed samples.
Quality: first-pass approval and rejection rate#
First-pass approval rate is, of the submissions reviewed at least once, the fraction whose first review decision was an approval. It answers “how often is this work right the first time?” Later re-reviews never change it.
Rejection rate is, of all review decisions made on the work, the fraction that were rejections. It is cumulative: every decision counts, including re-reviews of reworked samples, so it falls as fixed work gets approved.
Both rates ignore pending work. Submissions nobody has reviewed yet sit outside the denominator rather than dragging the rate down.
A worked example: an annotator submits 3 samples, and a reviewer approves 2 and rejects 1:
First-pass approval: 2 of 3 first decisions were approvals, 67%.
Rejection rate: 1 of 3 decisions was a rejection, 33%.
The rejected sample is then reworked, resubmitted, and approved:
First-pass approval stays 67%. That sample’s first decision was still a rejection, and first decisions are a permanent record.
Rejection rate falls to 25%: 1 rejection out of 4 total decisions.
Who reviews what in longer pipelines#
In a pipeline with several annotate and review stages, each review stage judges the work that reaches it, and a reviewer’s own approvals can be judged by a later review in turn. Consider a six-stage pipeline:
Annotate 1 → Annotate 2 → Review 1 → Annotate 3 → Review 2 → Review 3
Review 1 is the first review after Annotate 1 and Annotate 2, so its decisions judge the combined work of both stages. Each label counts toward the person who authored it.
Review 2 judges the new work from Annotate 3.
Review 3 follows another review directly, so it re-judges what passed Review 2: its decisions reflect on Annotate 3’s labels and on Review 2’s approvals.
When Review 3 rejects a sample that Review 2 approved, the rejection counts against Review 2’s row as well, which is why a review stage can itself show a rejection rate. This is how a two-tier review pipeline surfaces reviewer quality, not just annotator quality.
How time is measured#
All time metrics are built from active working time, measured in the browser while a person has a sample open as part of a task:
Presence is inferred from input. Pointer, keyboard, wheel and touch activity mark you as present. Short pauses between inputs count in full, because reading and inspecting a sample is work. Once a pause reaches a minute with no input, the clock rewinds to the last moment of activity and stops. Stepping away never inflates the numbers.
Hidden tabs never count. Switching to another tab or window stops the clock immediately, and returning restarts it.
Time follows the sample and the role. Working time is credited to the sample being worked on and to the stage where the work happens, so annotate time and review time are tracked separately.
A dash means no measurable time. Time metrics show a dash rather than a zero when there is no tracked active time in the selection.
What counts, and what doesn’t#
Only submitted work counts. Labels edited but never submitted stay off the board.
Labels are counted net of deletions: a label added and then deleted before submitting nets to zero.
A sample approved with no labels counts as a submitted sample with zero labels.
Skip is not a submission.
Rates never punish waiting: one reviewed-and-approved submission with ten more still pending reads 100% first-pass approval, not 9%.
How to: Work on tasks#
Labelers and reviewers start from My work. Sign in and you land on a list of the tasks you can work on.
Finding your tasks#
Each row is one task: its priority, the batch and project it belongs to, the number of samples, your progress, and who assigned it (Assigned by a person, or Assigned automatically). Tasks are ordered by priority, with P0 first.
The View menu switches between three lists:
Assigned to me: tasks that are yours to do.
Available to pick up: tasks from your projects that nobody has taken yet. Click Pick up to make a task yours.
Completed: tasks you have finished.
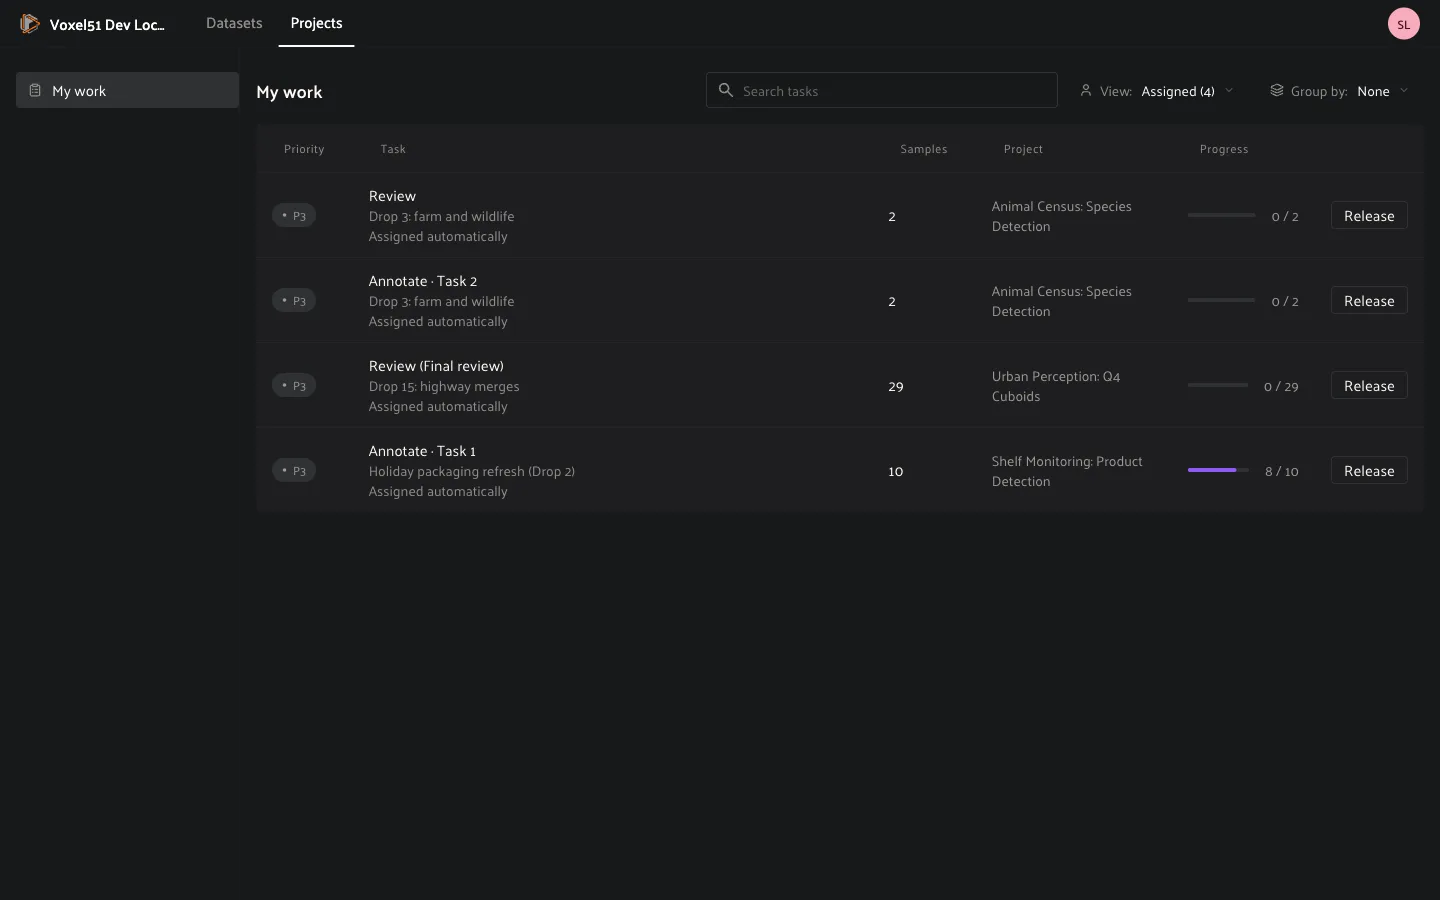
Use Group by to group the list by project, priority or batch, the sort controls to reorder it, and the search box to find a task by name. If you cannot do a task, click Release to hand it back to the pool so someone else can pick it up.
Benchmark attempts appear in the same list as name · attempt N. Open one the same way you open any task. A benchmark you can still take also shows as start an attempt under Available to pick up.
Opening a task#
Click a task to open it. Annotate tasks open in labeling mode and review tasks open in review mode. In both, the sample modal is set up for the task:
The sidebar shows only the fields that the stage’s label schema lets you see.
The … menu at the top right has Guidelines (the book icon), which opens your project’s guidelines in a panel beside the sample.
A bar at the bottom shows how many samples are left, your progress (for example 5 / 12), and the task’s actions.
Annotate#
Label one sample (or one group) at a time. Choose a tool in the toolbar, for example the box tool for detections, draw on the sample, then choose a class and fill in the attributes. Your labels are saved with the sample when you submit.
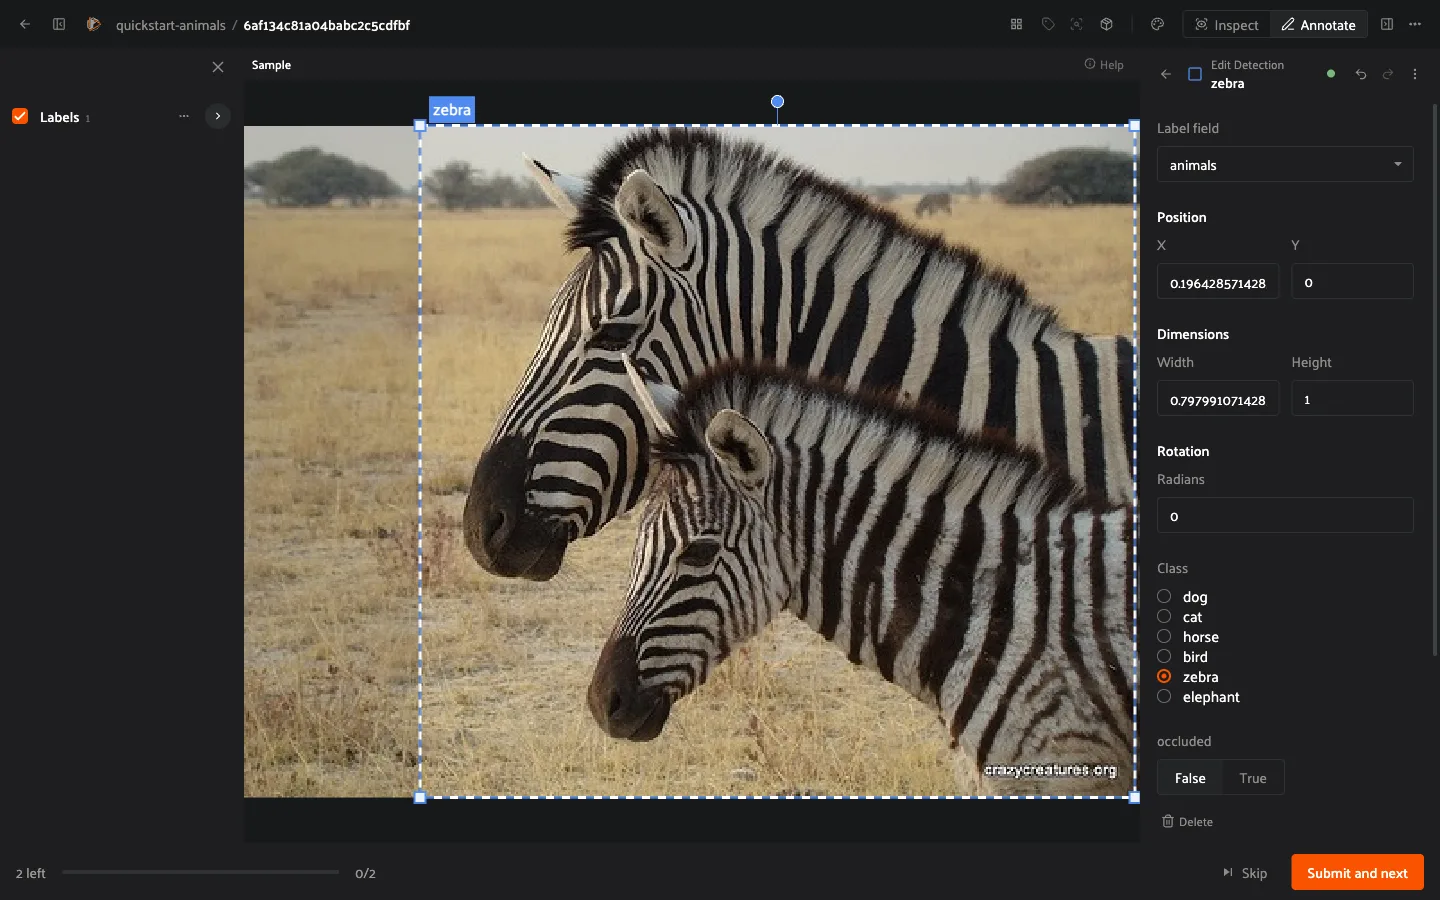
Submit and next saves your work and moves to the next sample.
Skip moves on without labeling. The sample stays pending, and you get it again before the task completes.
Use Cmd+Z (Ctrl+Z on Windows) to undo and Cmd+Y (Ctrl+Y on Windows) to redo a change before you submit.
When you submit the last sample, a Task completed message offers Stay here, See all projects or Next task.
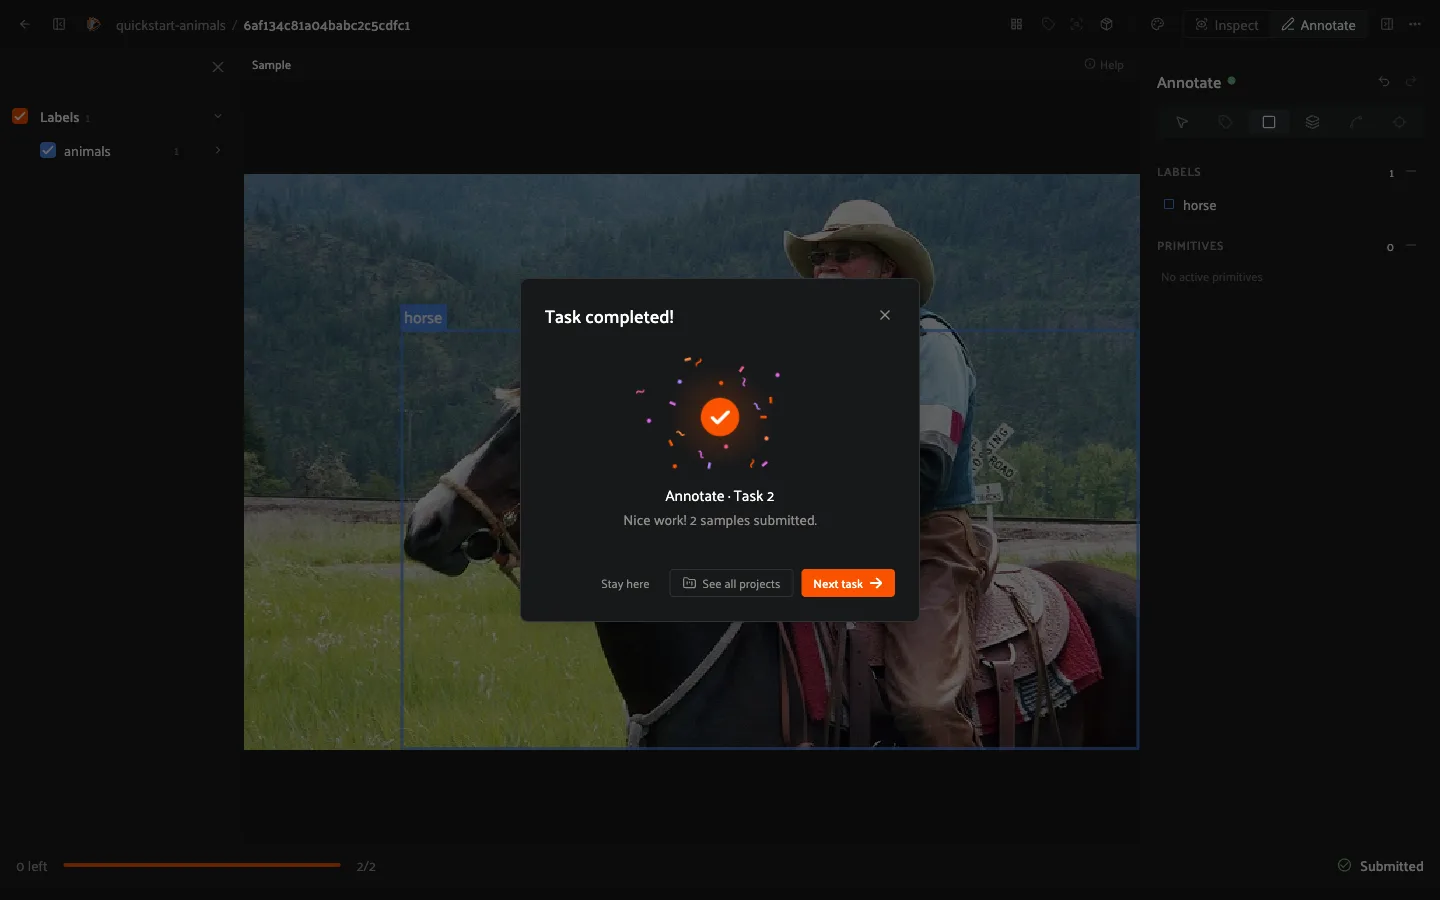
For consensus batches nothing changes for you: you label your copy as usual and never see anyone else’s.
Review#
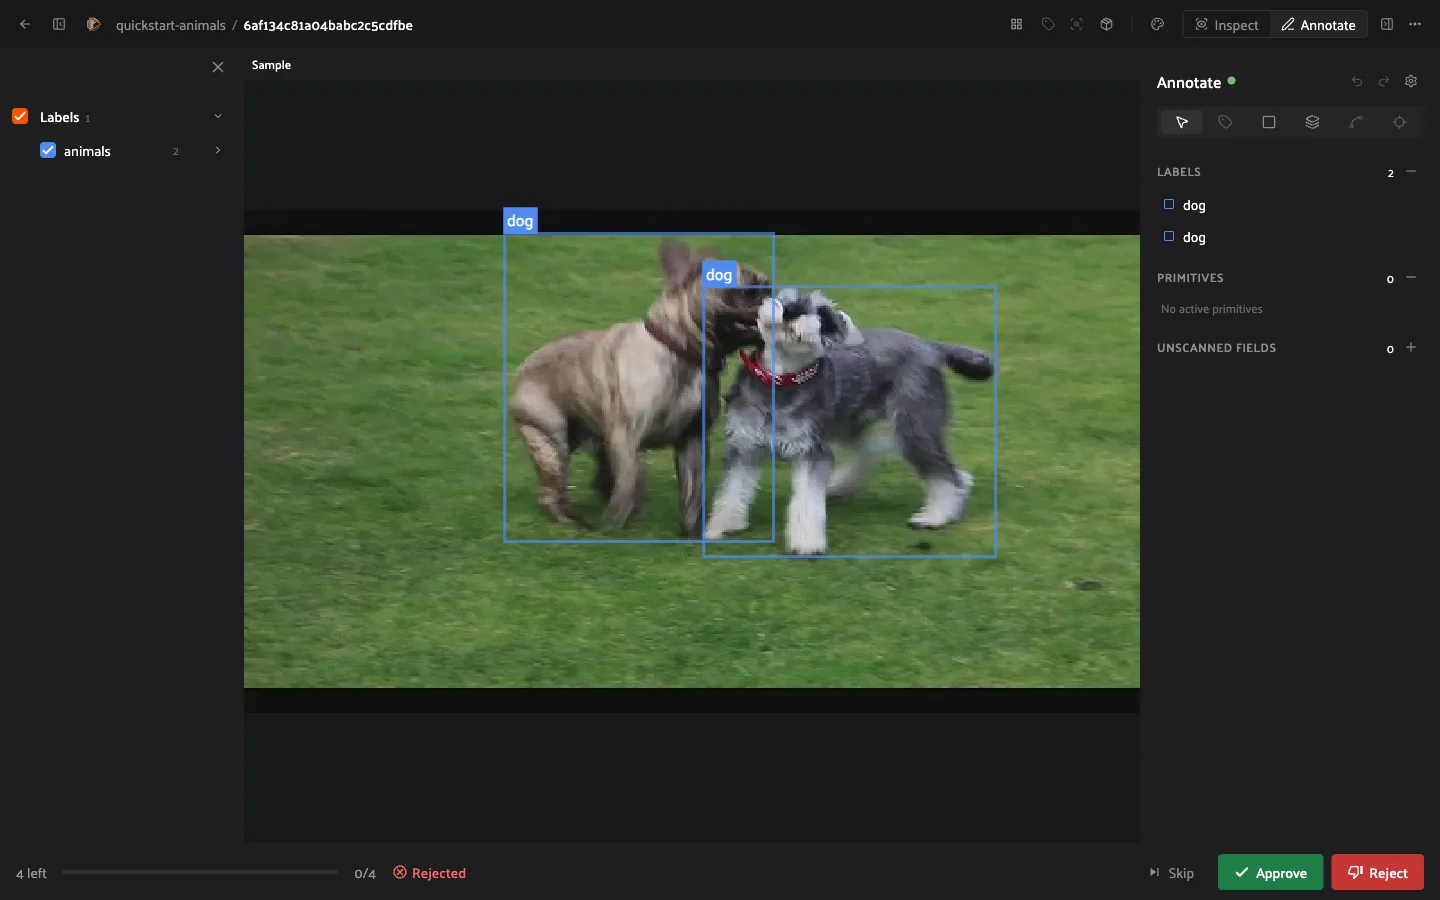
In a review task you approve or reject labeled samples. Look at the labels, then click Approve or Reject. Approving or rejecting routes the sample to the next stage as the workflow defines: a rejected sample usually goes back to an annotate stage. The progress bar reflects outcomes, for example 2 / 36 with 1 rejected, and the task completes when every sample has been decided.
Consensus review#
In a consensus batch, samples whose copies agree pass on their own. When the copies of a sample did not agree enough to pass, the sample comes to you as a pick review, and you choose which annotator’s work to keep.
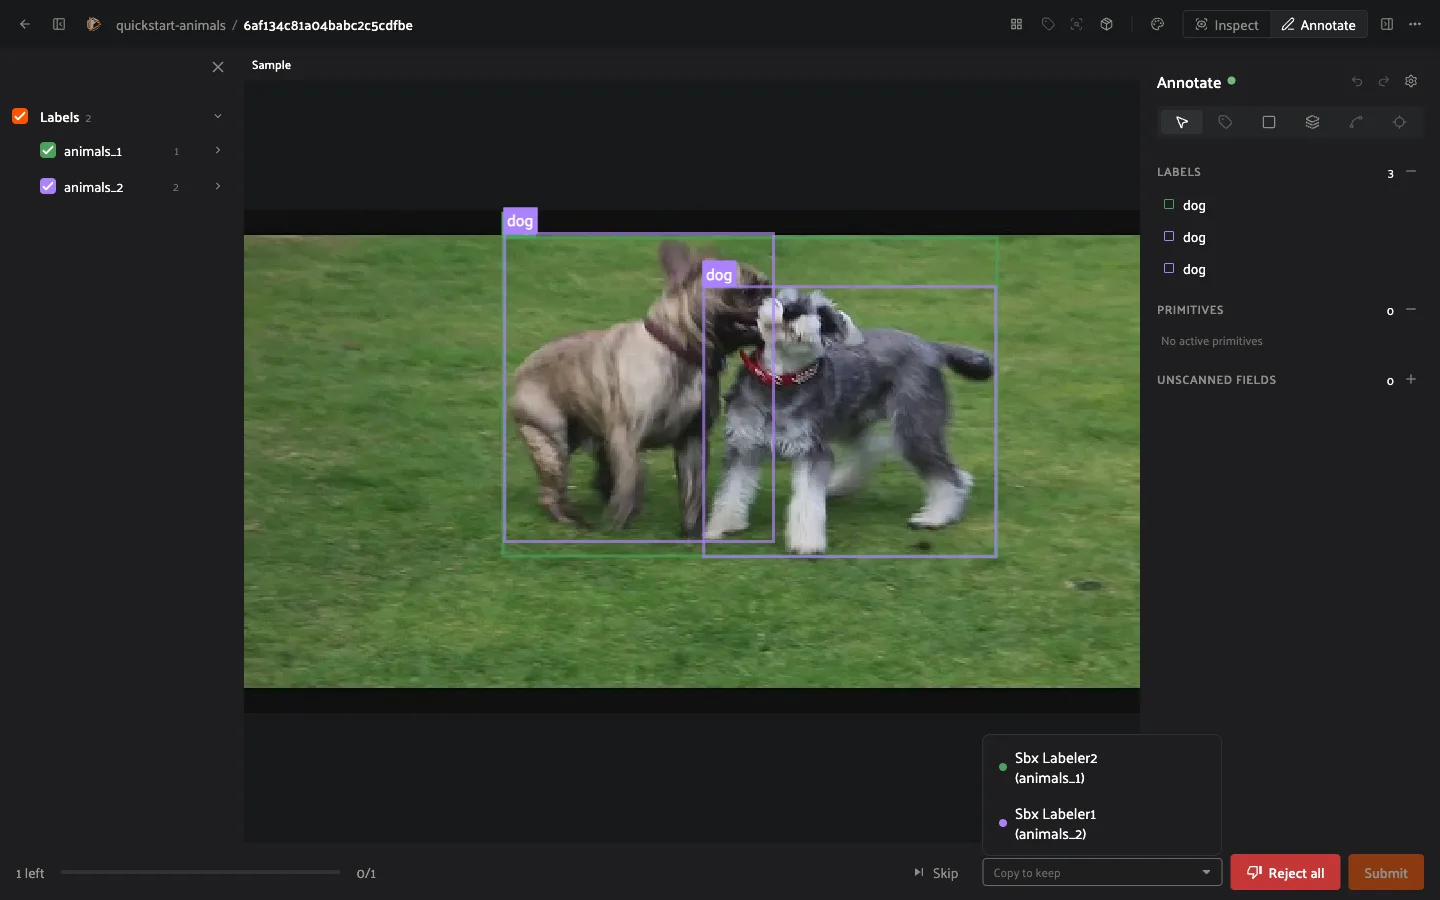
Compare the copies. Each annotator’s copy is drawn on the sample in its own color and listed in the sidebar, where you can show or hide it.
Open the Copy to keep dropdown in the footer. It lists each annotator with the field that holds their copy, for example Sbx Labeler2 (animals_1). Choose the one whose work you want to keep.
Click Submit. The kept copy is written to the stage’s label field and the sample moves on through the stage’s Picked output. If none of the copies is usable, click Reject all to send the sample out through the Rejected output instead.
Leaving comments#
While reviewing, you can leave comments on individual samples to flag issues, request changes, or discuss specific labels with the annotator. Comments stay attached to the sample, so the conversation follows the work as it moves through the pipeline.
Writing a custom assignment policy#
An assignment policy is an operator in your plugin that carries an
assignment_policy_descriptor attribute. The runtime finds it by that
attribute, lists it in the stage’s Assignment policy dropdown, and calls it
with one request per run: after a wave of samples creates new tasks, or after a
stage is switched to automatic. The policy only answers who holds what; the
runtime validates the answer against the pool and writes it with a
compare-and-swap, so a person who picked up a task meanwhile keeps it.
The request arrives as ctx.params["request"]:
{
  "stage":   {"workflow_id", "stage_id", "kind", "name", "pool",
              "priority", "batching", "options"},
  "tasks":   [{"id", "batch_index", "sample_total", "open_samples",
               "priority", "assigned_to", "assigned_by", "created_at",
               "source_collection", "sample_ids"?}, ...],
  "pending": [{"task_id", "reason"}, ...],
  "assignee_pool": {
    "users":  [{"id", "name", "open_tasks", "open_samples",
                "last_submit_at", "via_groups",
                "first_pass_approval"?, "first_pass_judged"?}, ...],
    "groups": [{"id", "name", "member_ids", "open_tasks"}, ...]
  },
  "triggered_by": "system" | "<user id>"
}
pending names the tasks that need an owner; tasks lists every open
task of the stage for context. An “anyone” pool arrives already resolved to
every user with Can tag permission.
The descriptor shapes the rest:
optionsdeclares number fields ("type": "int"or"float", with an optionallabel,description,default,min,maxandunit). They appear under the policy in the stage form, each stage keeps its own values, and they arrive, over the defaults, asrequest["stage"]["options"].request_fieldsasks for facts that cost a read:"sample_ids"adds each task’s sample ids (load the samples yourself if the decision depends on their content), and"first_pass_approval"adds each user’s first-pass approval rate (0 to 1,Nonewithout history) and how many of their samples were judged.
Return a dict:
{
  "assignments": [{"task_id", "assignees": [...], "note"?}, ...],
  "priorities":  {"<task_id>": 0..10},            # optional
  "fallthrough": "default" | "none"               # optional
}
assignees may be one person, several people, one or more groups, or []
to leave the task unassigned; every principal must come from the pool. Tasks
you do not answer for are handed to the built-in Fewest assigned tasks
policy unless you return "fallthrough": "none".
A complete example that routes each batch to the team whose cameras it came from, and lets the default policy handle the rest:
import fiftyone as fo
import fiftyone.operators as foo
import fiftyone.operators.types as types

CAMERA_TEAMS = {"cam_a": "group:team-a-id", "cam_b": "group:team-b-id"}


class AssignByCamera(foo.Operator):
    assignment_policy_descriptor = {
        "label": "By camera team",
        "description": "Each batch goes to the team that owns its camera.",
        # each task's sample ids, to read their camera
        "request_fields": ["sample_ids"],
    }

    @property
    def config(self):
        return foo.OperatorConfig(
            name="assign_by_camera",
            label="Assign by camera team",
            unlisted=True,
        )

    def execute(self, ctx):
        request = ctx.params["request"]
        field = "camera"
        tasks = {t["id"]: t for t in request["tasks"]}
        pool = {g["id"] for g in request["assignee_pool"]["groups"]}
        out = []
        for pending in request["pending"]:
            task = tasks[pending["task_id"]]
            view = ctx.dataset.select(task["sample_ids"])
            cameras = set(view.distinct(field))
            team = next(
                (CAMERA_TEAMS[c] for c in cameras if c in CAMERA_TEAMS),
                None,
            )
            if team in pool:
                out.append(
                    {
                        "task_id": task["id"],
                        "assignees": [team],
                        "note": f"camera {', '.join(sorted(cameras))}",
                    }
                )
        # Batches without a known camera fall through to the default policy
        return {"assignments": out, "fallthrough": "default"}


def register(p):
    p.register(AssignByCamera)
Once the plugin is installed, pick By camera team in the stage’s
Assignment policy dropdown, or set it from a script with
update_stage_assignment().
Writing a custom scoring policy#
A scoring policy, also called a label scorer, replaces only the maths of benchmark and consensus scoring: how close two labels are, and what passes. Voxel51 keeps doing everything around it: queueing the work so a submit never waits, building the request, retrying when the scorer is down, storing the scores, settling attempts, routing consensus sets and feeding the Metrics rollups.
A scorer is an operator in your plugin that carries a
label_scorer_descriptor attribute. The runtime finds it by that attribute,
so nothing else needs registering. It then appears in the Metric select of
a consensus stage, and of New benchmark when Custom metrics is Yes.
Install the plugin where the workflows plugin runs.
The descriptor shapes how the scorer is listed and configured:
Key |
Meaning |
|---|---|
|
Shown in the Metric select. |
|
The field types it scores, for example |
|
|
|
|
|
Fields shown under the Metric select: |
The runtime calls execute with ctx.params["request"]. The score
step carries many samples per call. a is the submission (or one copy) and
b the gold (or another copy), both as label dicts:
{
  "kind": "benchmark",
  "step": "score",
  "field": {"name": "gt", "label_type": "Detections", "attributes": [...]},
  "options": {"min_iou": 0.5, ...},
  "samples": [{"id": "...", "sample_id": "...", "a": {...}, "b": {...}}]
}
Return a score from 0 to 1 for each sample id, and optionally passed,
per-box matches, extra and missed (the App colors the boxes) and a
free-form detail. Return None for an id to hand it to the built-in
scorer:
{"scores": {"<id>": {"score": 0.8, "detail": {...}}}}
If the descriptor sets verdict, a second verdict step runs once per
attempt (or consensus set) after its last score. It replaces the built-in
pass-or-fail rule, so the threshold only applies if your code applies it. The
request carries every sample’s result:
{
  "kind": "benchmark",
  "step": "verdict",
  "options": {"pass_threshold": 0.6, ...},
  "attempt": {"id": "...", "user_id": "...", "trial": 1, "sample_total": 40},
  "samples": [
    {"id": "...", "sample_id": "...", "score": 0.8, "passed": true,
     "detail": {...}}
  ]
}
A consensus verdict has "set": {"sample_id": "...", "fields": [...]} in
place of attempt. Its samples hold one entry per pair of copies, each
naming the pair with a_field and b_field. Return the verdict:
{"score": 0.82, "passed": true, "summary": "2 critical attribute misses",
 "kept": "animals_2"}
score is a number from 0 to 1 (or None),
passed must be true or false, and summary is optional free text.
kept is for consensus only: the name of the copy’s label field, one of
fields, to write as the result when the sample passes. Leave it out, or
name anything else, and the copy with the highest mean agreement is kept.
fiftyone.management.scoring has the built-in scorer’s pieces to build on:
pair_objects, score_attributes (which understands conditional
attributes) and label_from_dict. A minimal scorer that scores boxes on
overlap, with an adjustable match threshold:
import fiftyone.operators as foo
from fiftyone.management.scoring import label_from_dict, pair_objects


class BoxesByOverlap(foo.Operator):
    label_scorer_descriptor = {
        "label": "Boxes by overlap",
        "description": "Mean IoU of matched boxes; extras and misses score 0",
        "label_types": ["Detections"],
        "kinds": ["benchmark", "consensus"],
        "options": {
            "min_iou": {
                "type": "float",
                "label": "Match at IoU",
                "description": "Boxes below this overlap don't pair.",
                "default": 0.5,
                "min": 0,
                "max": 1,
            },
        },
    }

    @property
    def config(self):
        return foo.OperatorConfig(
            name="boxes_by_overlap",
            label="Boxes by overlap scorer",
            unlisted=True,
        )

    def execute(self, ctx):
        request = ctx.params["request"]
        min_iou = request["options"]["min_iou"]
        scores = {}
        for sample in request["samples"]:
            res = pair_objects(
                label_from_dict(sample["a"]),
                label_from_dict(sample["b"]),
                min_iou=min_iou,
            )
            n = len(res["matches"]) + len(res["extra"]) + len(res["missed"])
            total = sum(m["iou"] for m in res["matches"])
            scores[sample["id"]] = {"score": total / n if n else 1.0}
        return {"scores": scores}


def register(p):
    p.register(BoxesByOverlap)
A fuller scorer scores each box on overlap and attribute agreement together,
counts conditional attributes the way
the schema asks them, lets you mark critical attributes whose wrong value
zeroes a box, and decides pass or fail itself with a verdict step:
import fiftyone.operators as foo
from fiftyone.management.scoring import (
    label_from_dict,
    pair_objects,
    score_attributes,
)


class BoxesWithAttributes(foo.Operator):
    label_scorer_descriptor = {
        "label": "Boxes + attributes",
        "description": "IoU and attribute agreement per matched box",
        "label_types": ["Detections"],
        "kinds": ["benchmark", "consensus"],
        "verdict": True,
        "options": {
            "min_iou": {
                "type": "float",
                "label": "Match at IoU",
                "default": 0.5,
                "min": 0,
                "max": 1,
            },
            "attribute_weight": {
                "type": "float",
                "label": "Attribute weight",
                "description": "Share of a box's score from its attributes",
                "default": 0.4,
                "min": 0,
                "max": 1,
            },
            "critical": {
                "type": "attributes",
                "label": "Critical attributes",
                "description": "A wrong value zeroes the box.",
                "default": [],
            },
            "pass_threshold": {
                "type": "float",
                "label": "Pass score",
                "default": 0.8,
                "min": 0,
                "max": 1,
            },
            "max_critical_misses": {
                "type": "int",
                "label": "Critical misses allowed",
                "default": 0,
                "min": 0,
            },
        },
    }

    @property
    def config(self):
        return foo.OperatorConfig(
            name="boxes_with_attributes",
            label="Boxes + attributes scorer",
            unlisted=True,
        )

    def execute(self, ctx):
        request = ctx.params["request"]
        options = request["options"]
        if request["step"] == "verdict":
            return _verdict(options, request["samples"])
        specs = request["field"].get("attributes")
        return {
            "scores": {
                s["id"]: _score(options, specs, s)
                for s in request["samples"]
            }
        }


def _score(options, specs, sample):
    w = options["attribute_weight"]
    critical = set(options.get("critical") or [])
    res = pair_objects(
        label_from_dict(sample["a"]),
        label_from_dict(sample["b"]),
        min_iou=options["min_iou"],
    )
    scores = []
    misses = 0
    for m in res["matches"]:
        attrs = score_attributes(m["pred"], m["gold"], specs)
        wrong = {
            slot["name"]
            for slot in attrs["slots"]
            if slot.get("agree") == 0.0
        }
        if wrong & critical:
            misses += 1
            scores.append(0.0)
        else:
            scores.append((1 - w) * m["iou"] + w * attrs["score"])
    n = len(scores) + len(res["extra"]) + len(res["missed"])
    return {
        "score": sum(scores) / n if n else 1.0,
        "extra": res["extra"],
        "missed": res["missed"],
        "detail": {"critical_misses": misses},
    }


def _verdict(options, samples):
    if not samples:
        return {"score": None, "passed": False, "summary": "Nothing scored"}
    mean = sum(s["score"] for s in samples) / len(samples)
    misses = sum(
        (s.get("detail") or {}).get("critical_misses", 0) for s in samples
    )
    return {
        "score": mean,
        "passed": mean >= options["pass_threshold"]
        and misses <= options["max_critical_misses"],
        "summary": f"{misses} critical attribute miss(es)",
    }


def register(p):
    p.register(BoxesWithAttributes)
A box scores (1 - w) * IoU + w * attribute agreement, where w is the
Attribute weight. An attempt, or a consensus set, passes when its mean
score clears the Pass score and its critical misses stay within the
allowance. This formula is only an example: yours can ignore IoU, score other
label types, or decide pass or fail any way it likes.