
FiftyOne Agent#

The FiftyOne Agent is an AI-powered assistant built into the Voxel51 App. It lets you work with your datasets using natural language. You can import data, run model inference, find duplicates, evaluate predictions, and more, all from a conversational interface.

Setup#
Contact your Customer Success representative to enable the FiftyOne Agent for your deployment.
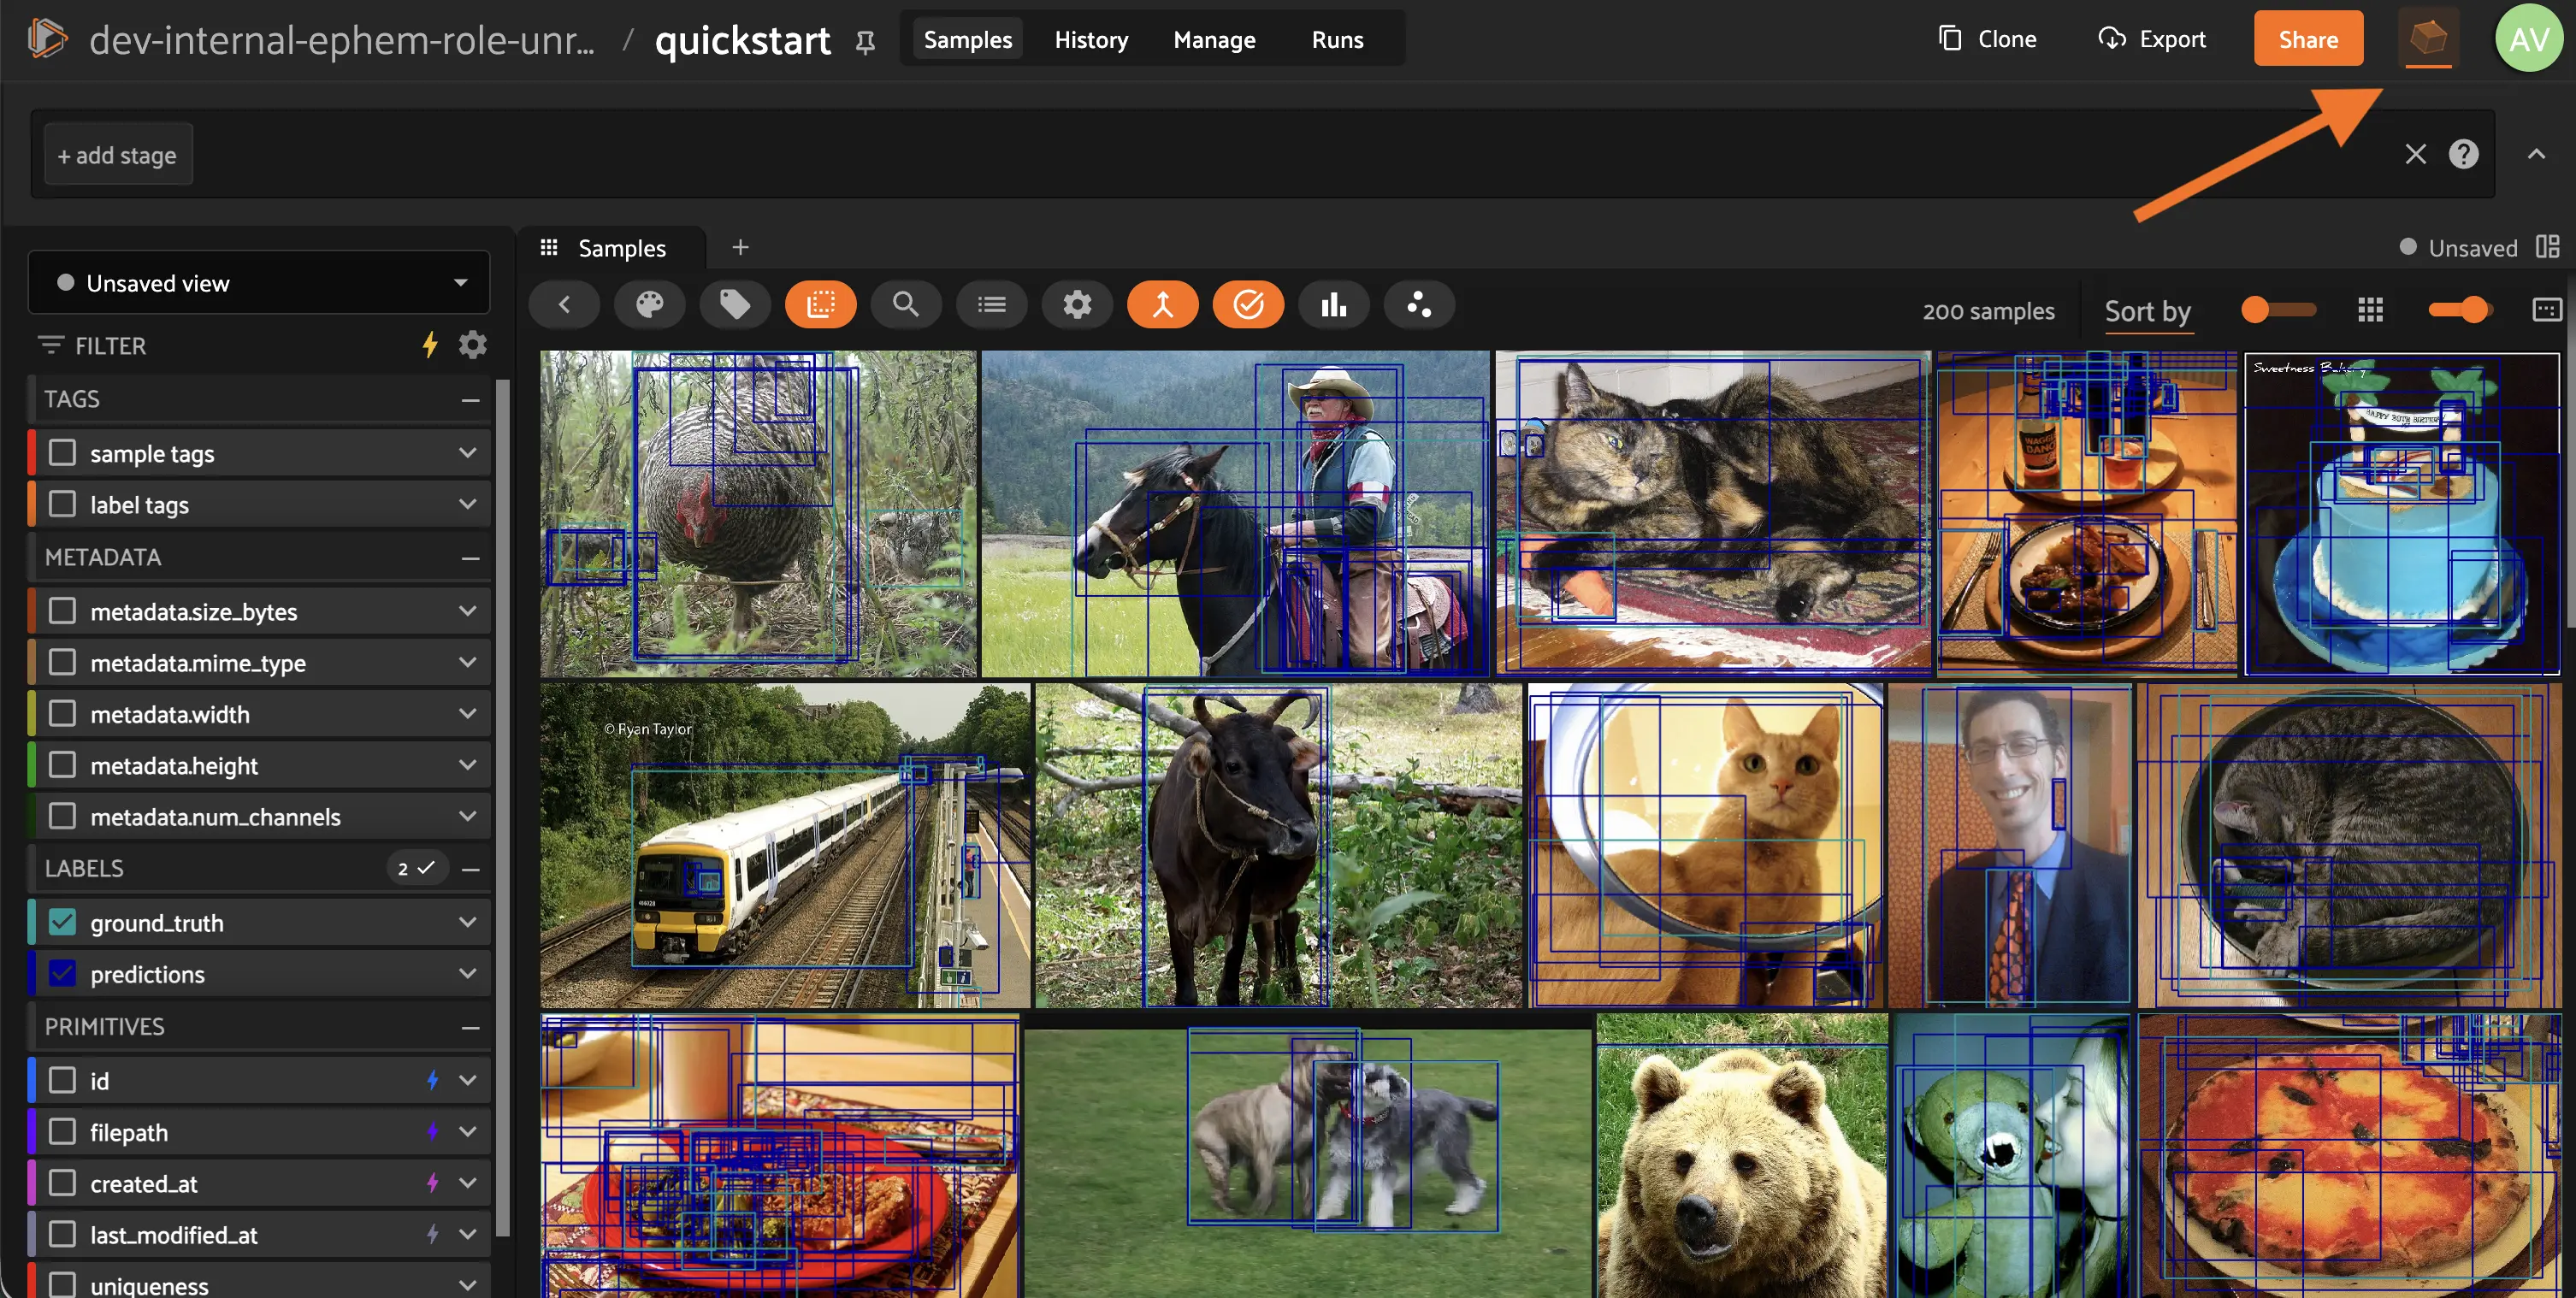
Open any dataset in the Voxel51 App. You will see a new Agent button in the upper-right corner of the App.
Note
The FiftyOne Agent now ships as a built-in feature of the Voxel51 App rather than a separately installed plugin. If you installed an earlier standalone version of the Agent plugin, you can remove it once your deployment is upgraded. The built-in version replaces it entirely.
Configuring model providers#
The first time you open the Agent, you will be prompted to configure a model provider. The Provider dropdown lists every supported provider, including Anthropic, OpenAI, Google, Azure, AWS Bedrock, Vertex AI, and many more.
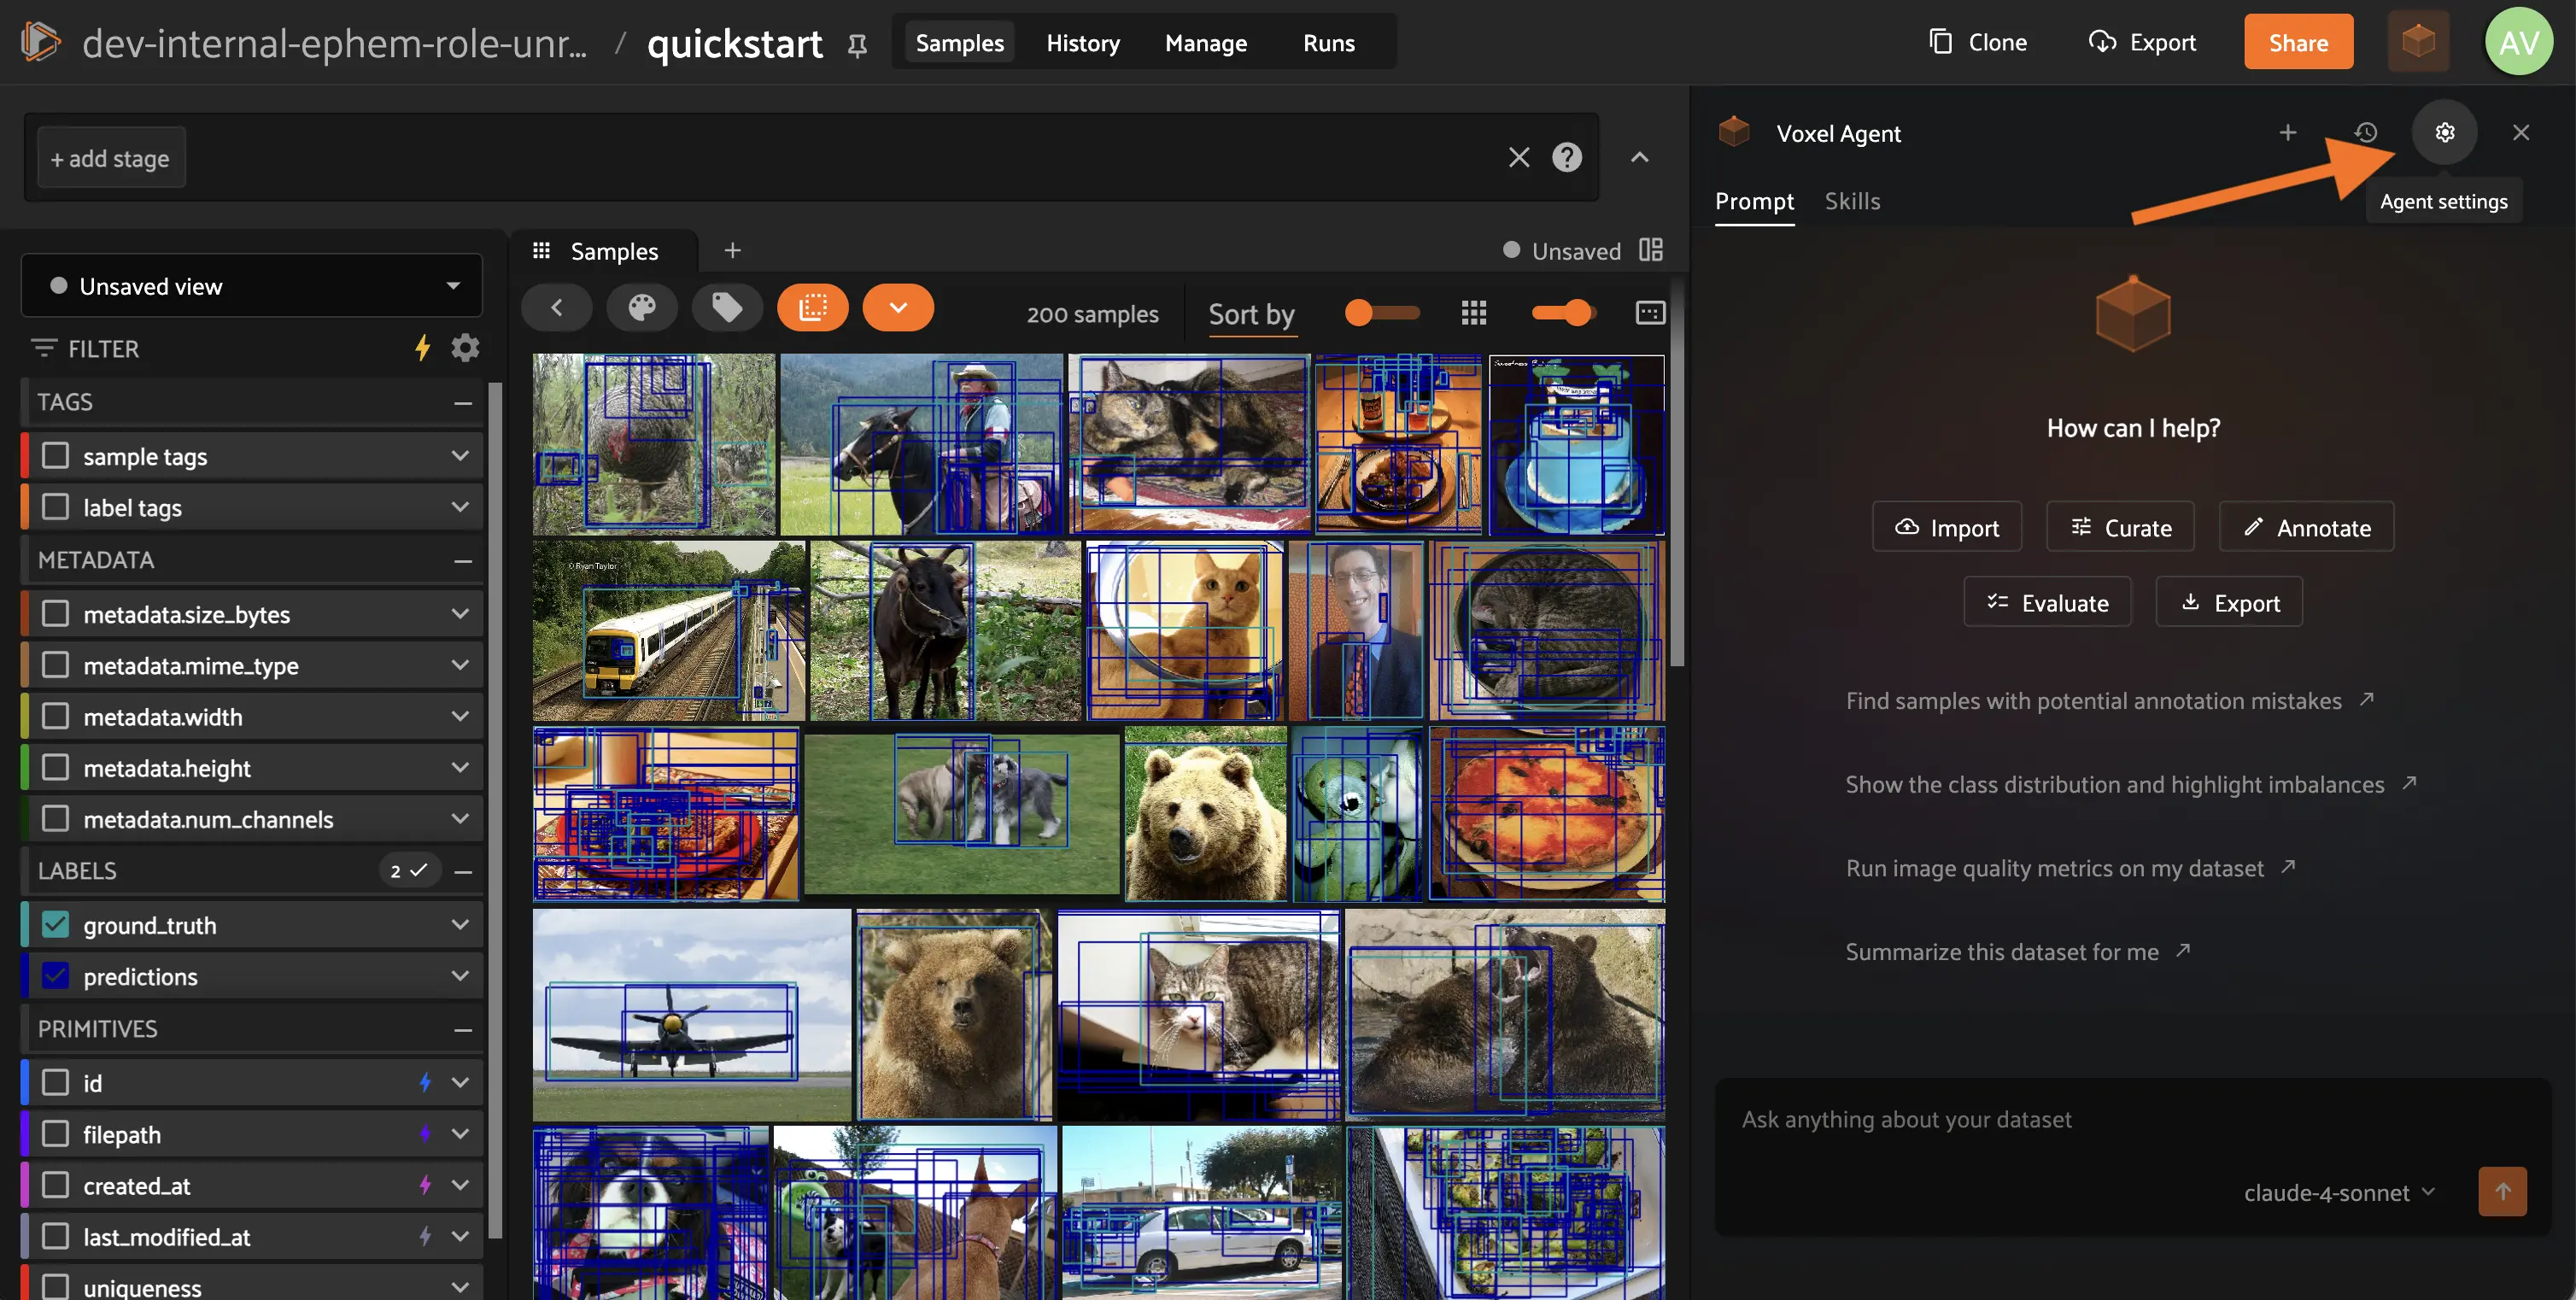
To add a provider, fill in the following fields:
Name: a label for this provider configuration
Provider: select from the list of supported providers
Endpoint (optional): use this to route requests to a custom URL, such as an internal enterprise gateway or a self-hosted model server. Setting an endpoint does not change how model names are routed automatically; when it’s set, use the Custom model names field to provide a provider-prefixed model name (see below) so the request is routed correctly
API key (optional): your provider’s API key. Leave this field blank to use credentials already configured in the server environment
Models: select one or more models to make available. Leave this empty to allow every model from this provider; note that Test connection requires at least one model to be selected
Custom model names (optional): enter model identifiers that are not in the standard picker, such as non-standard IDs used by an enterprise gateway. Prefix with the provider slug so the request is routed correctly, e.g.
openai/aws:anthropic.claude-sonnet-4-6to reach a Bedrock-hosted Claude model through an OpenAI-compatible gatewayExtra headers (optional): static key-value HTTP headers sent with every request (e.g.
User-Agent, project tokens required by your gateway). When an endpoint is set, anX-FiftyOne-User-Emailheader identifying the requesting user is also added automatically, to support attribution/logging on your own gateway
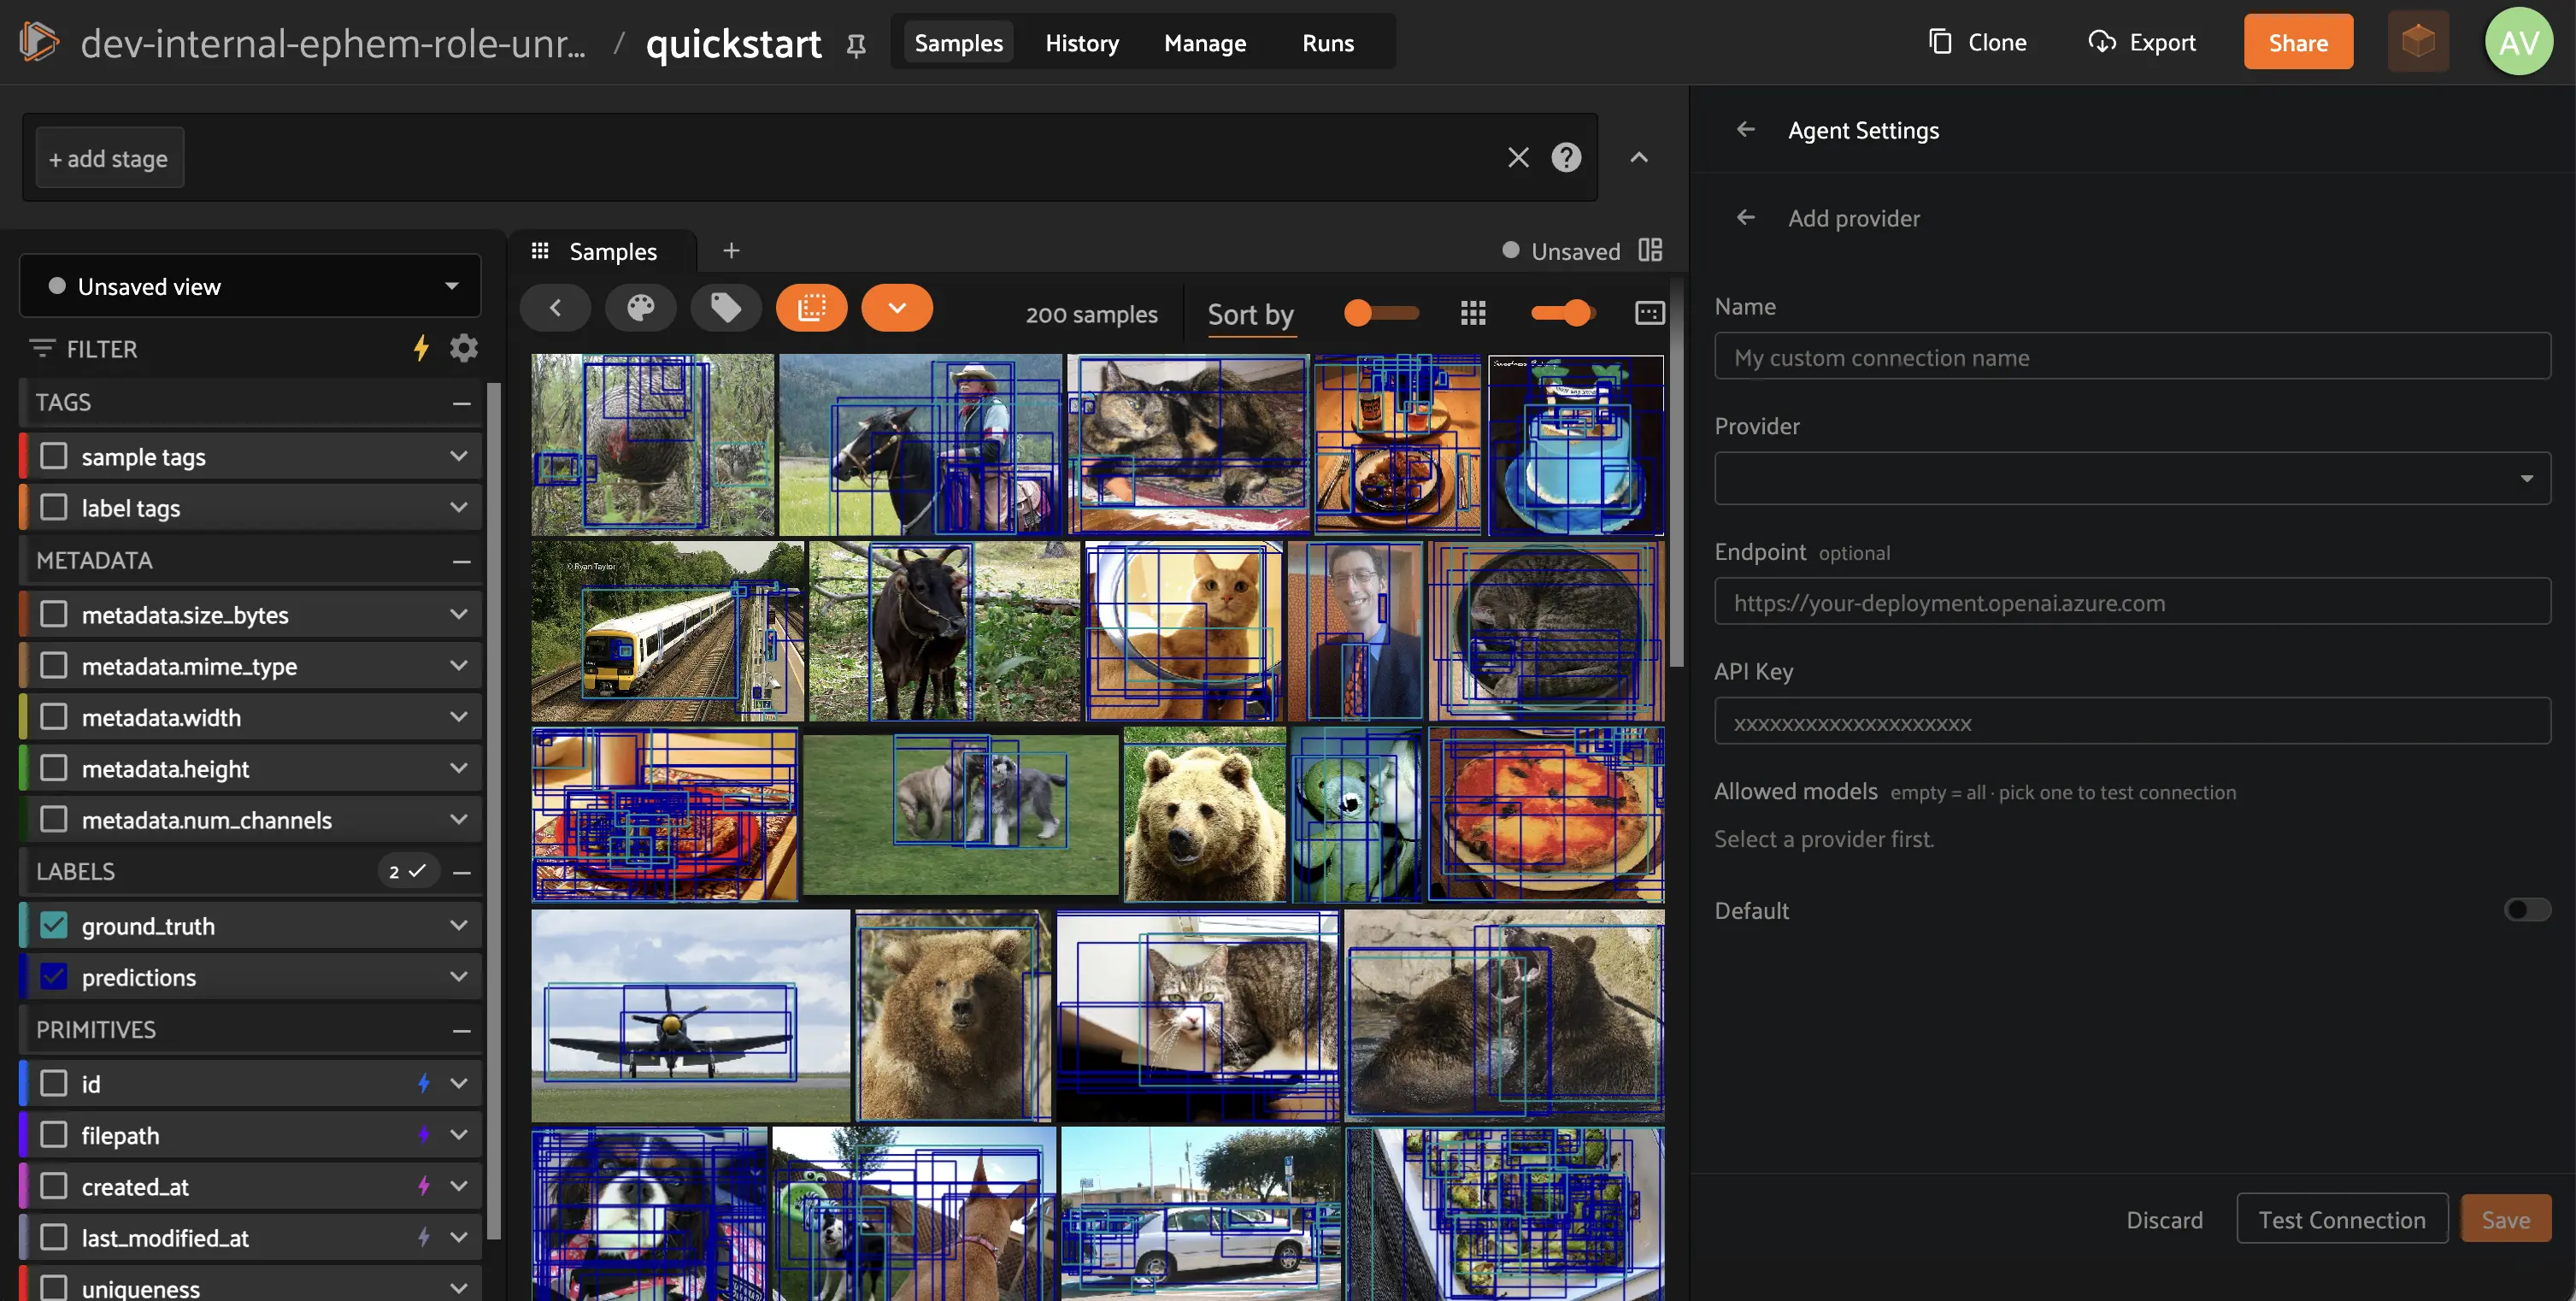
You can click Test connection to verify your credentials before saving.
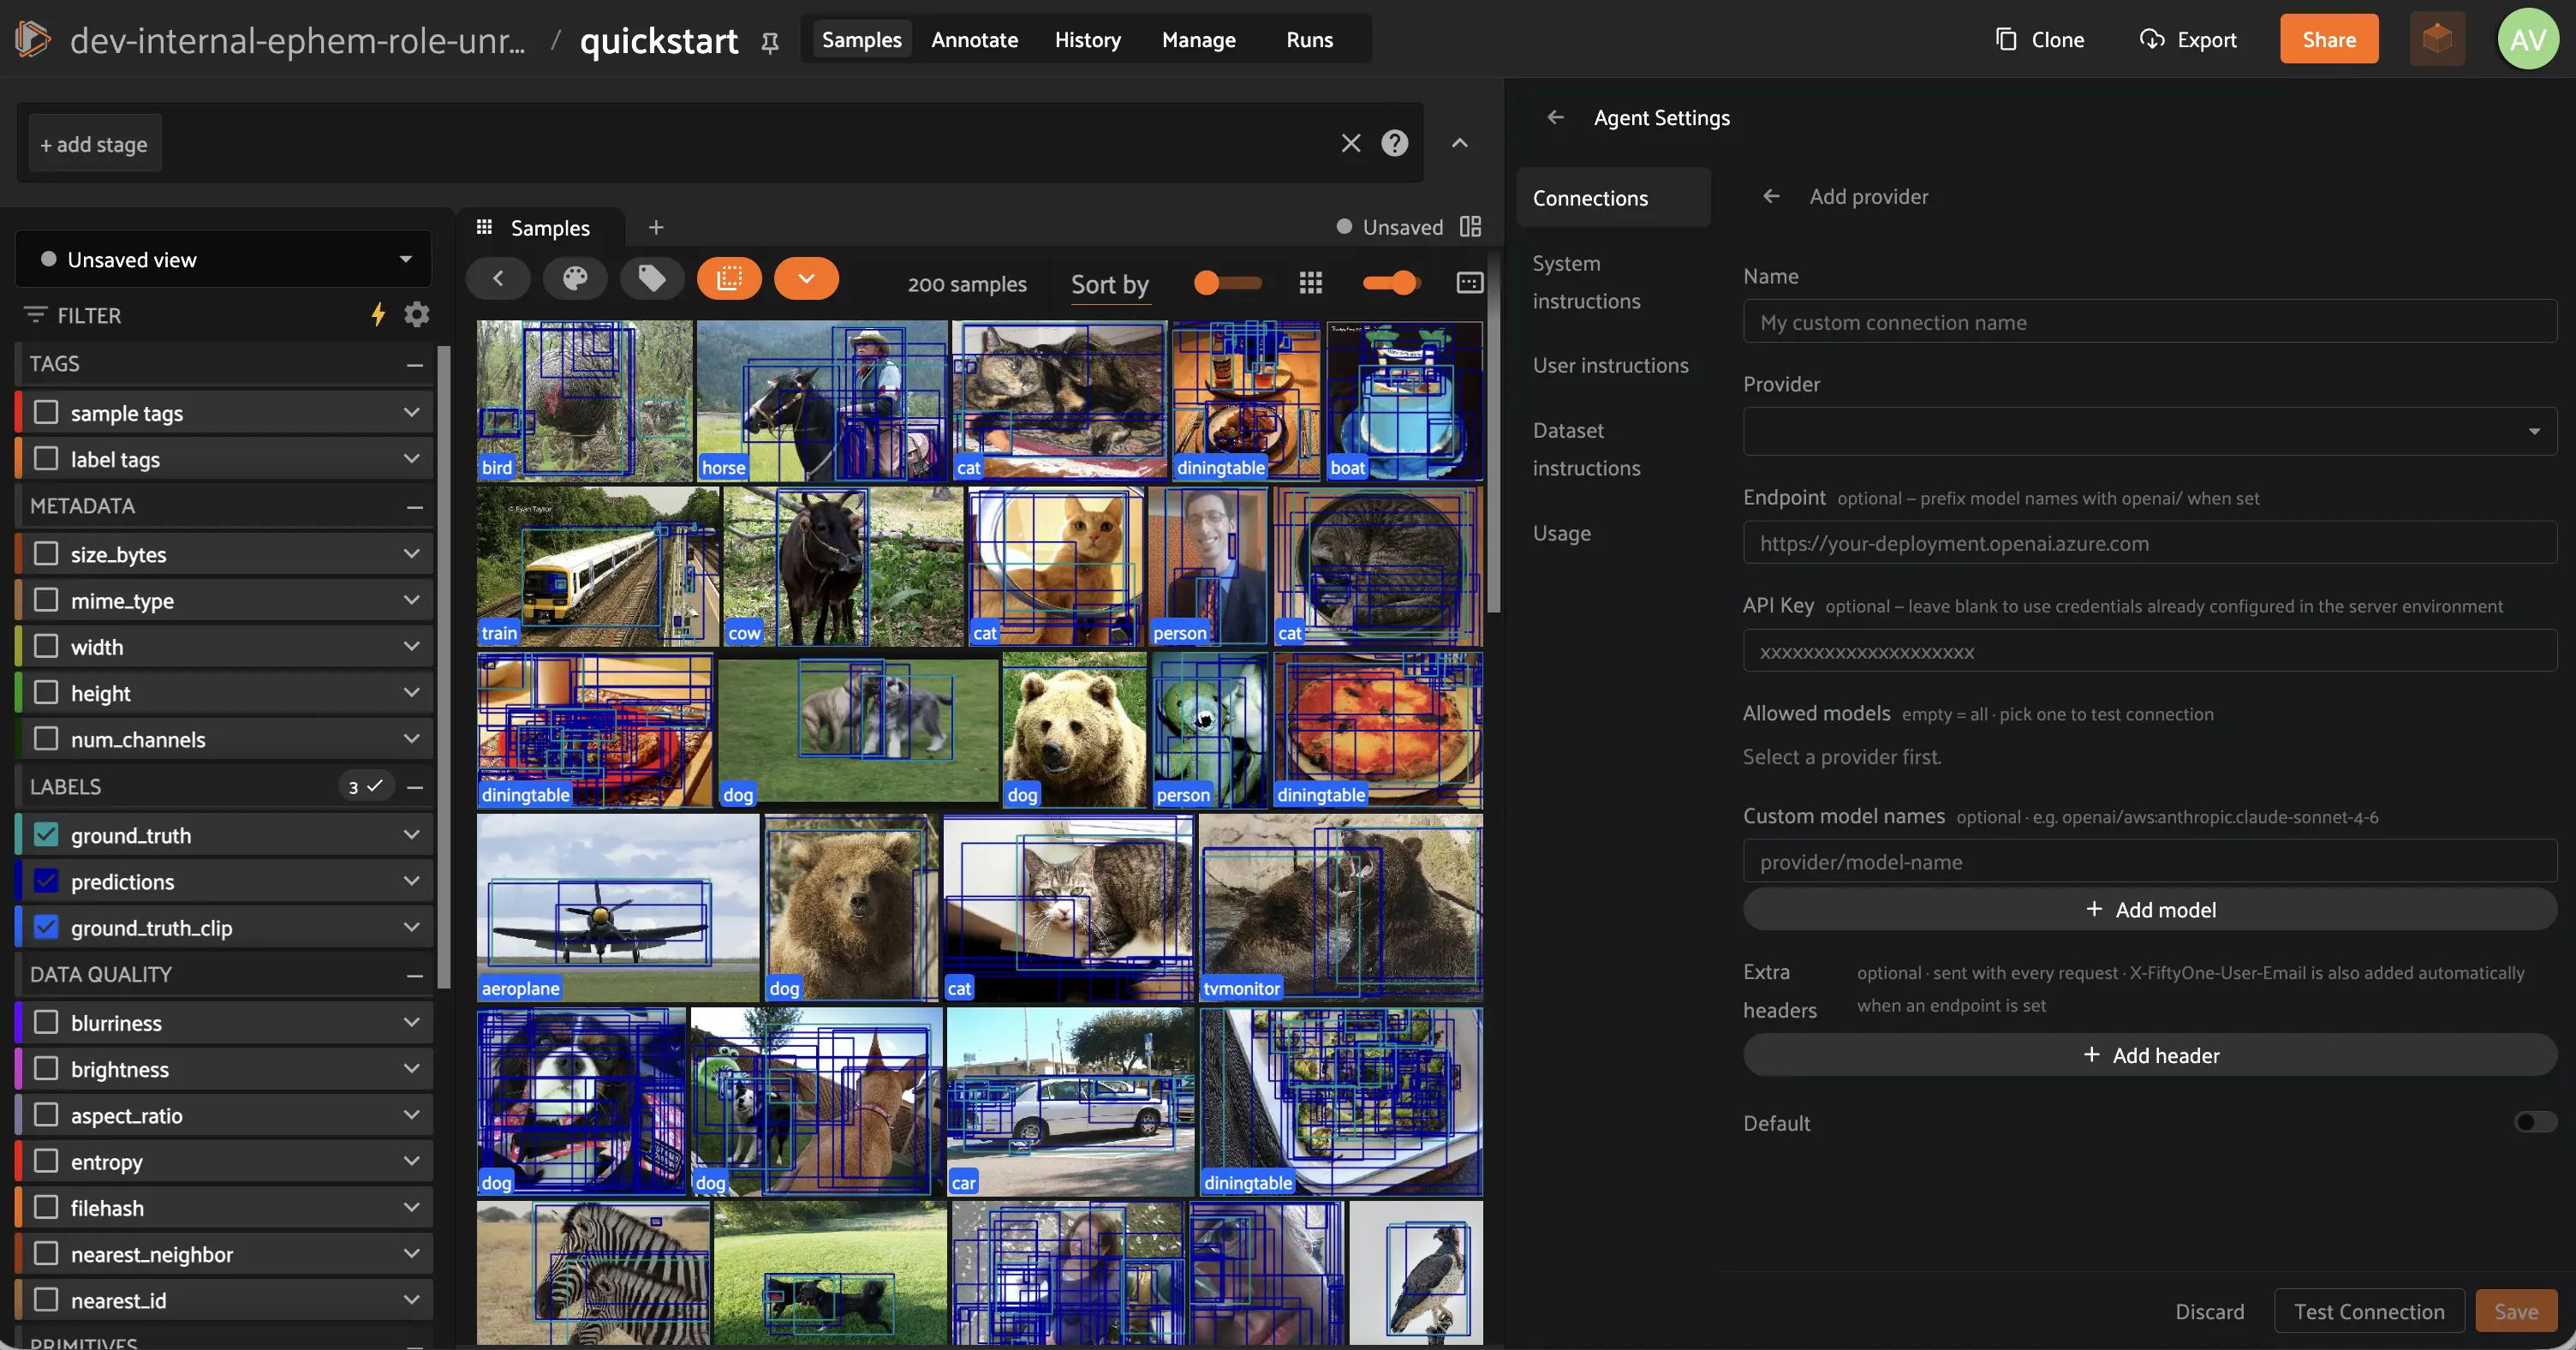
To choose which model new users start with, use the Default model picker at the top of the Connections list.
Note
API keys are automatically stored securely using Voxel51’s Secrets infrastructure. No manual secret configuration is required.
Permissions#
Any user who can view a dataset can chat with the Agent and ask it to take action on that dataset. A few capabilities require additional permissions:
Managing connections (adding, editing, or removing a model provider, or changing the default model) requires the Admin role.
Generating and testing plugins with the Agent requires the Admin role.
Generating and executing SDK code with the Agent requires a role with API key access enabled. See Roles and permissions for which roles support this by default and how to change it.
Custom endpoints and enterprise gateways#
If your organization routes LLM traffic through an internal gateway or proxy, you can point the Agent at it using the Endpoint and Extra headers fields on any provider configuration.
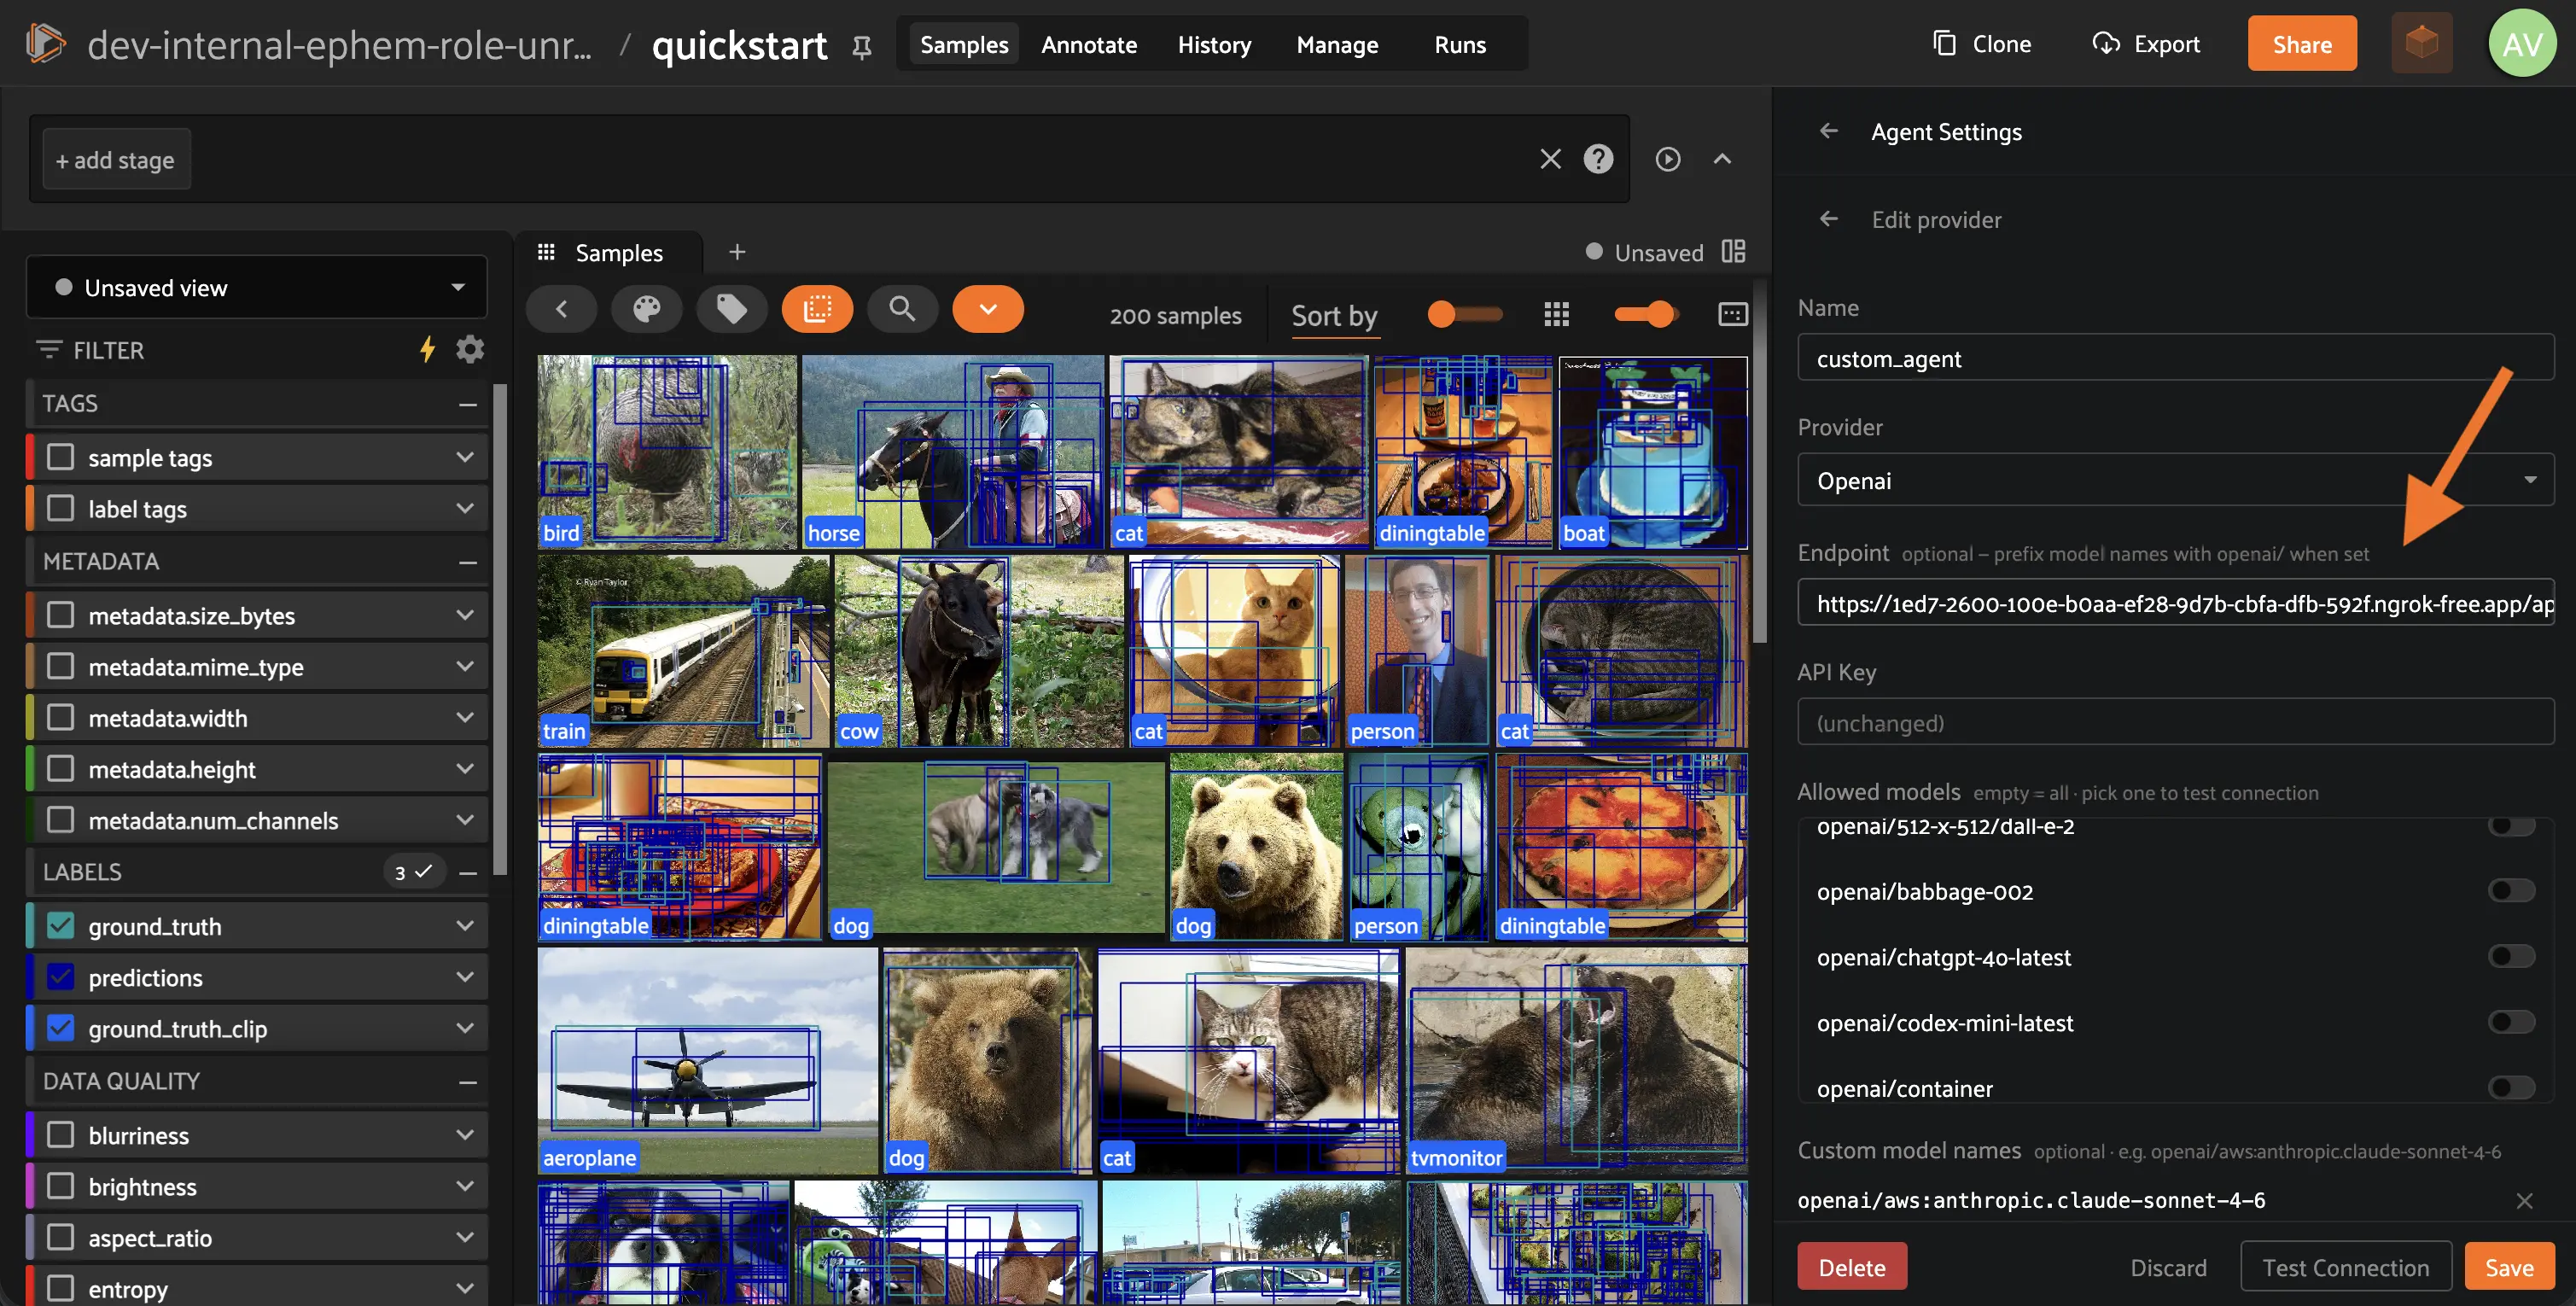
Provider, match the API format, not the model brand
The Provider field controls the request format the Agent uses, not which model it calls. Set it to match what your gateway expects:
If your gateway exposes an OpenAI-compatible API (
/chat/completions), selectopenai, even if the underlying model is Claude or GeminiIf your gateway exposes the Anthropic Messages API (
/v1/messages) natively, selectanthropic
Endpoint, base URL only
Enter only the base URL of your gateway — do not include the API path. The Agent appends the correct path automatically based on the provider you selected. For example:
✓  https://gateway.internal/api/openai/v1
✗  https://gateway.internal/api/openai/v1/chat/completions
Model names, always prefix with the provider slug
Use the model identifier your gateway provides, prefixed with the provider slug. The prefix prevents the model ID from being misrouted to a cloud provider instead of your gateway, and is stripped before the name is sent:
openai/your-model-id
anthropic/your-model-id
This is especially important when your gateway returns model IDs that start
with a vendor name (e.g. anthropic.claude-sonnet). Without the prefix,
those IDs may be misrouted to a cloud provider instead of your gateway.
Use Test connection to verify the full configuration works before saving.
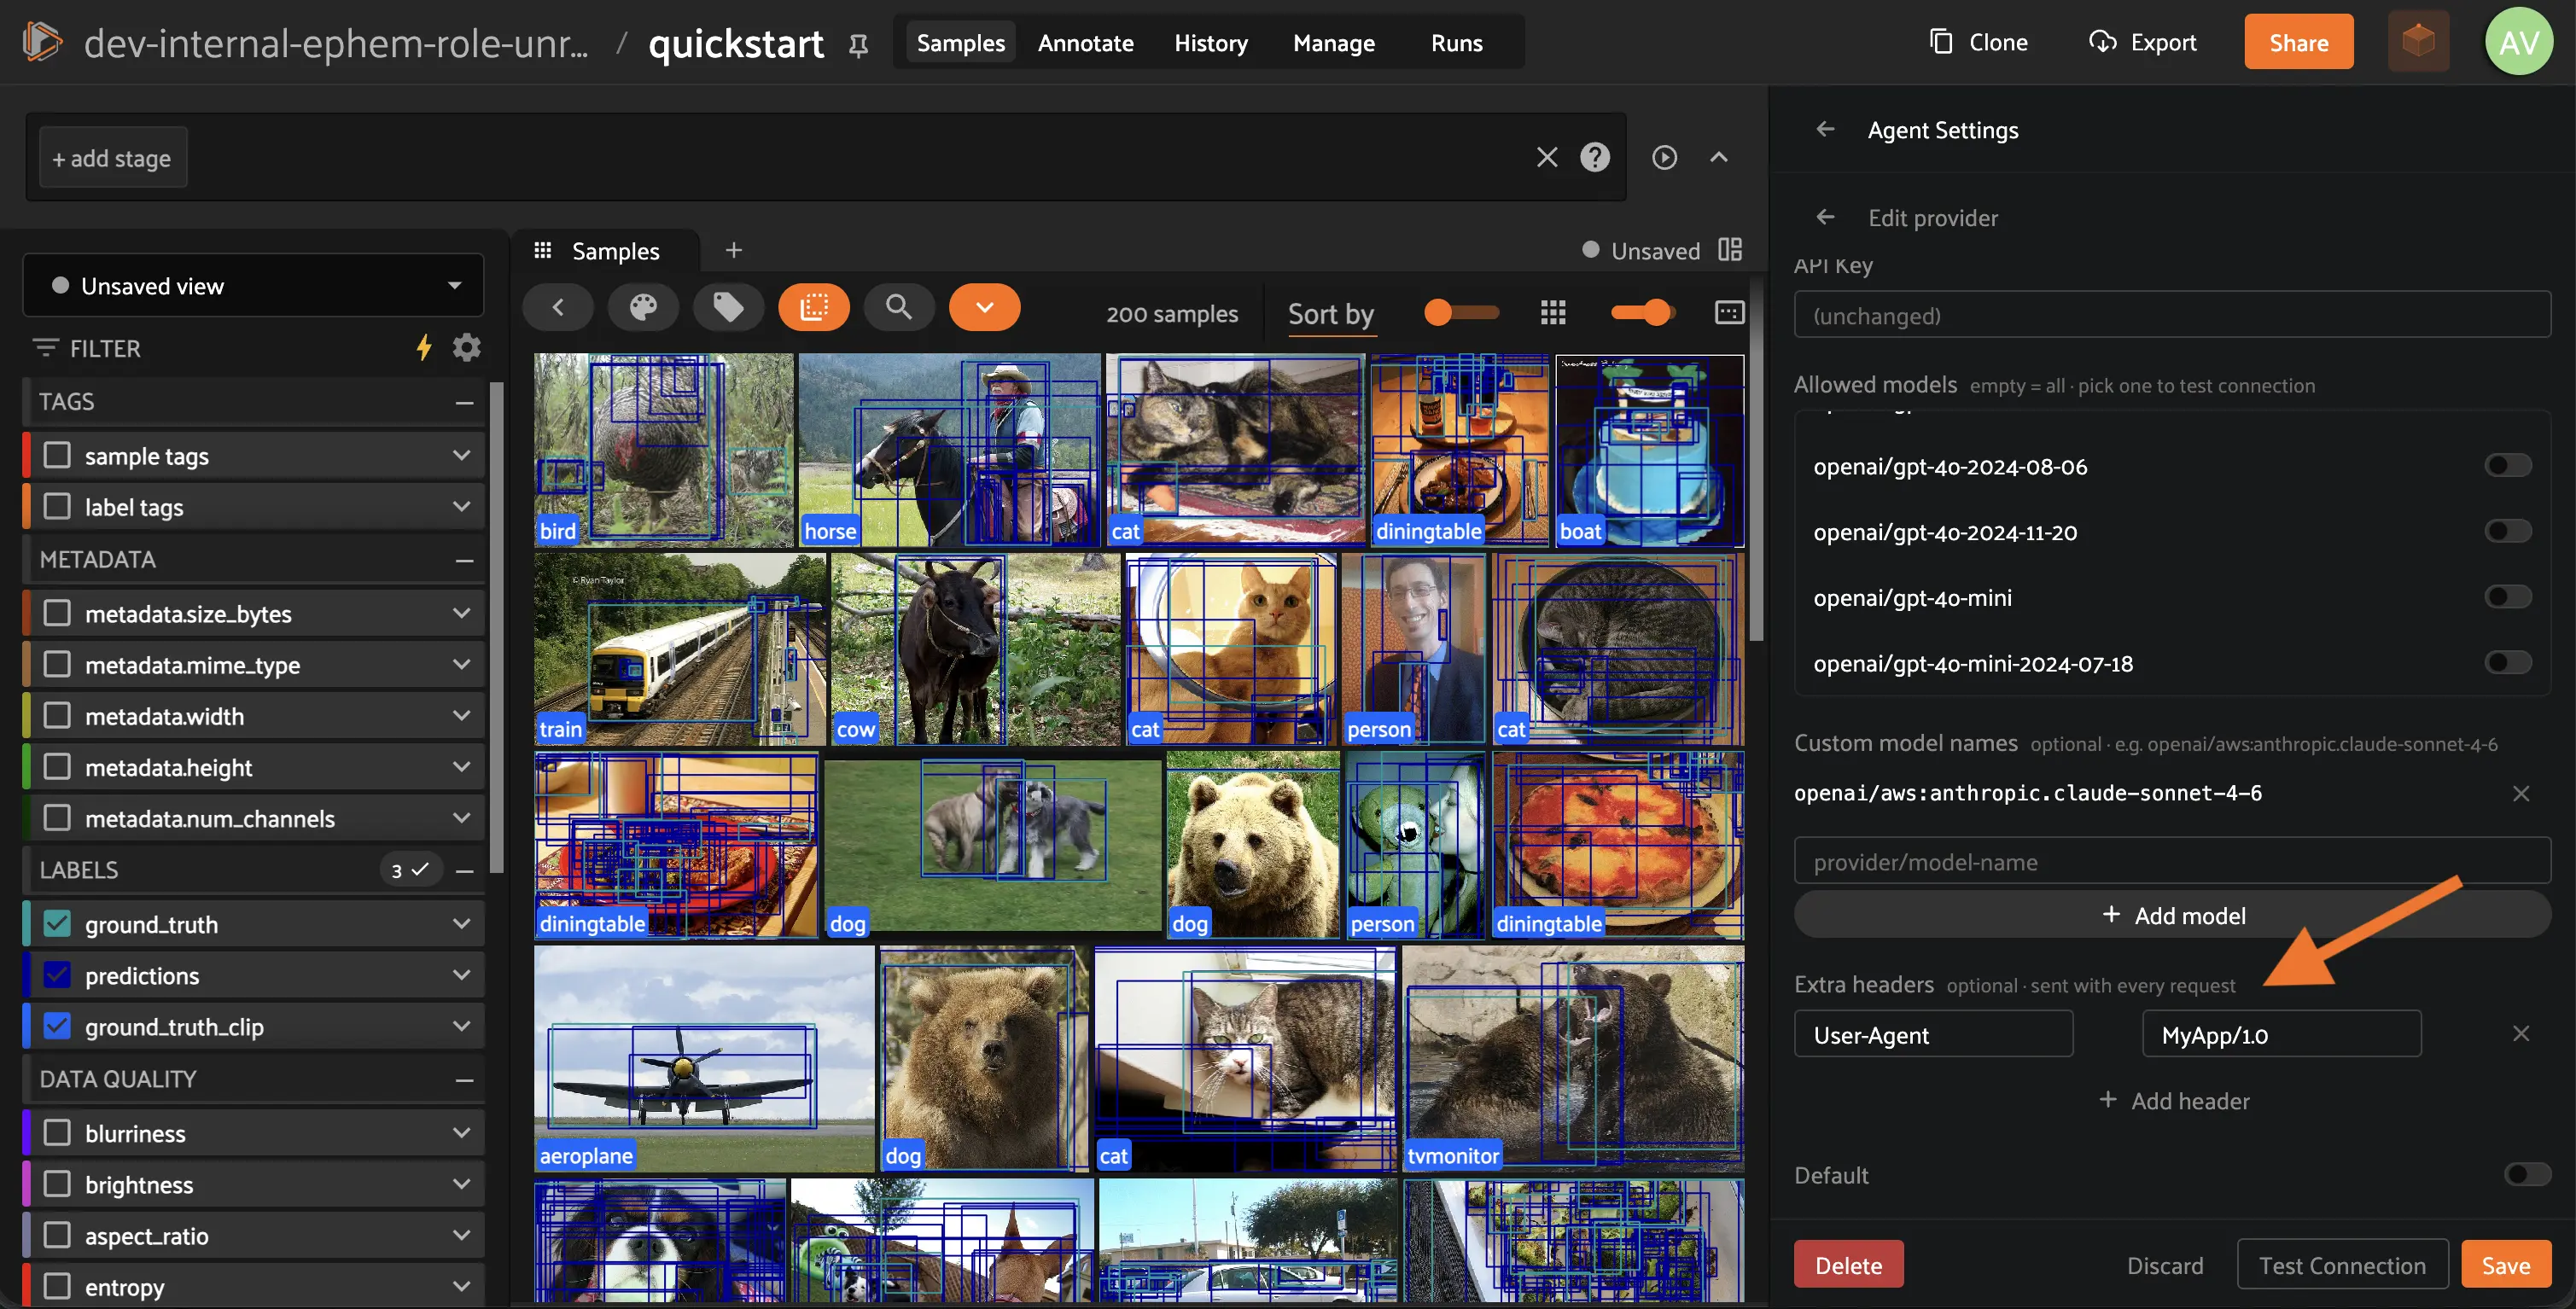
Use Extra headers for any additional authentication or routing headers your
gateway requires, such as project tokens or custom User-Agent values.
Per-user attribution
When a custom endpoint is configured, the Agent automatically adds an
X-FiftyOne-User-Email header to every request containing the email address
of the currently logged-in user. Gateways can use this header to attribute
requests to individual users rather than a shared system account, which is
useful for enforcing per-user quotas or audit logging.
Note
Admins are responsible for ensuring that the configured endpoint’s data handling and retention align with their organization’s privacy policy.
Custom instructions#
You can give the Agent standing instructions that are automatically included in every conversation, at three scopes:
Organization: written by an admin, applied to every conversation for every user in the deployment
User: personal instructions that apply only to your own conversations
Dataset: shared instructions that apply to every conversation involving a specific dataset, for everyone with access to it
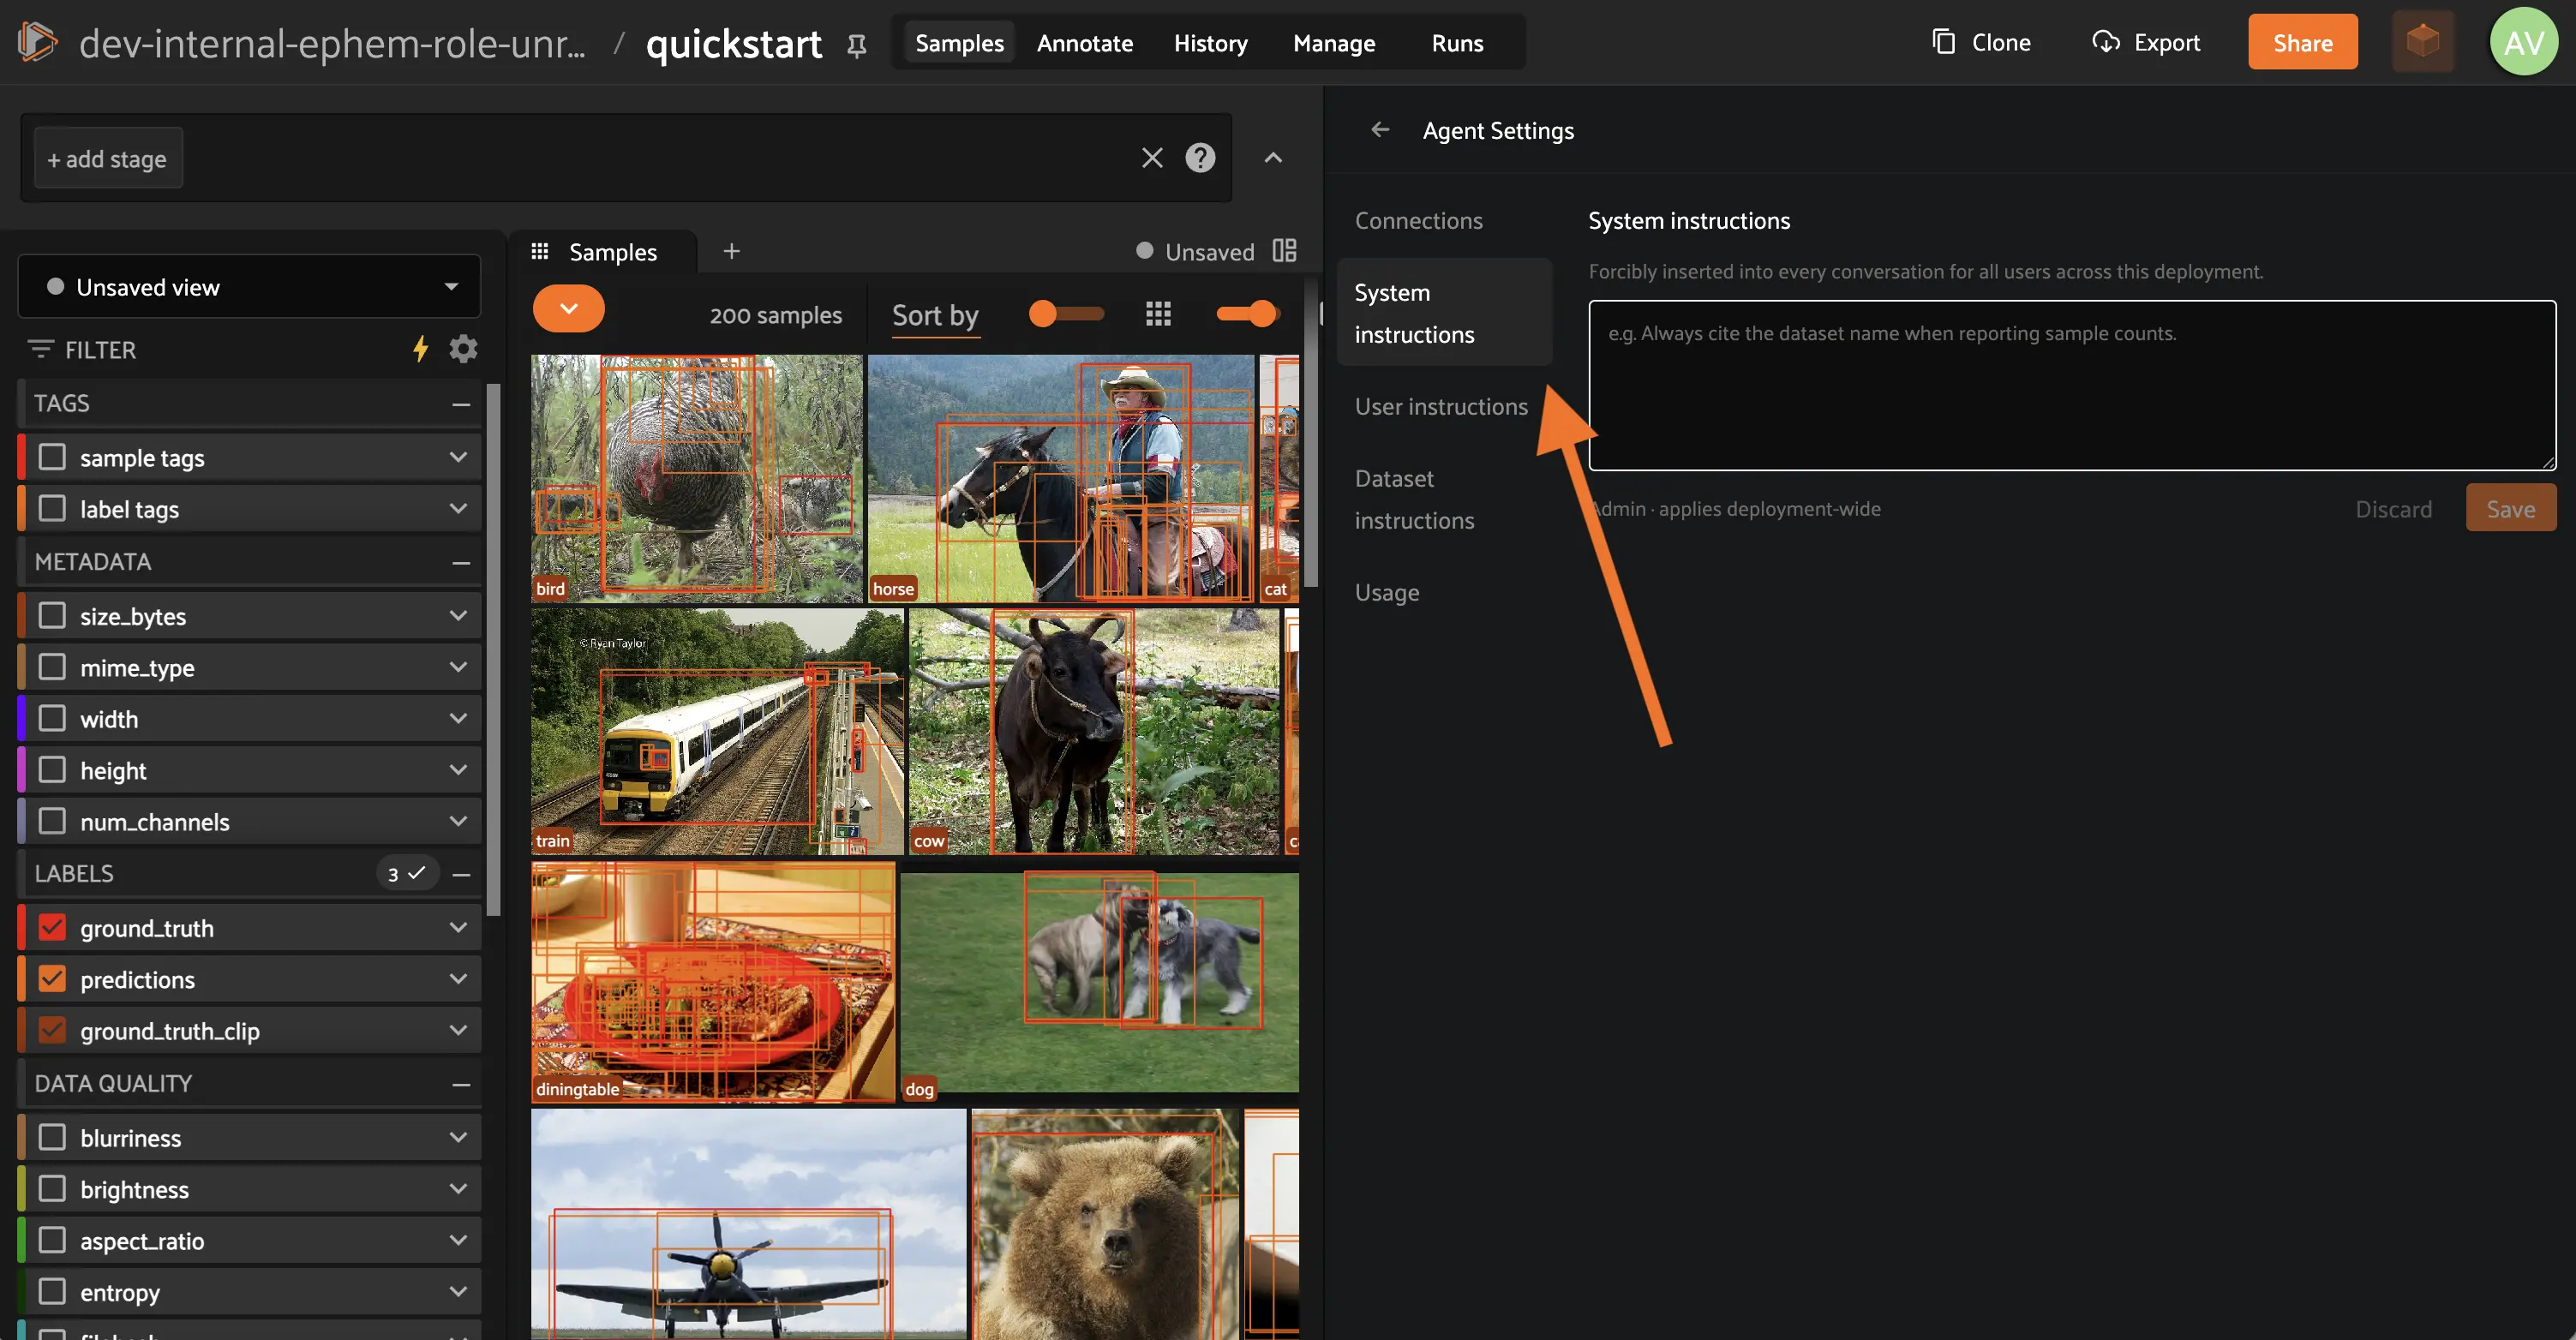
Configure instructions from the Agent’s settings panel.
Grounding answers in the documentation#
The Agent can ground its answers in the live FiftyOne documentation. Before answering a question about the SDK, an operator, or an API, it searches a knowledge base that stays continuously in sync with the docs, so answers reflect the current release and cite the sources they came from.
This is powered by a Kapa knowledge base hosted by
Voxel51. To enable it, set the KAPA_API_KEY secret in your deployment.
Your customer success contact can provide the key.
export KAPA_API_KEY=...
The lookup is optional, and the Agent works without it. We strongly recommend enabling it: without the key, FiftyOne questions are answered from the model’s general knowledge, which is not tied to your version and drifts as the product evolves.
Note
No dataset content is sent to the knowledge base. Only the search query the Agent formulates is transmitted.
Using the agent#
Once a provider is configured, you can start a conversation with the Agent. Type any task in plain language and the Agent will execute it against your dataset.
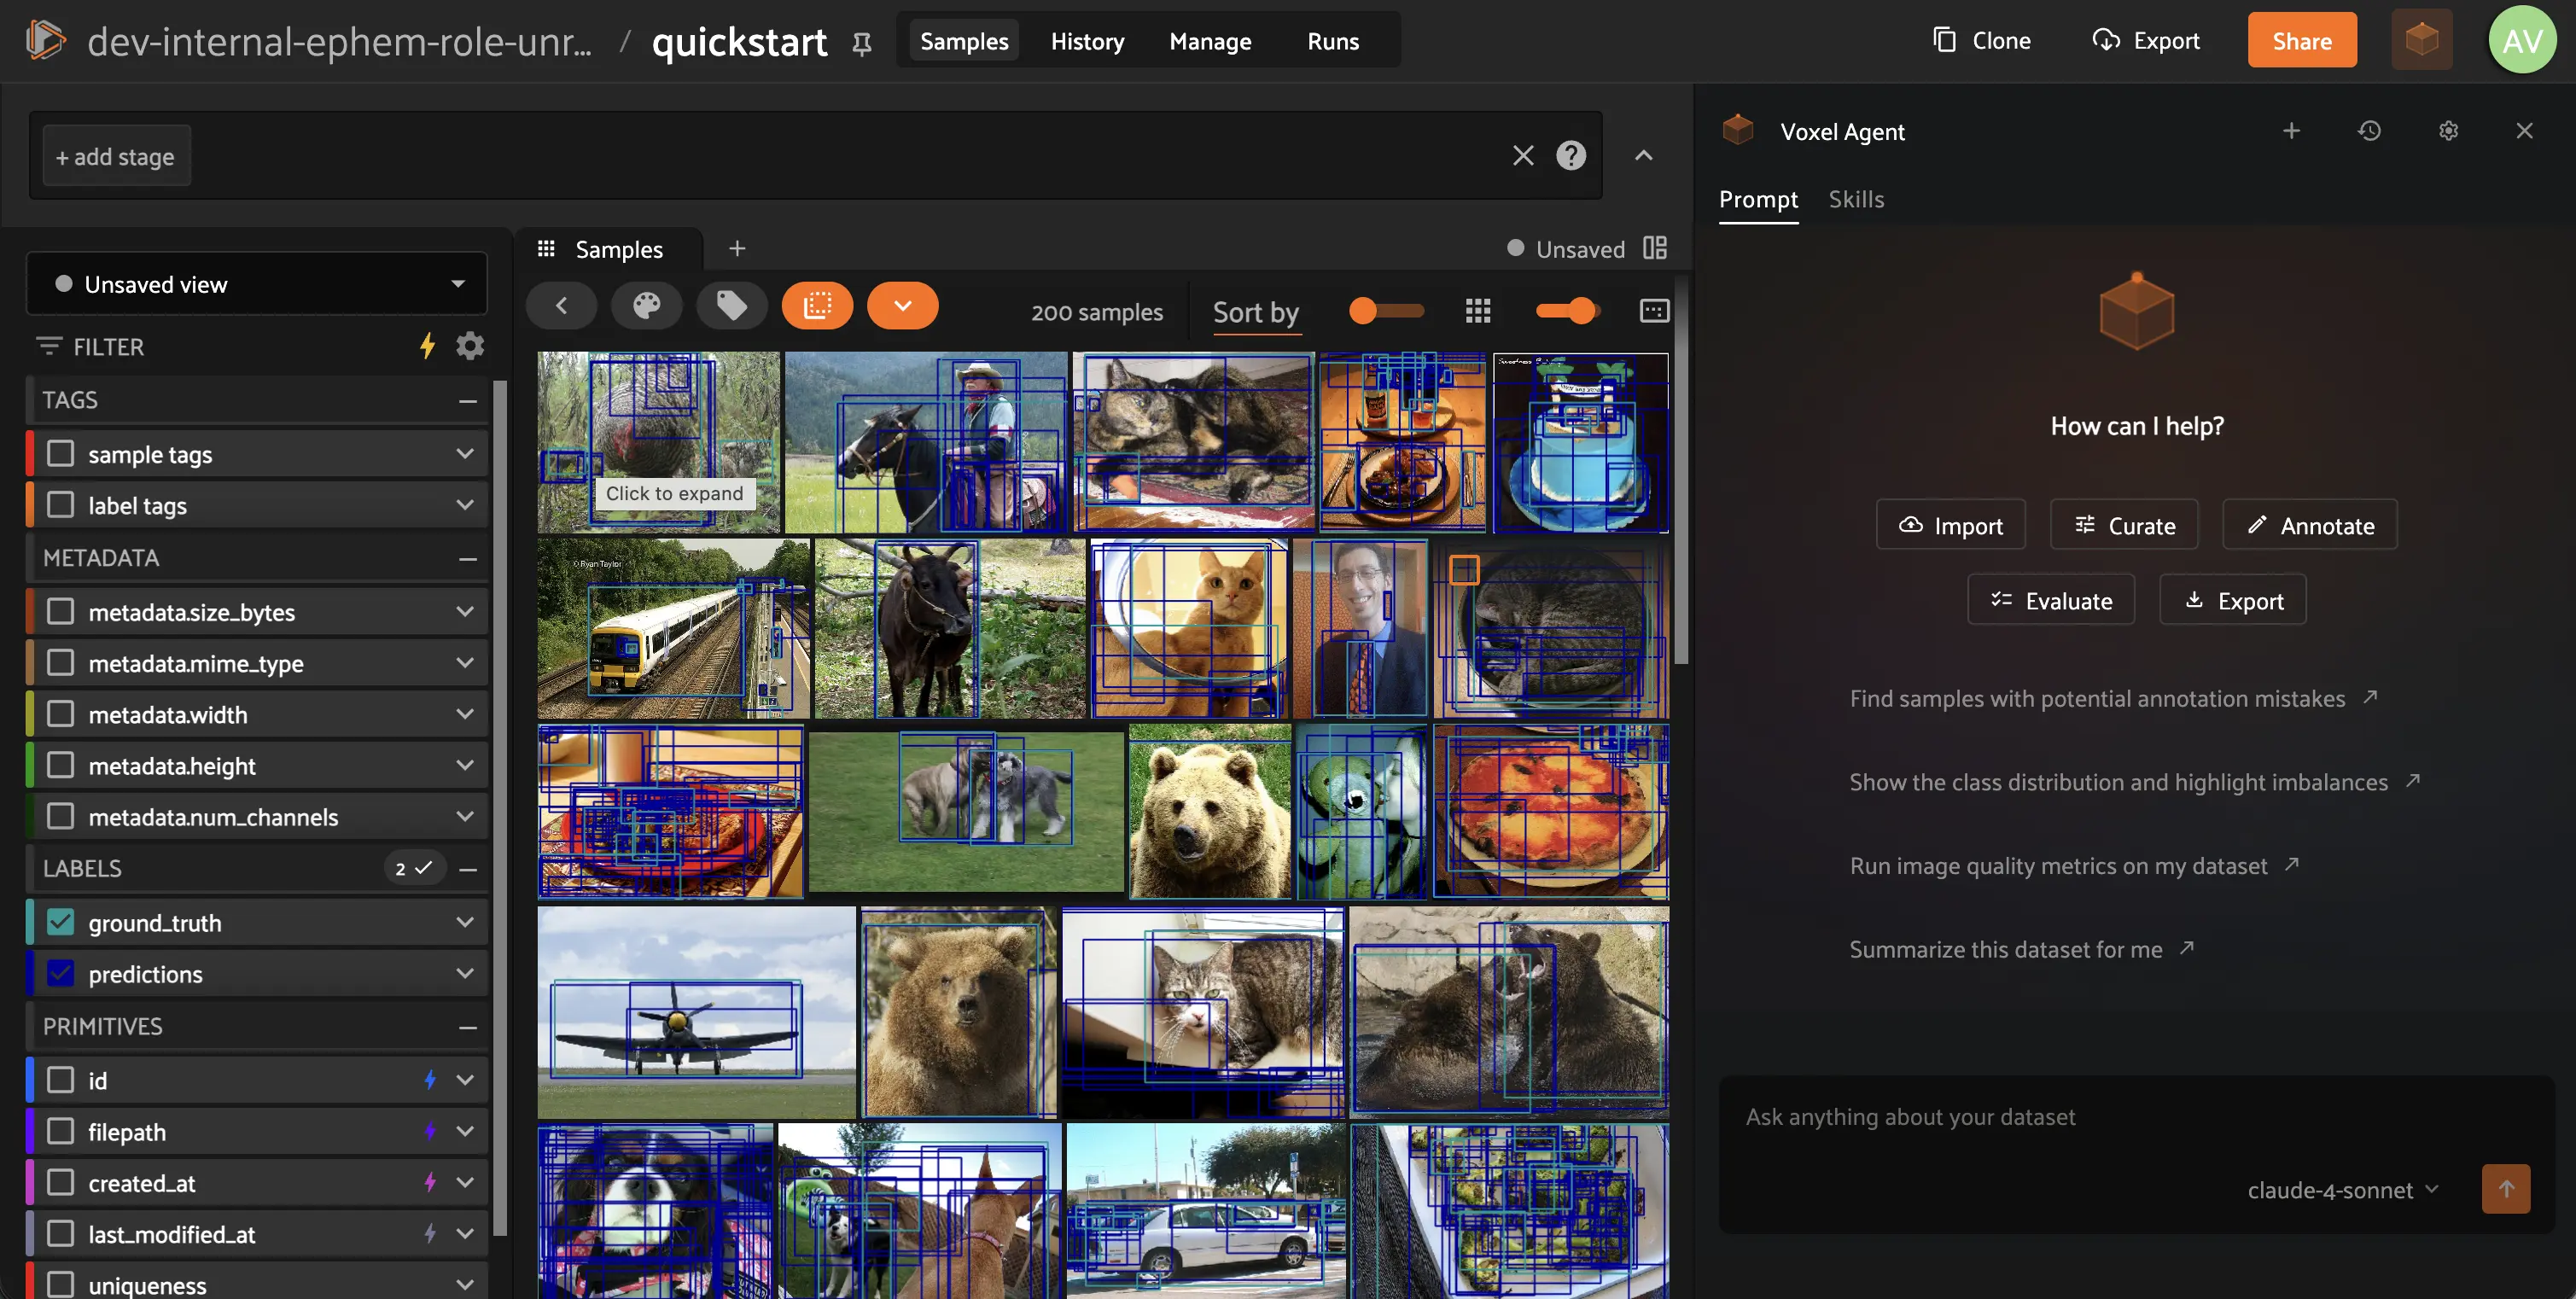
Some examples of what you can ask:
“Find and remove duplicate images from this dataset”
“Run object detection and show me low-confidence predictions”
“Export this dataset to COCO format”
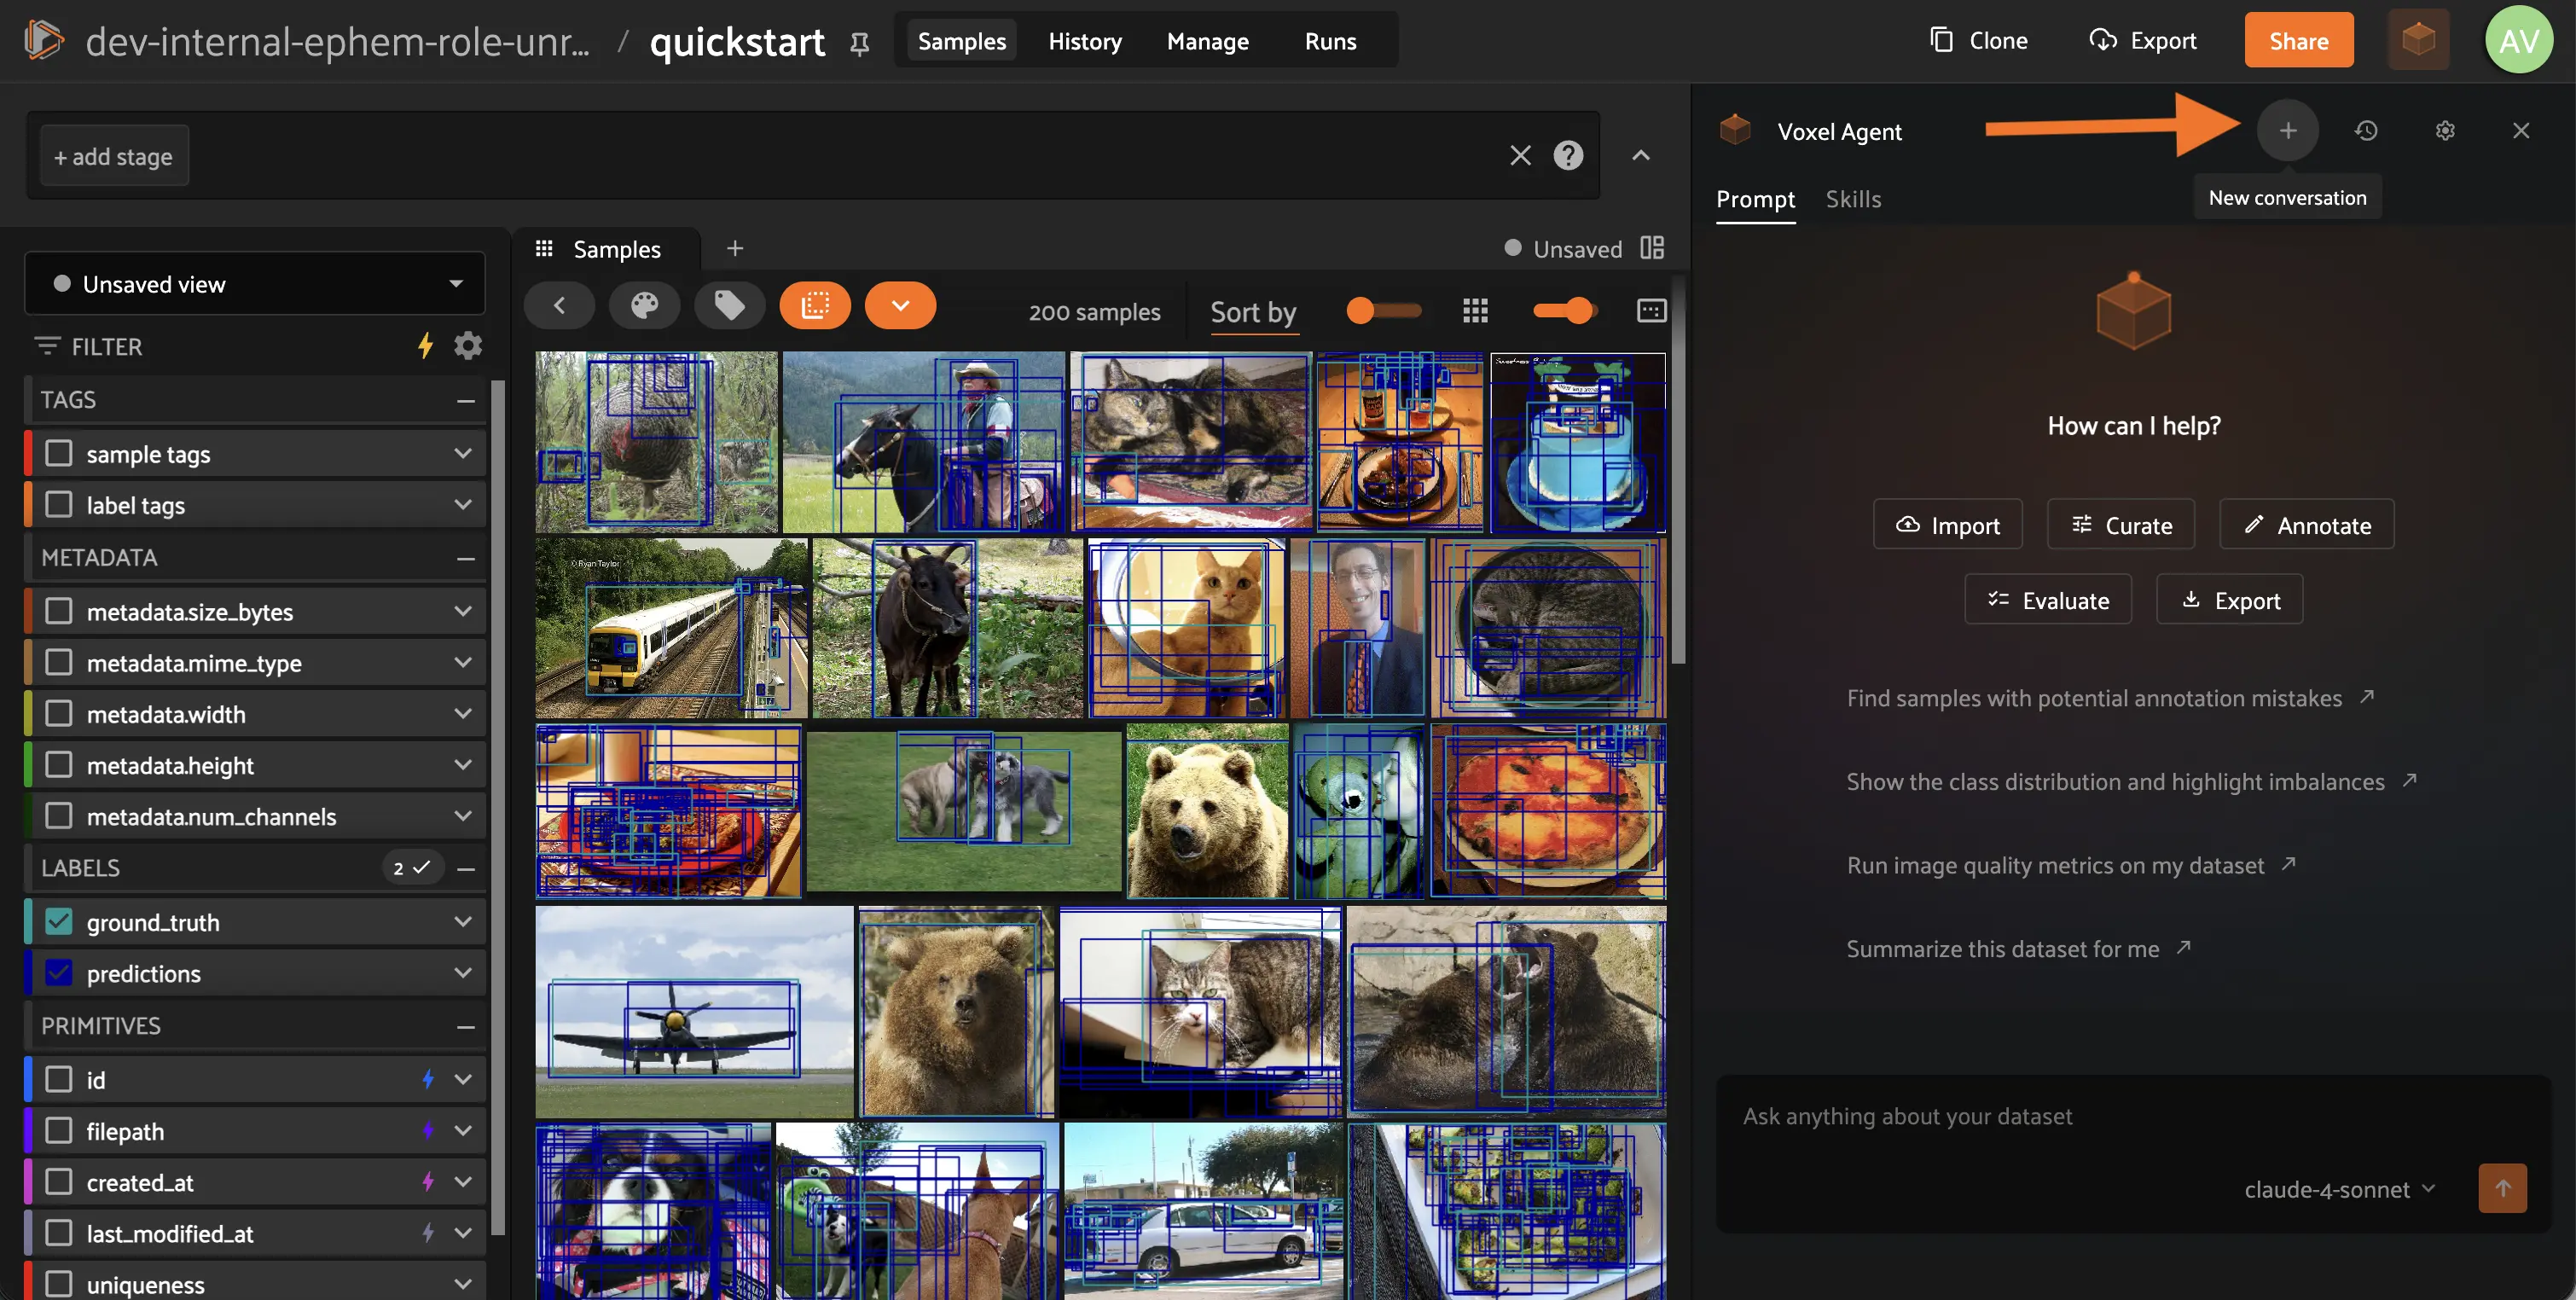
To start a new conversation, click the + button.
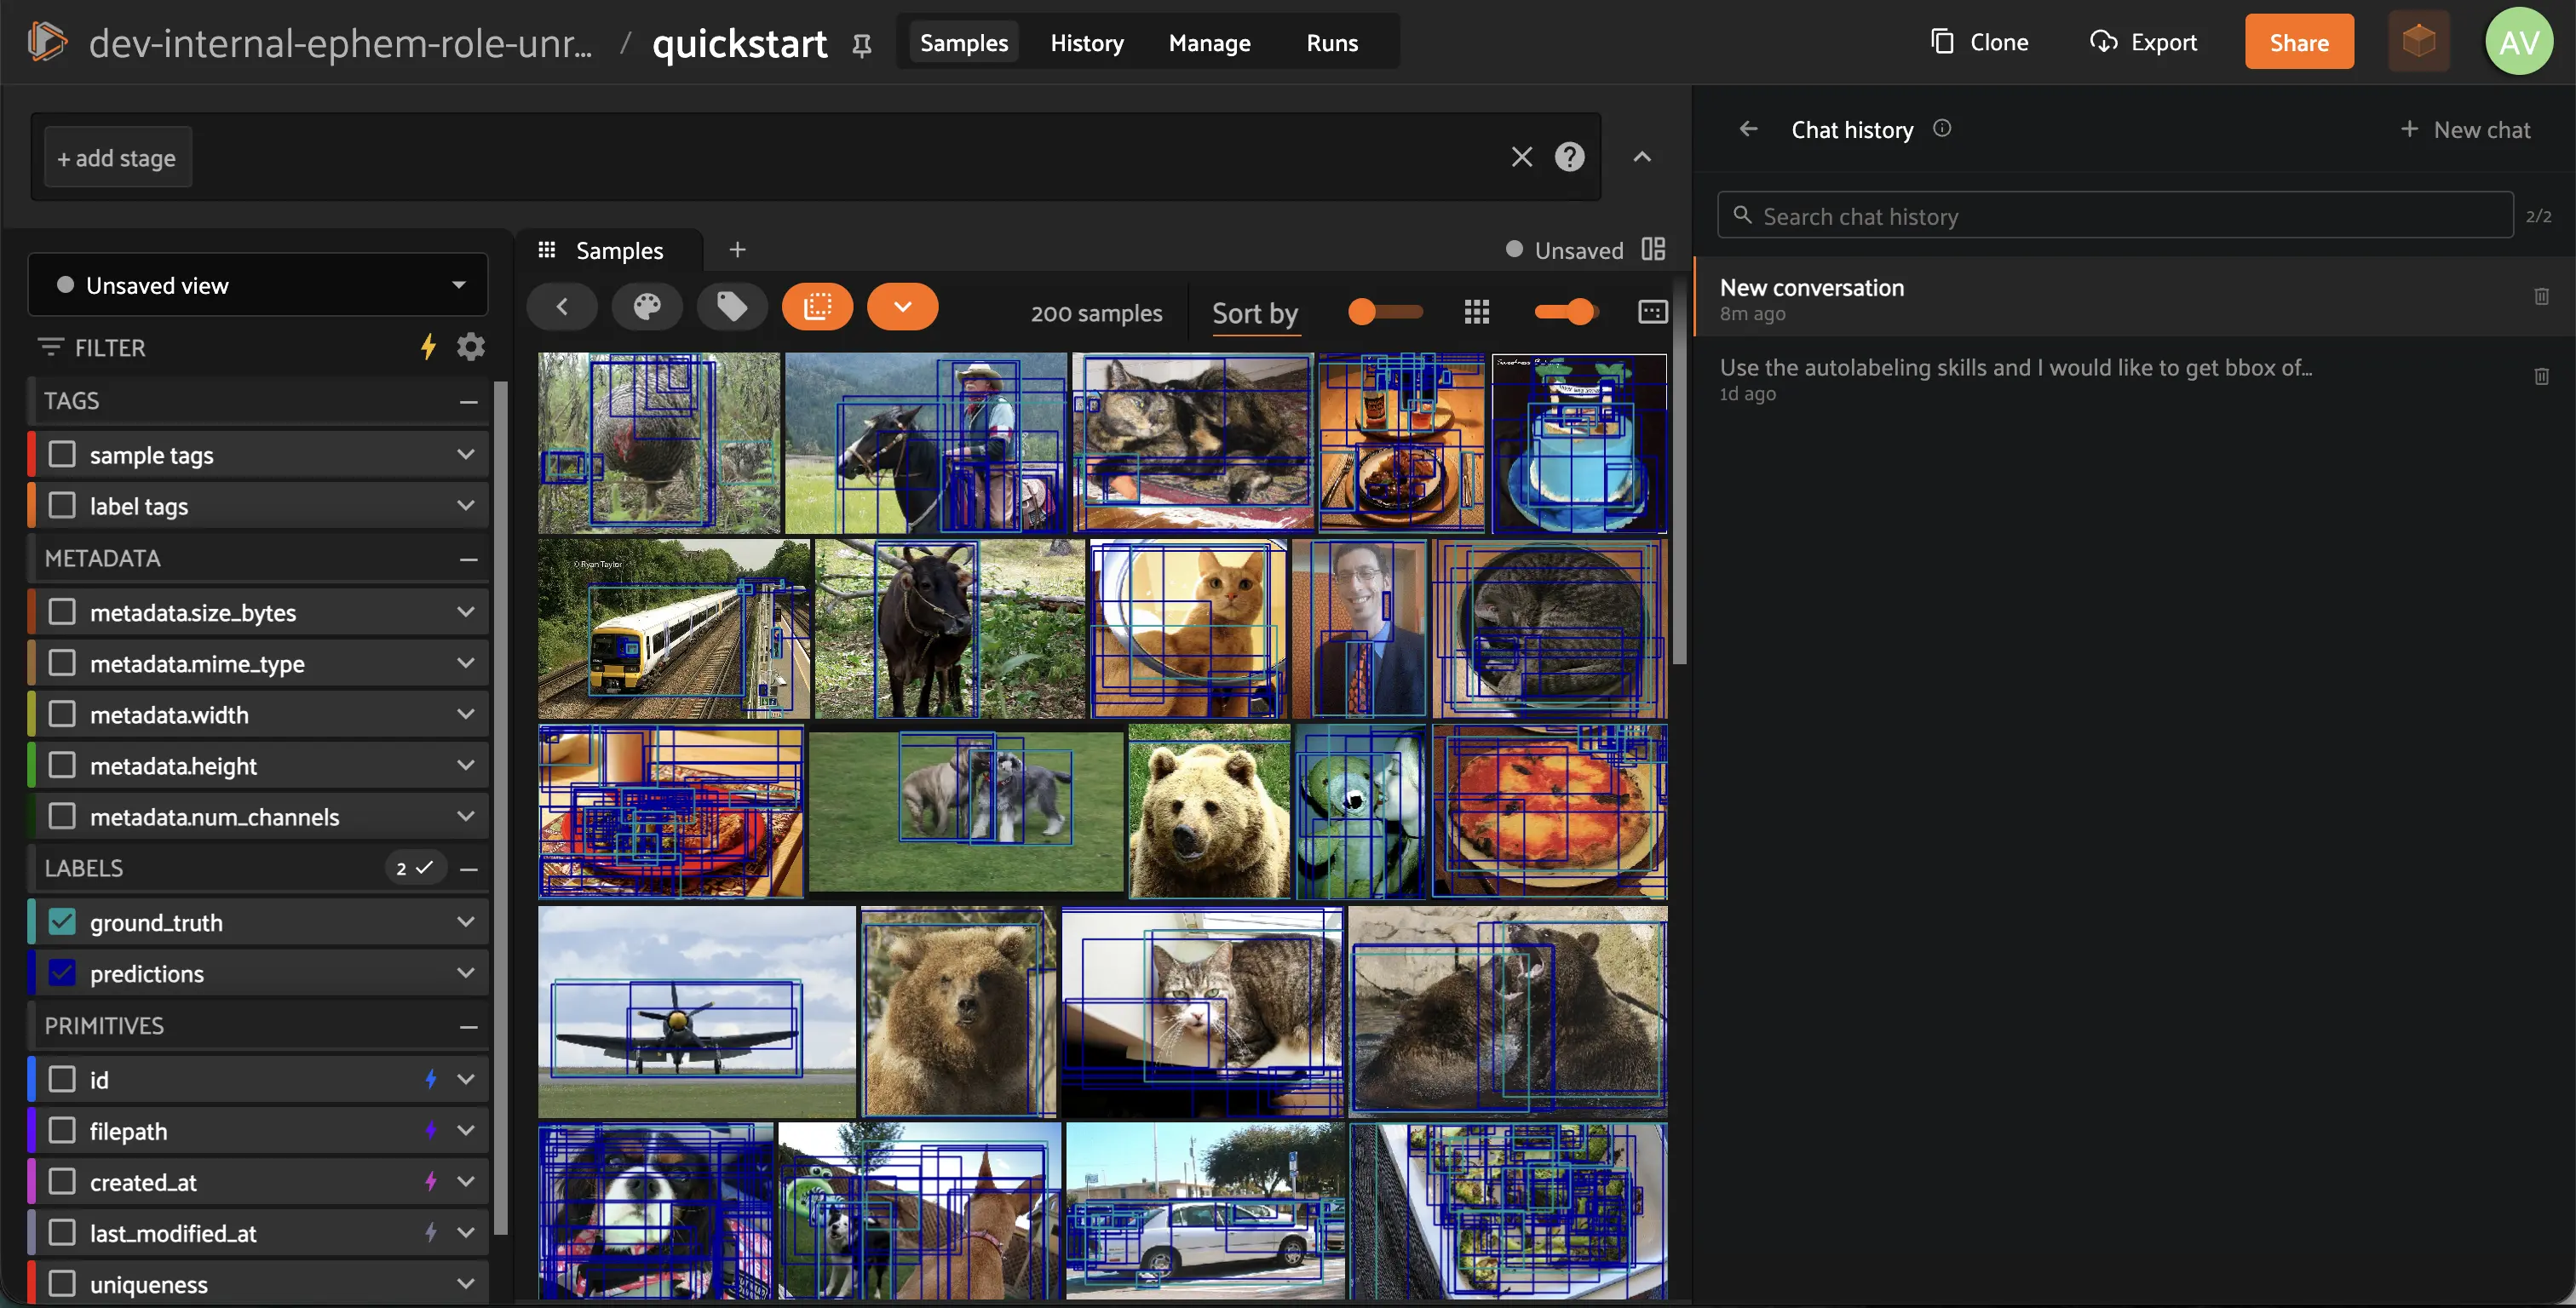
To return to a previous conversation, click History.
Asking about the current App state#
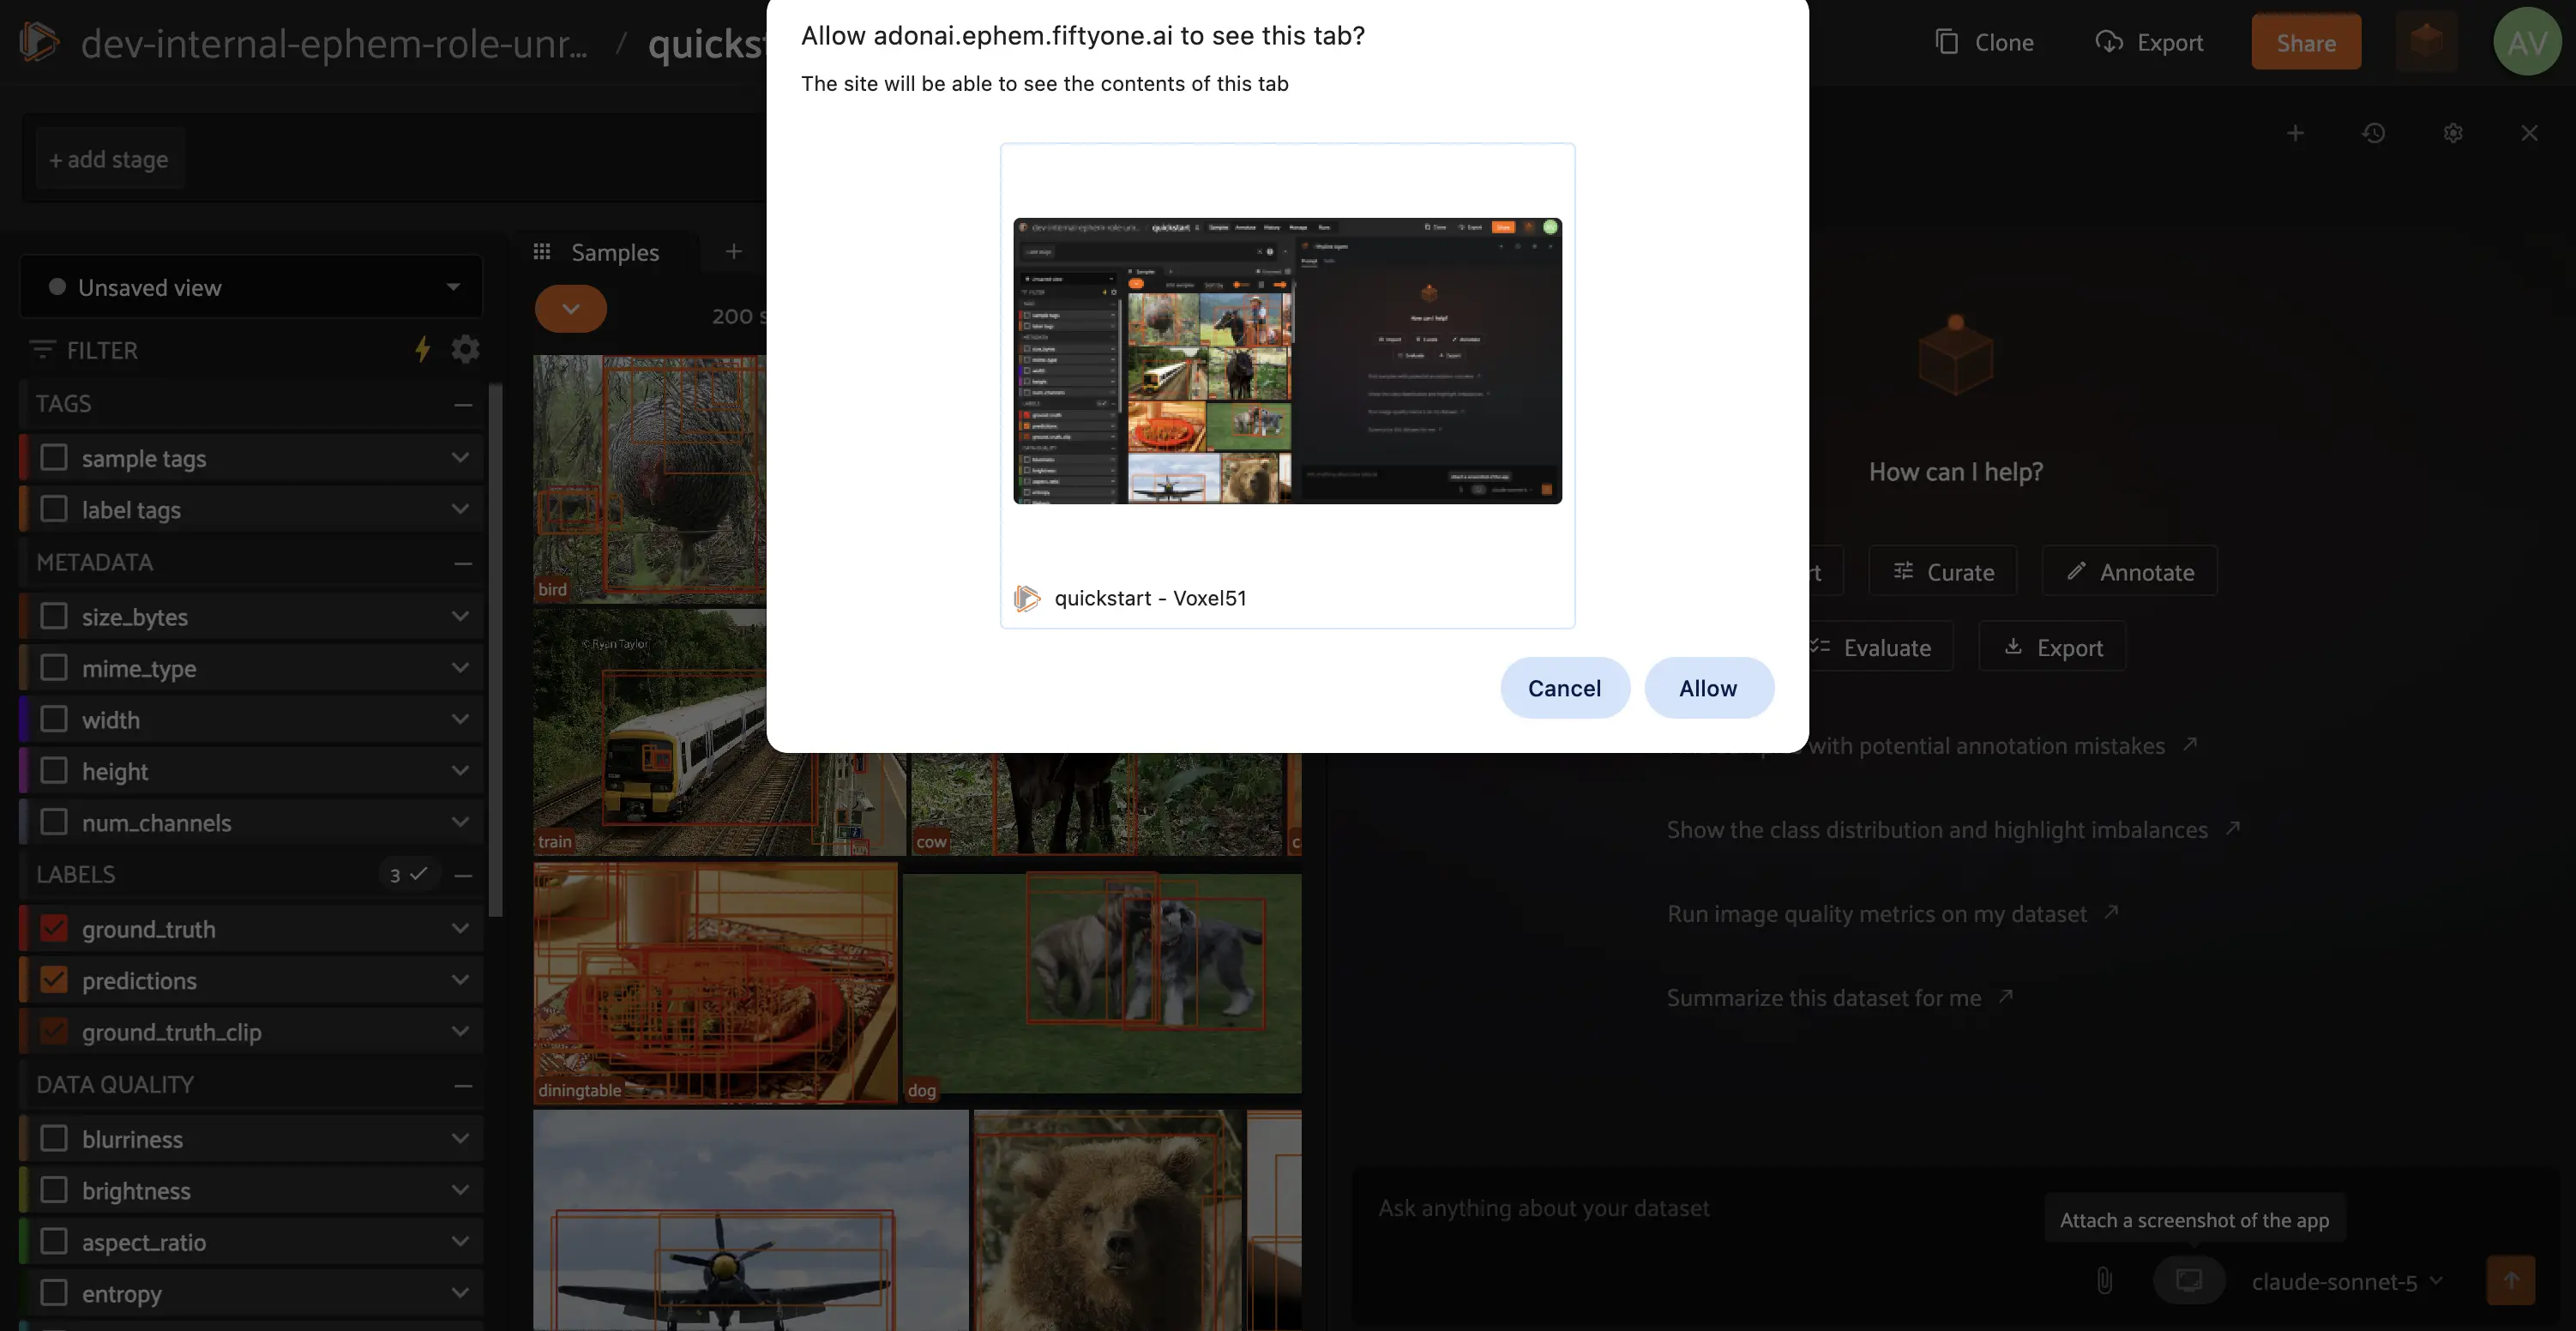
Click the screenshot icon next to the attach icon in the message box to capture what’s currently on screen and attach it to your next message.
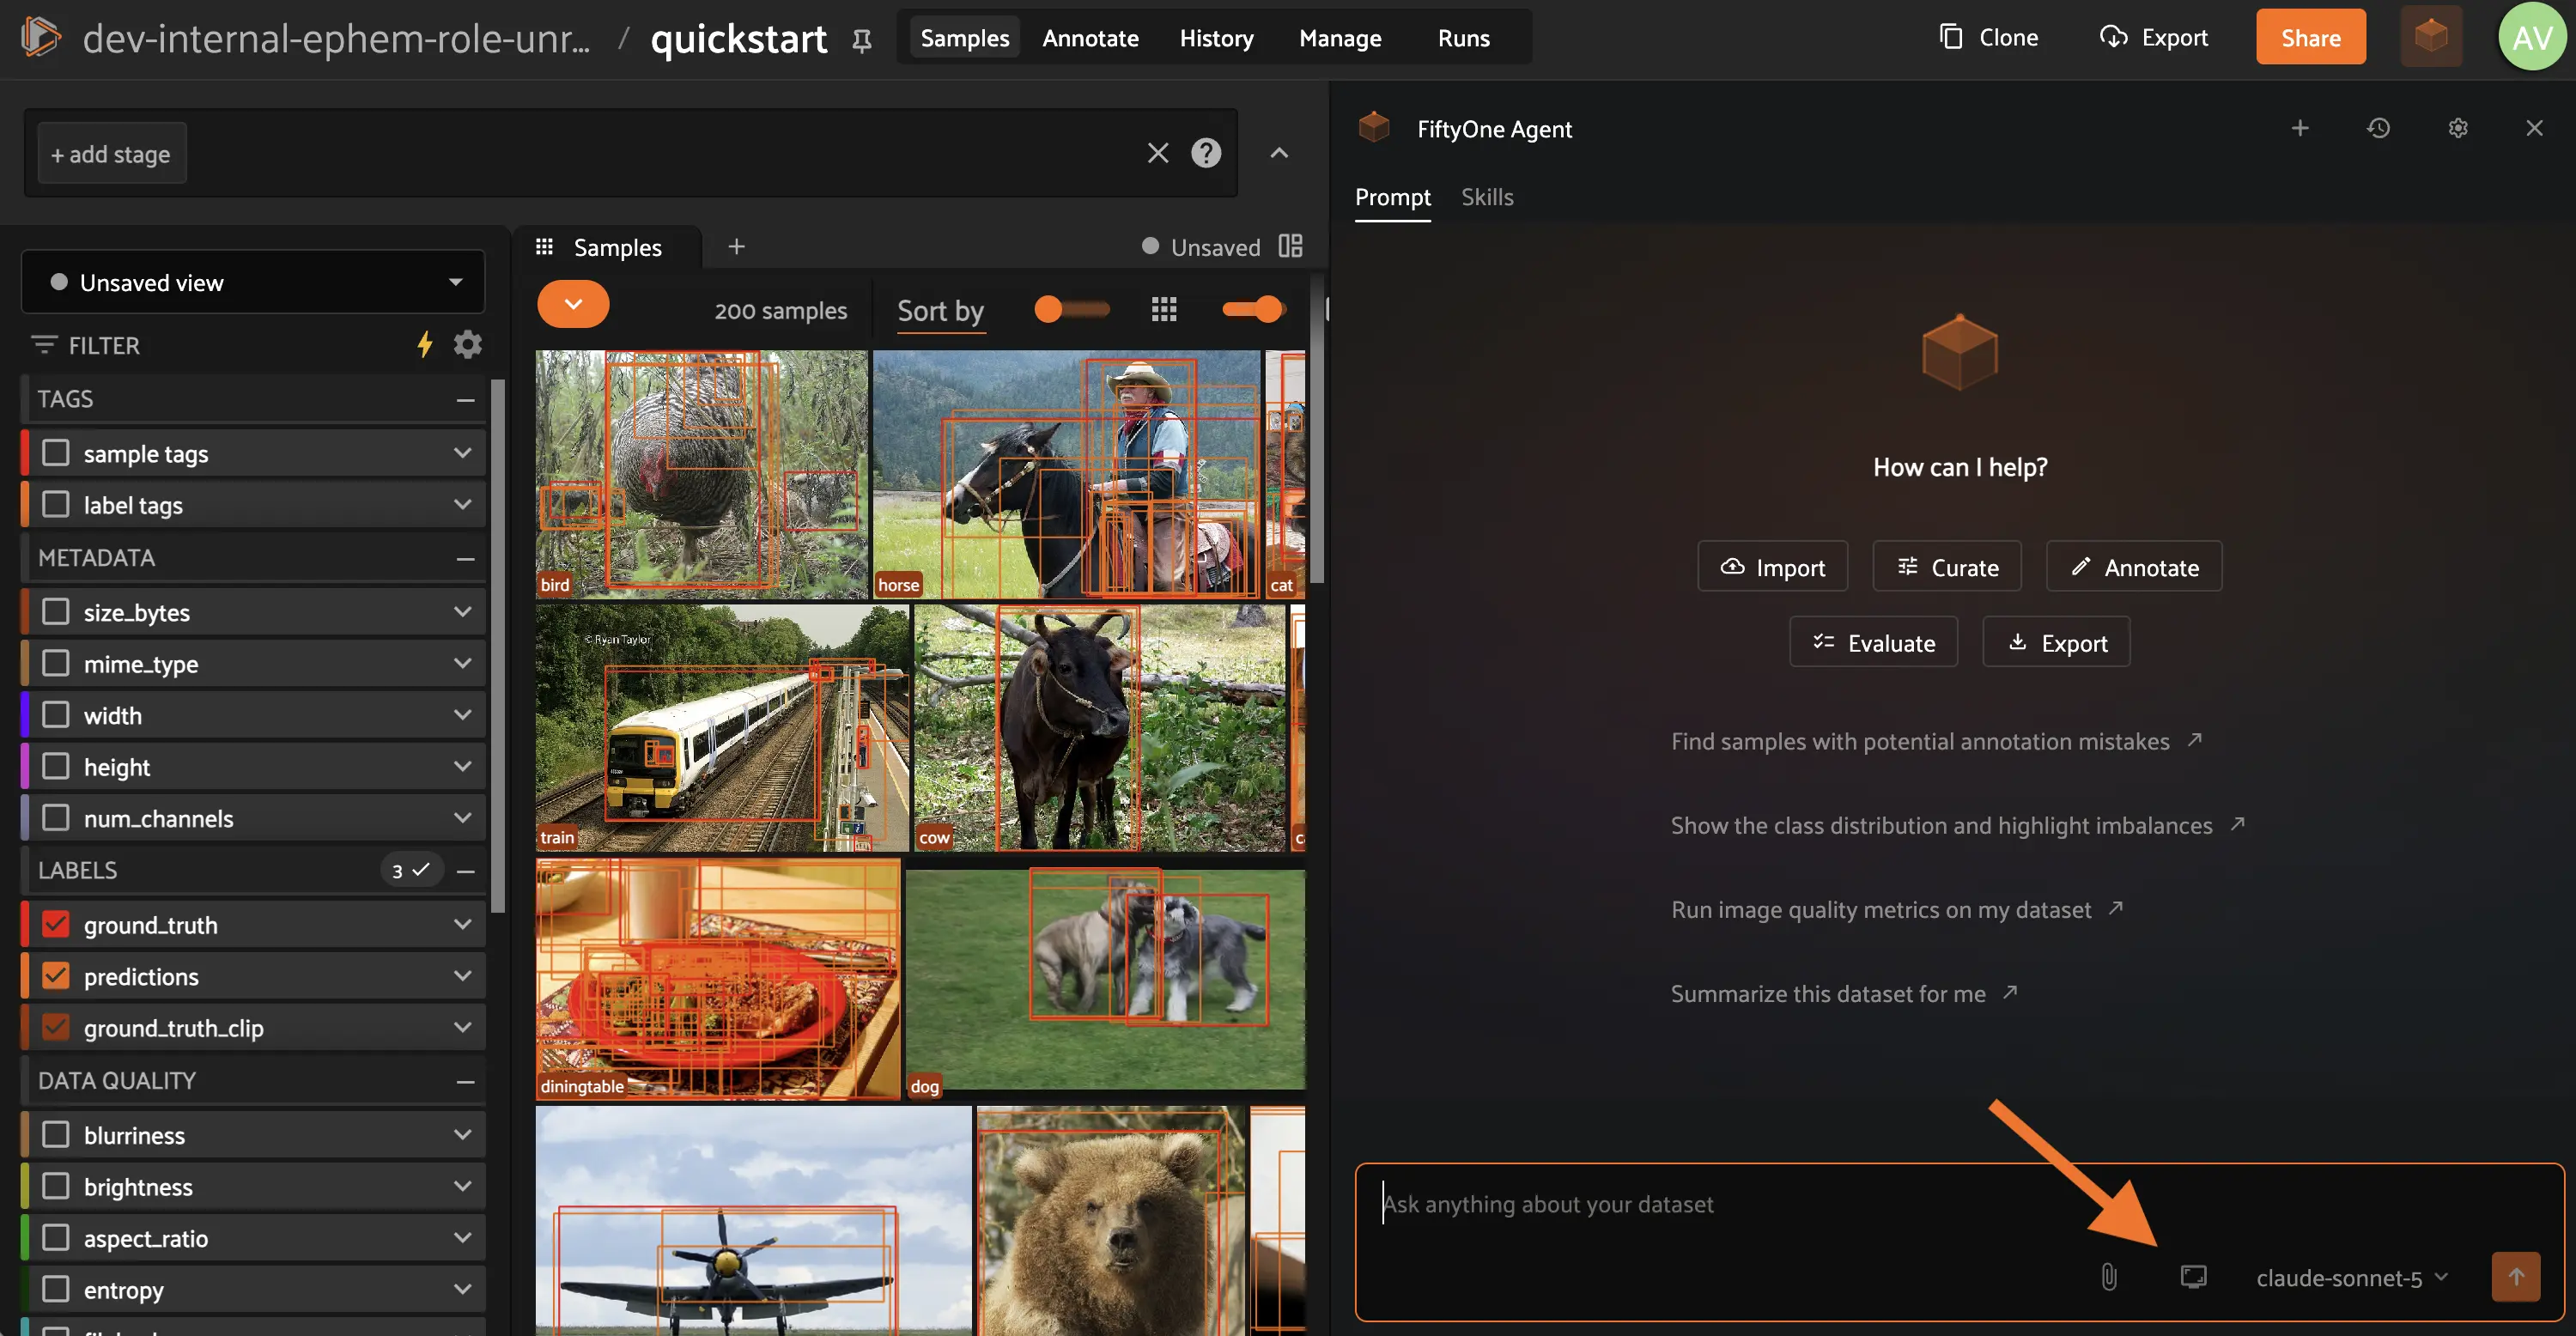
This lets you ask the Agent about exactly what you’re looking at, such as a specific sample, a plot, or a 3D scene, without describing it in words. Your browser will prompt you to choose what to share before the screenshot is attached.
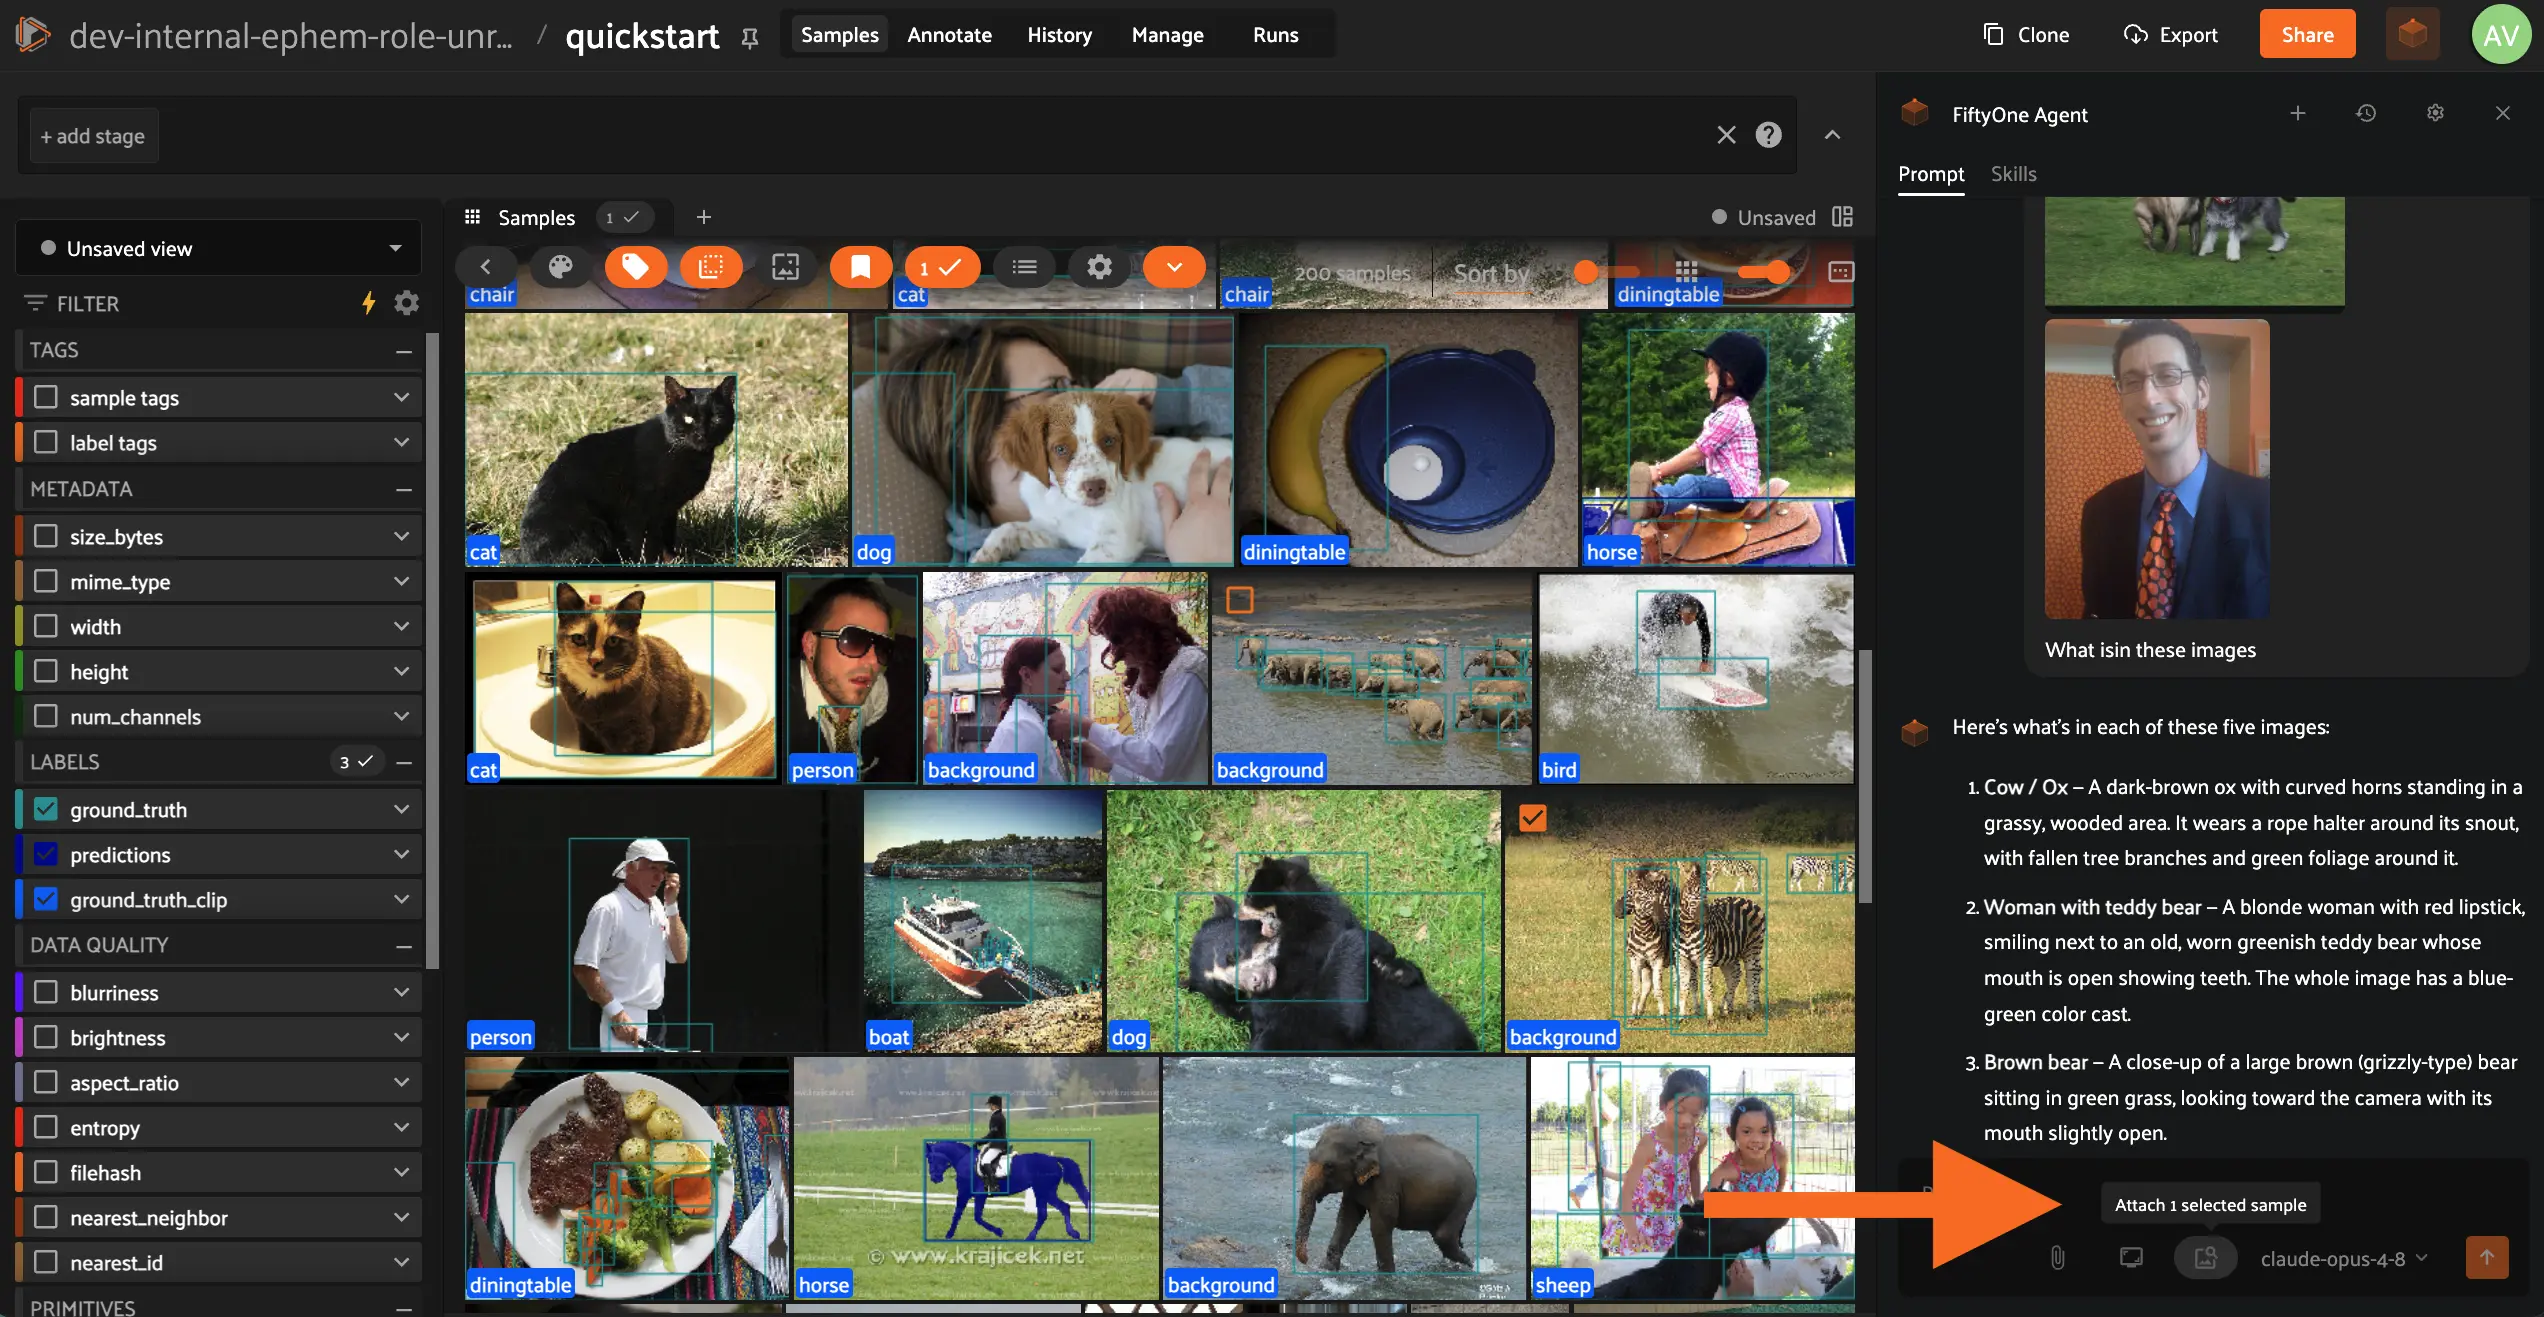
If you select one or more samples in the grid first, an additional icon lets you attach their images directly, so you can ask the Agent about specific samples without describing or searching for them in words. Up to 20 samples can be attached at once; if more are selected, only the first 20 are attached.
Returning to a previous view#
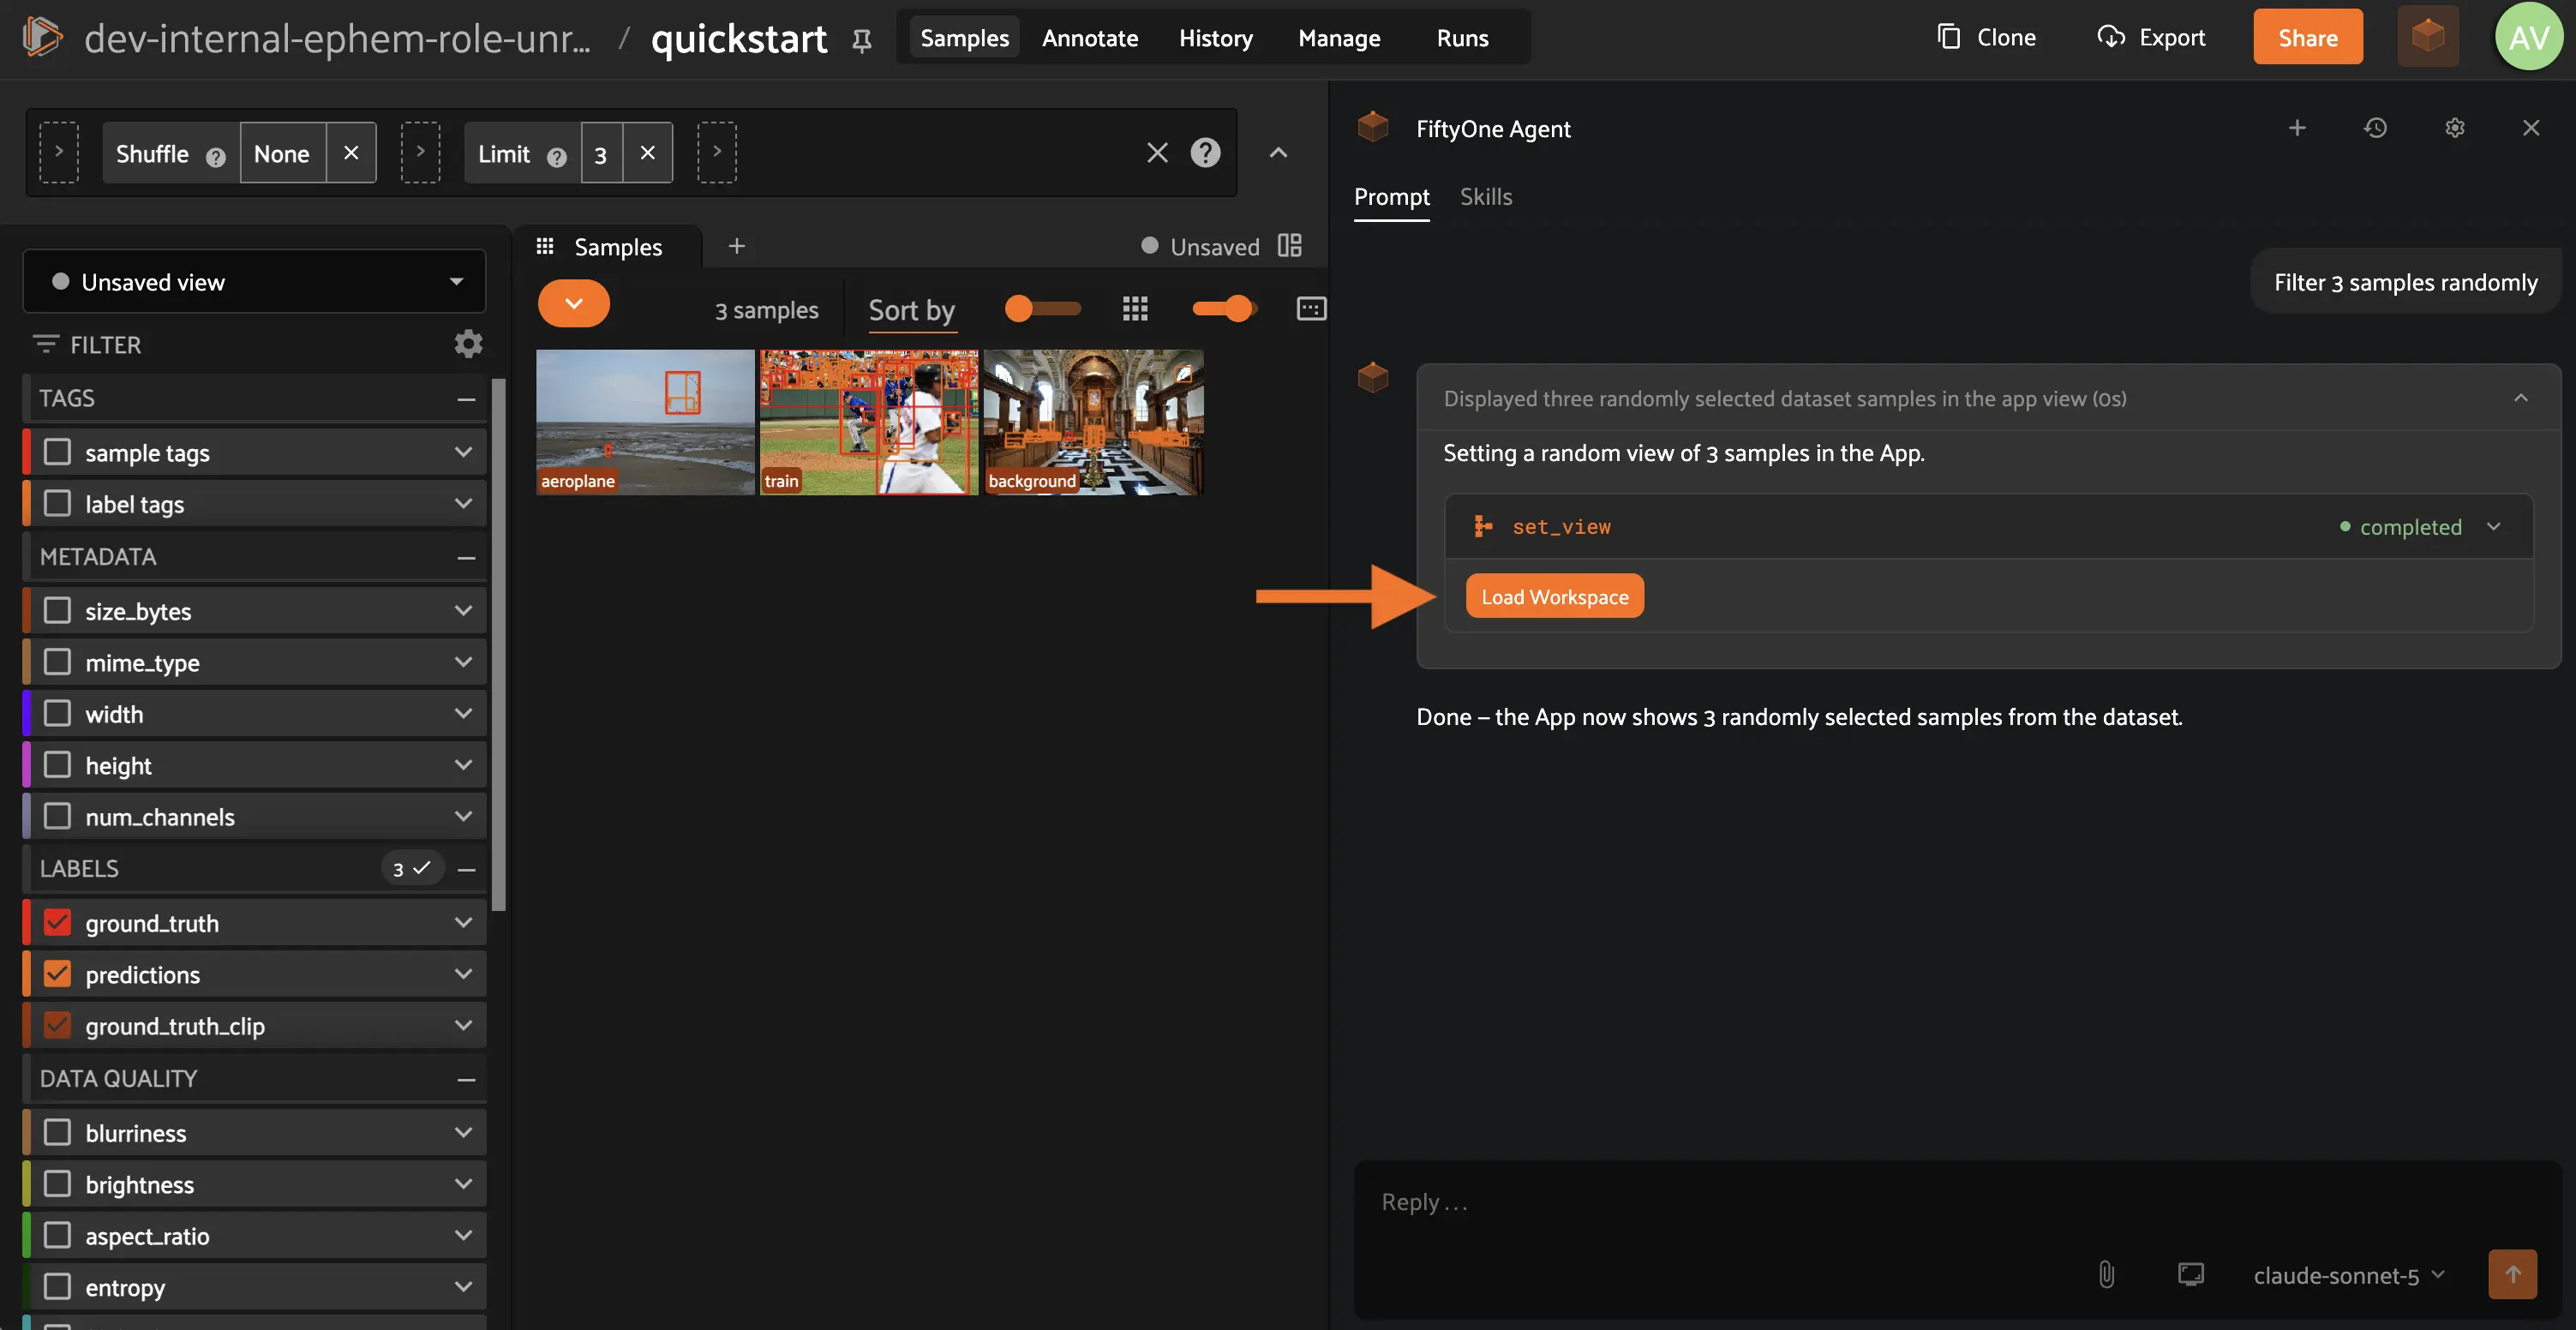
Whenever the Agent changes what you’re looking at, such as applying a filter, loading a view, or running an operator, that step gets a Load Workspace button. Click it any time, even after navigating away, to instantly restore the App to that exact state.
Tracking delegated operations#
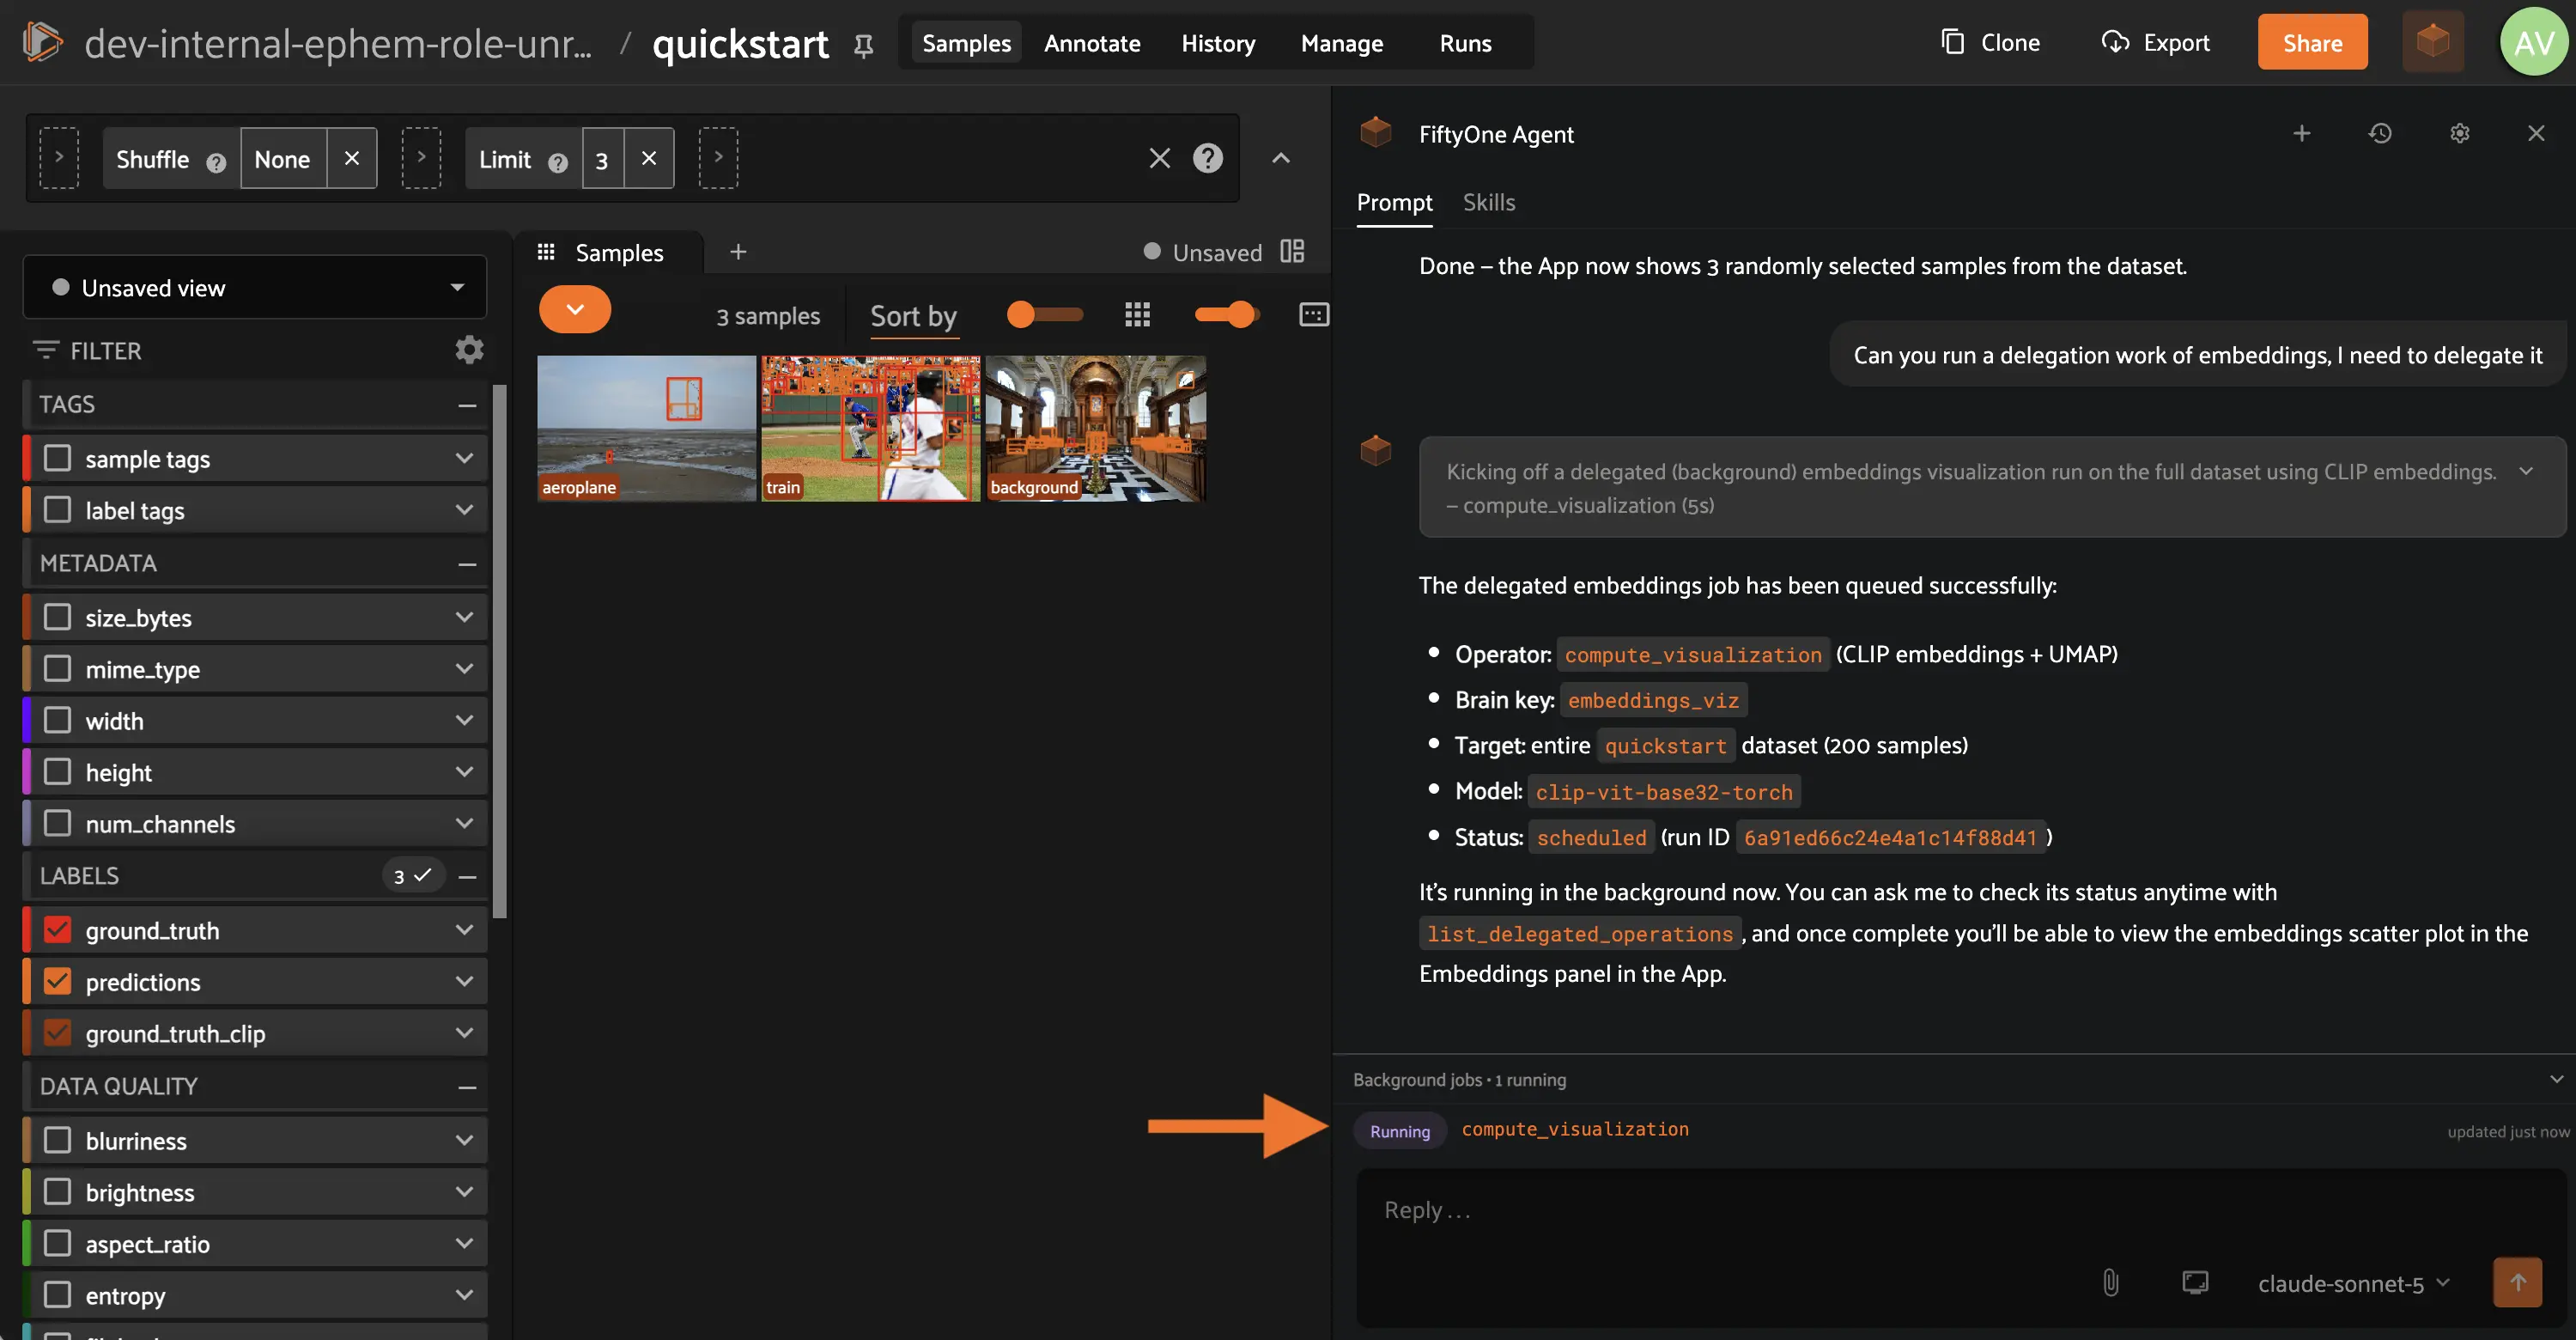
When the Agent runs a long-running task as a delegated operation, it appears in a tray showing how many are queued, running, completed, and failed, so you can keep chatting while it runs in the background.
Click a job in the tray to see its own progress and details.
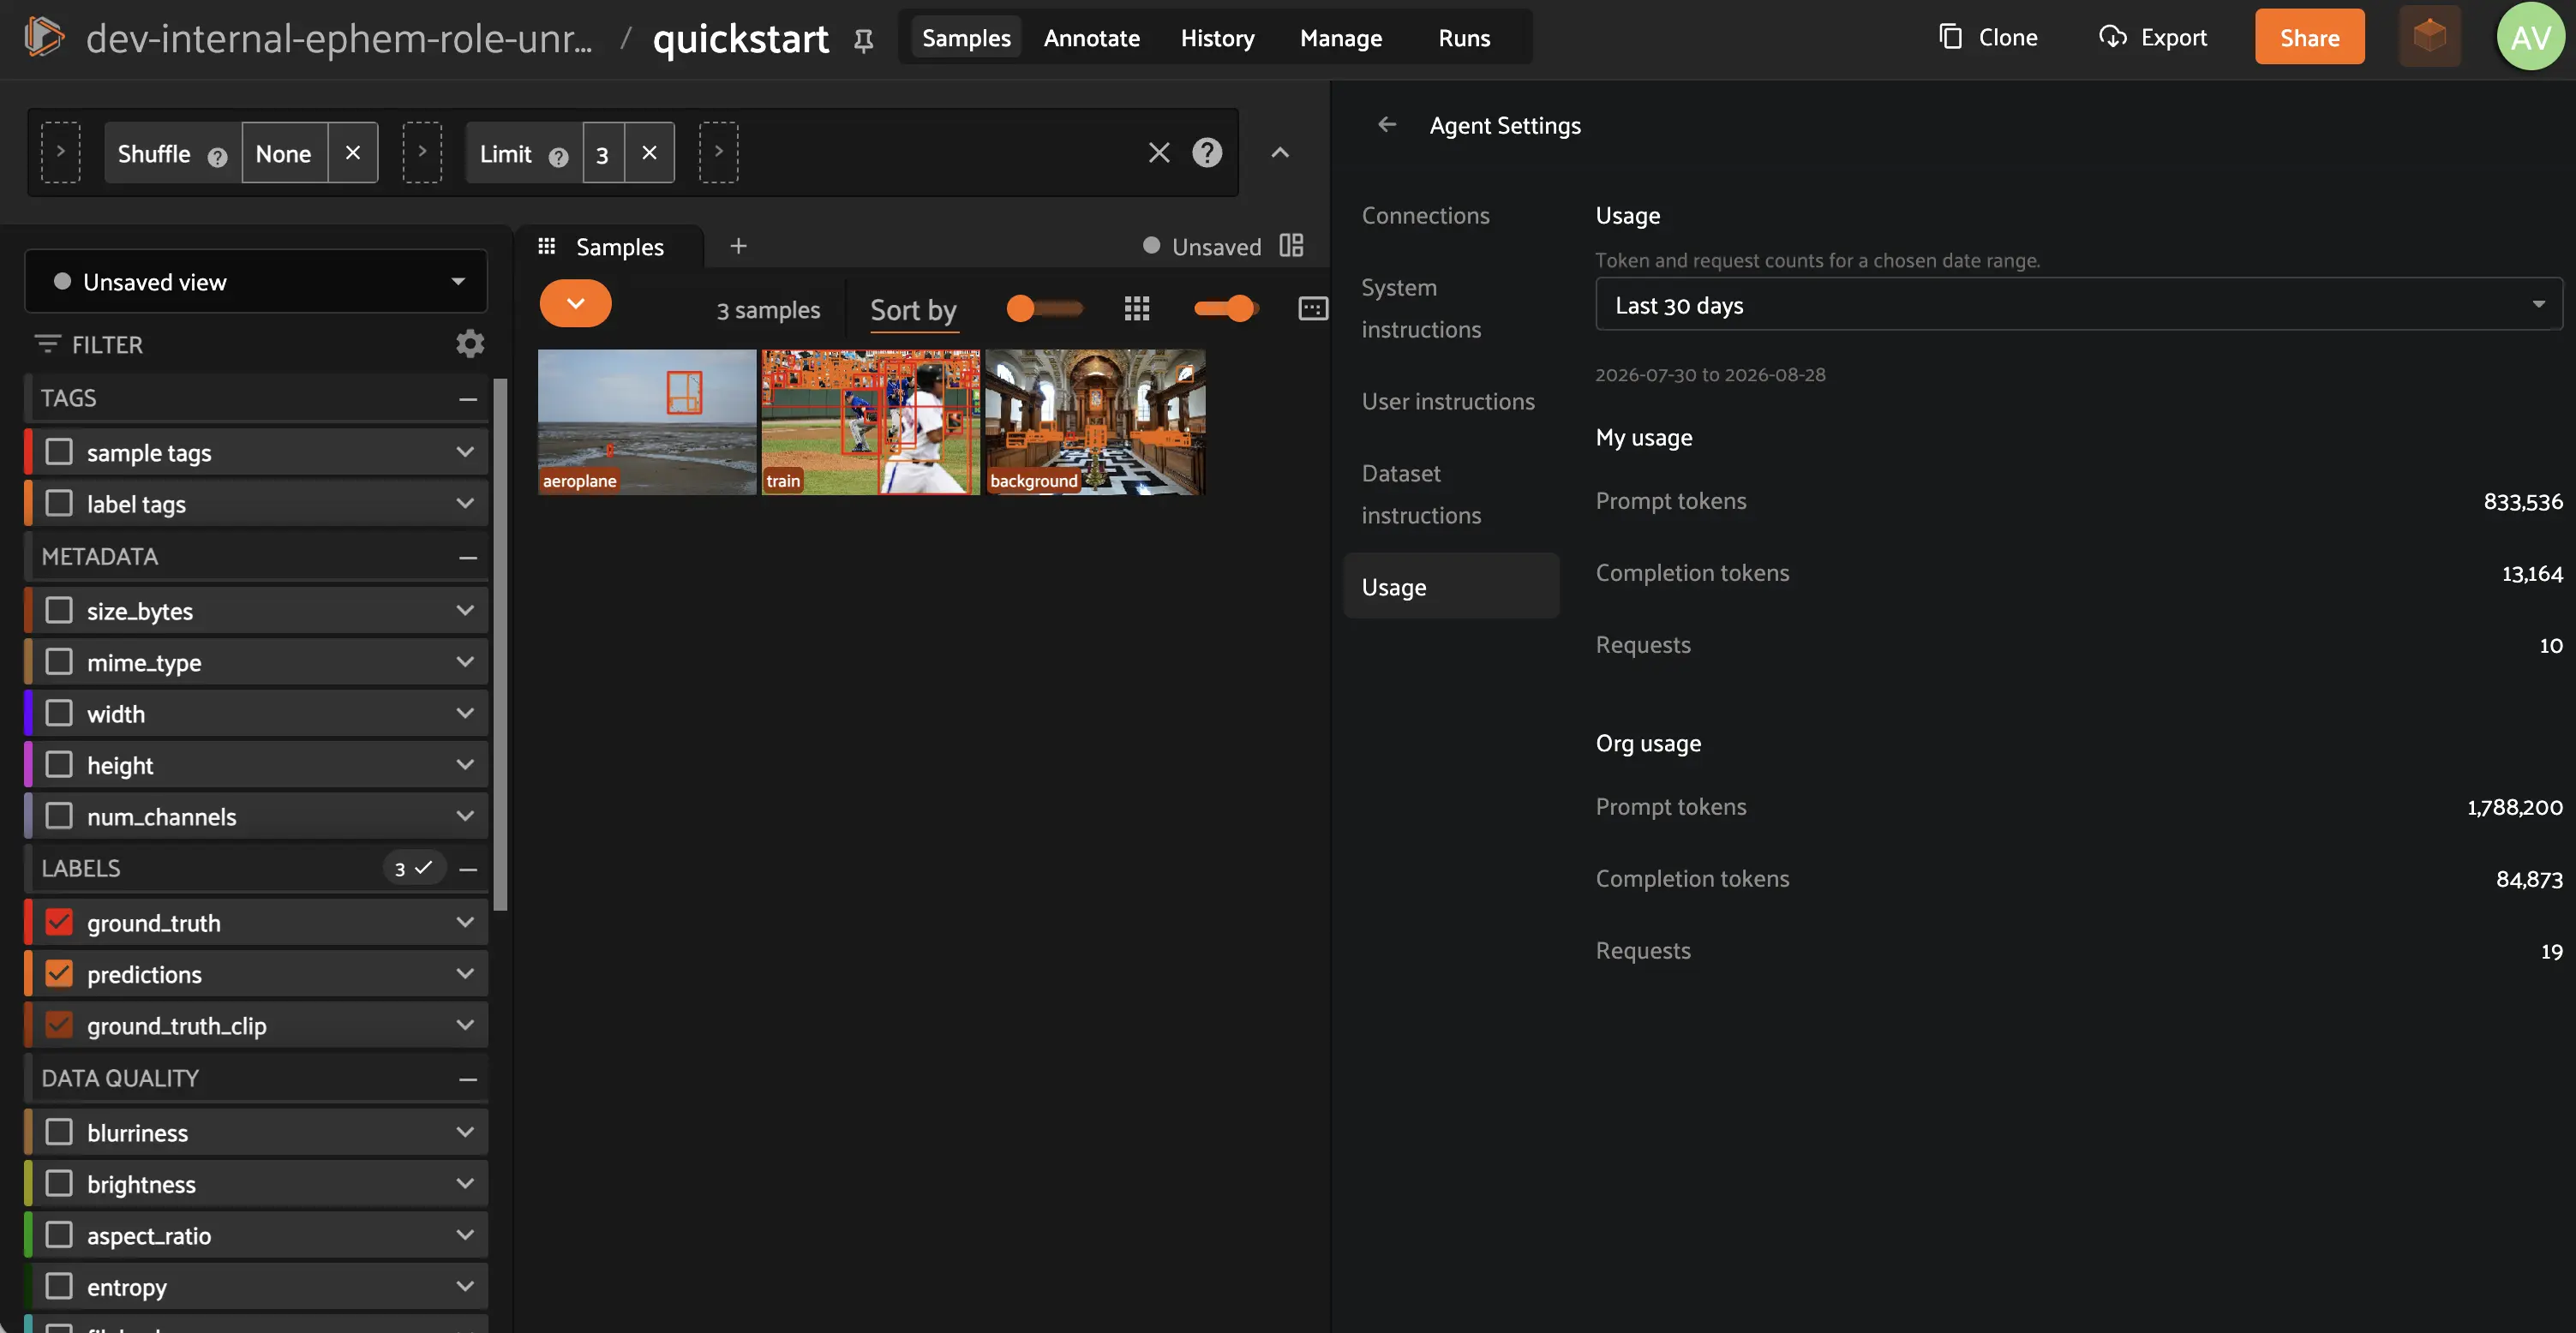
Usage#
The Agent’s settings panel includes a Usage tab showing your own token and request counts for the current period. Admins additionally see usage totals for the entire organization.
Skills#
The Agent ships with a set of built-in skills that cover the most common computer vision workflows. Skills are structured instructions that tell the agent exactly how to perform a task, step by step.
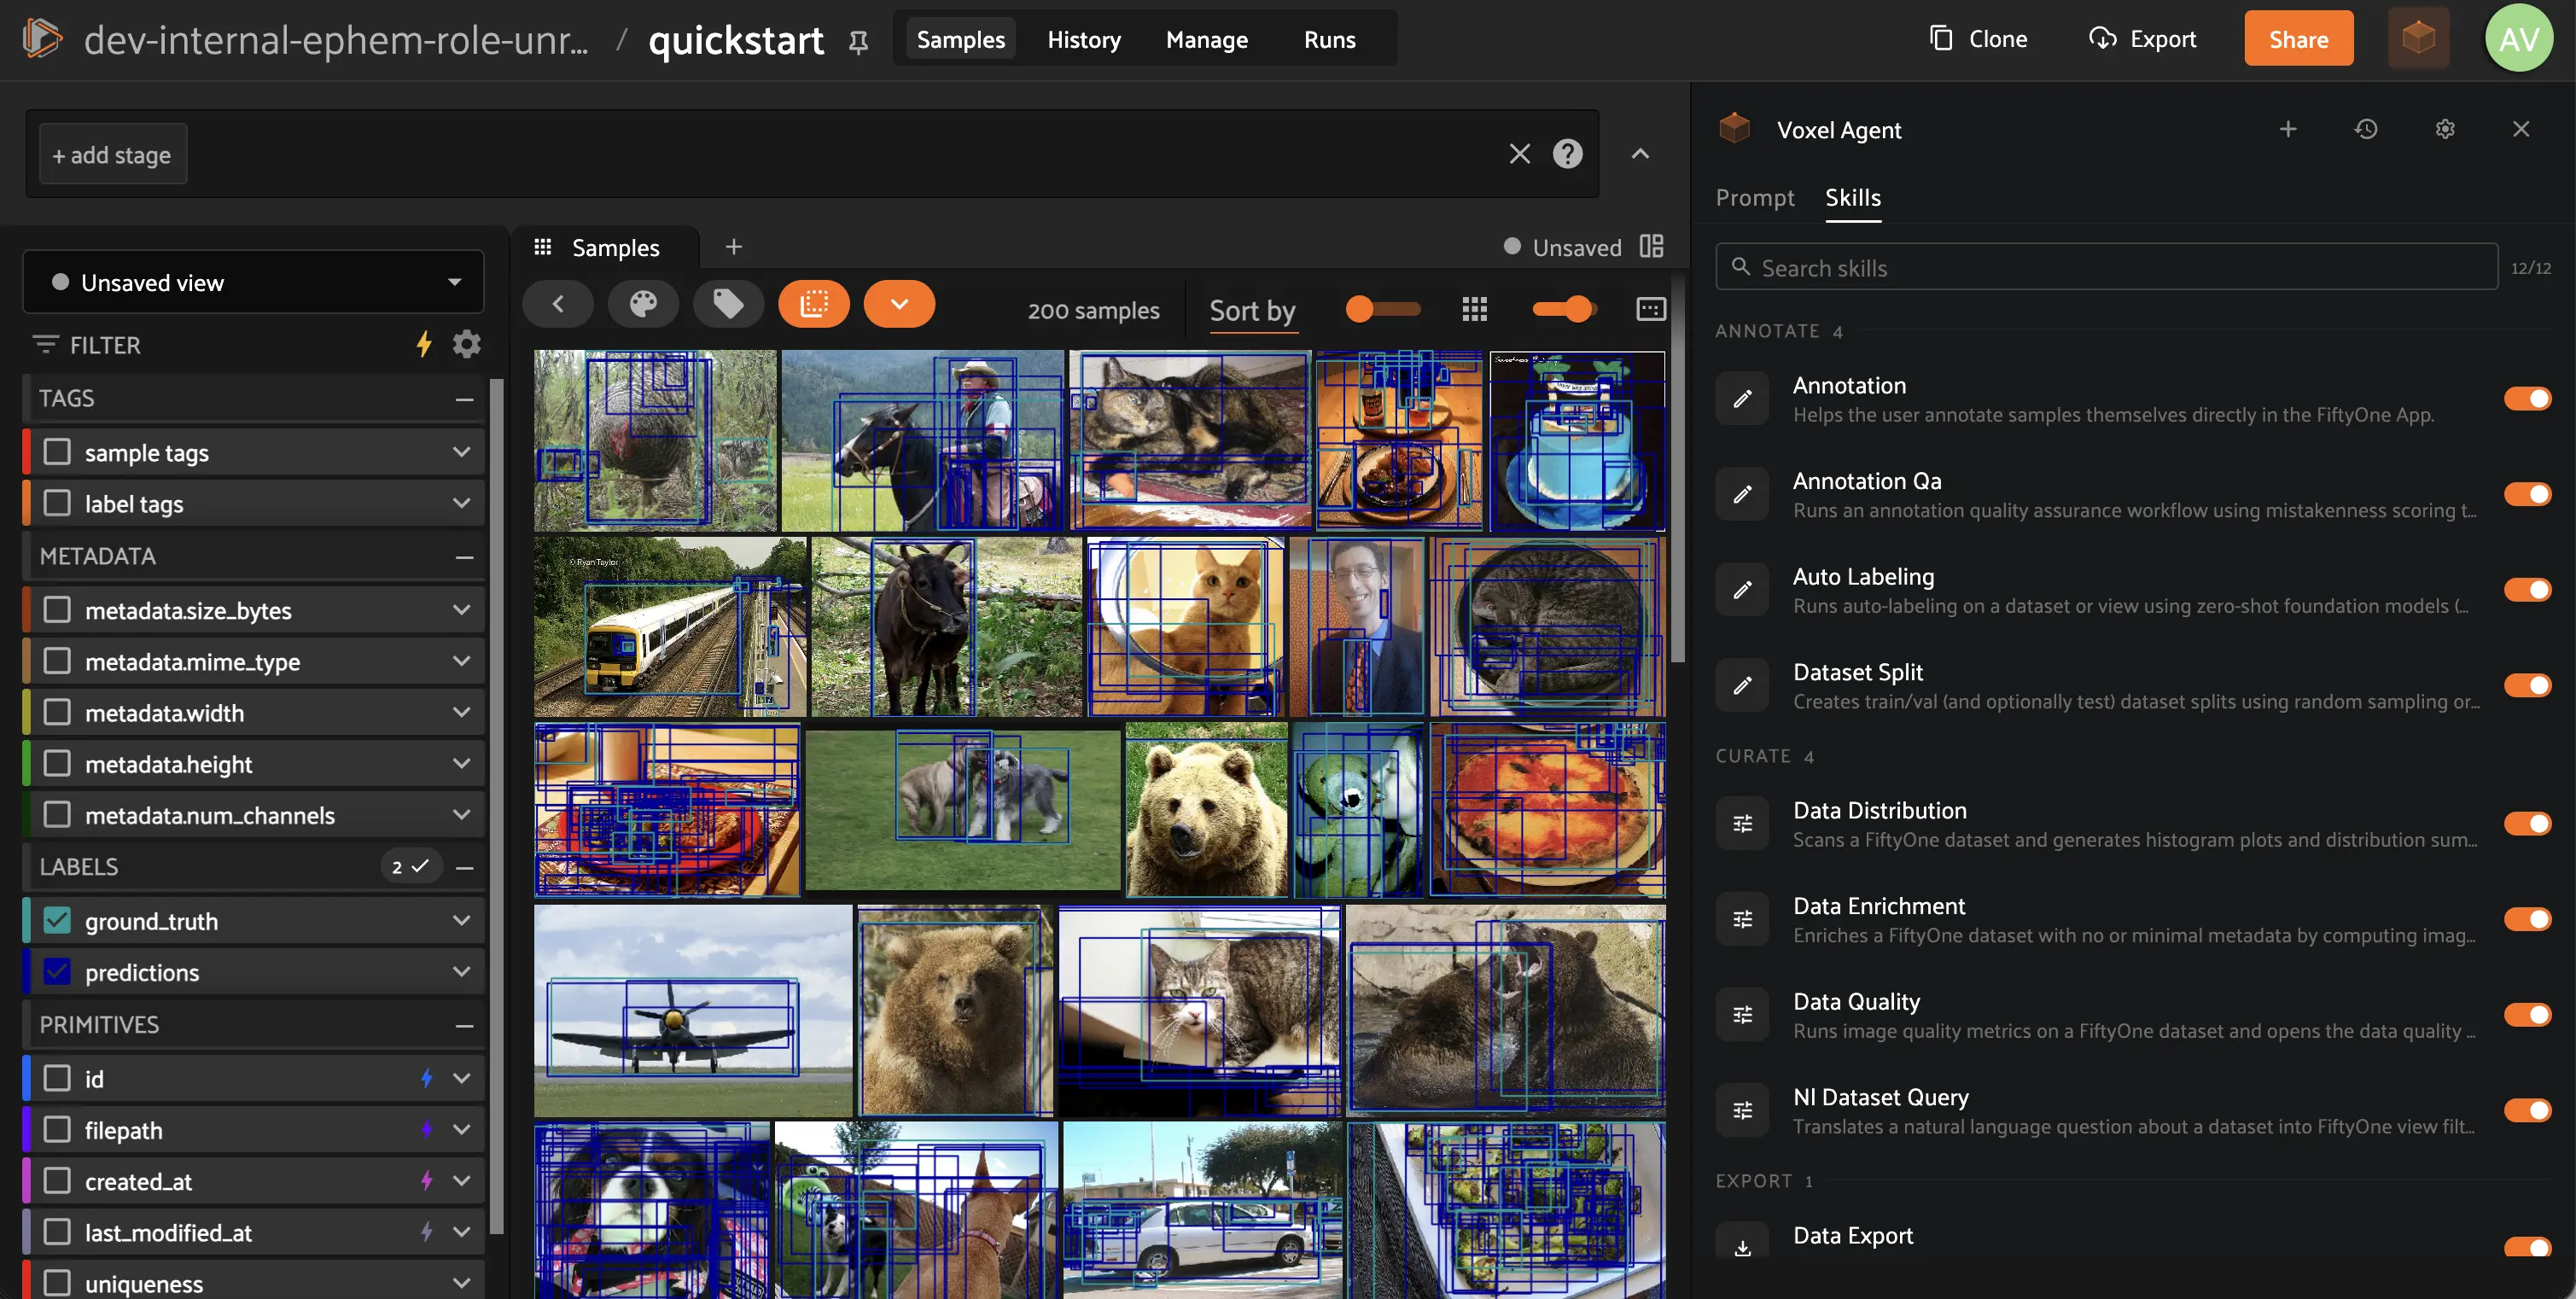
Open any skill to read its full definition: the description that tells the Agent when to use it, and the step-by-step instructions it follows. Built-in skills are read-only, so you can always see exactly what the Agent was told to do.
Use the toggle on each skill to control which ones the Agent may use. Turning a skill off removes it from the Agent’s options without deleting anything.
Creating and editing skills#
Admins can extend the Agent with their own skills, directly from the settings panel. No plugin packaging or deployment step is required.

Click Create skill to write a new one. Every skill needs three things:
Name: lowercase and dash-separated, e.g.
triage-blurry-imagesDescription: when the Agent should reach for this skill. This is the only thing the Agent sees when choosing between skills, so write it as when to use this, not what this is
Instructions: the workflow itself, in Markdown, covering what to check first, which operators to call, and the steps to follow
To adapt a built-in skill, open it and click Duplicate. This gives you an editable copy, leaving the original untouched. The copy needs its own name and its own description: two skills that describe themselves the same way make the Agent’s choice between them arbitrary.
Once your copy is saved, switch the built-in skill off using its toggle. The Agent then uses your version instead, and you keep the original in place to turn back on or duplicate again later.
To remove a custom skill for good, open it and click Delete. You will be asked to confirm, and the skill is gone for everyone in the deployment. Built-in skills cannot be deleted, only switched off.
Note
Custom skills are stored as a plugin in your deployment, so they can be downloaded and shared like any other plugin. See Writing a skill if you would rather author them as files.
Asking the Agent to write a skill#
You can also ask the Agent to write or improve a skill for you, for example “turn the steps we just worked through into a skill” or “add a validation step to my triage skill”.
The Agent never writes a skill on its own. It proposes the change in a review card showing exactly what would be added and removed, line by line, against the current version. Nothing is saved until you click Approve, and rejecting leaves the skill exactly as it was.
Built-in skills stay protected here too: if you ask the Agent to change one, it will propose a copy instead of modifying the original.