
Agentic Labeling#
Agentic Labeling labels your images with a prompt-driven vision-language model (VLM). You describe what you want in plain language, optionally show the model a few examples, and it produces labels like classifications, detections, captions, or per-region labels across your dataset for review. Agentic Labeling is available as a panel in the Voxel51 App.
Agentic Labeling vs Auto-Labeling#
Agentic Labeling is a form of auto-labeling. Where Auto-Labeling applies a fixed set of learned classes from the FiftyOne Model Zoo and foundation models through a delegated pipeline with a confidence-scored review-and-approval workflow, Agentic Labeling uses a VLM that you steer with natural language and visual prompts, then refine until the output matches your ontology. The two are complementary: Agentic Labeling is often the first step to produce an initial labeled set quickly, and those labels can go on to train a custom model for large-scale Auto-Labeling.
Availability and prerequisites#
Agentic Labeling requires a running Agentic Labeler service.
Agentic Labeling is supported for image datasets and frames views of video datasets. 3D, grouped, and multimodal datasets are not yet supported.
Note
Agentic Labeling is a Beta feature. Its behavior may change in future releases.
How it works#
You drive Agentic Labeling by building a Labeling Agent which includes:
Text prompt — plain-language instructions for what to label.
Task — the kind of label to produce (classification, detection, caption, or a region variant).
Allowed classes — an optional list constraining which class labels the model may use.
Examples — an optional handful of sample images showing what “right” looks like.
The workflow is a short loop: author an agent, Test it on a few grid samples, refine, Save it, then launch a Run at scale. Test previews are for iteration only and are never written to your dataset; only a run persists labels.
User guide#
This section walks through the full labeling loop: open the panel, train an agent, test it, save it, launch a run, and monitor it.
Opening the panel#
Load your image dataset in the FiftyOne App, then open the Agentic
Labeling panel from the new-panel (+) menu above the samples grid.
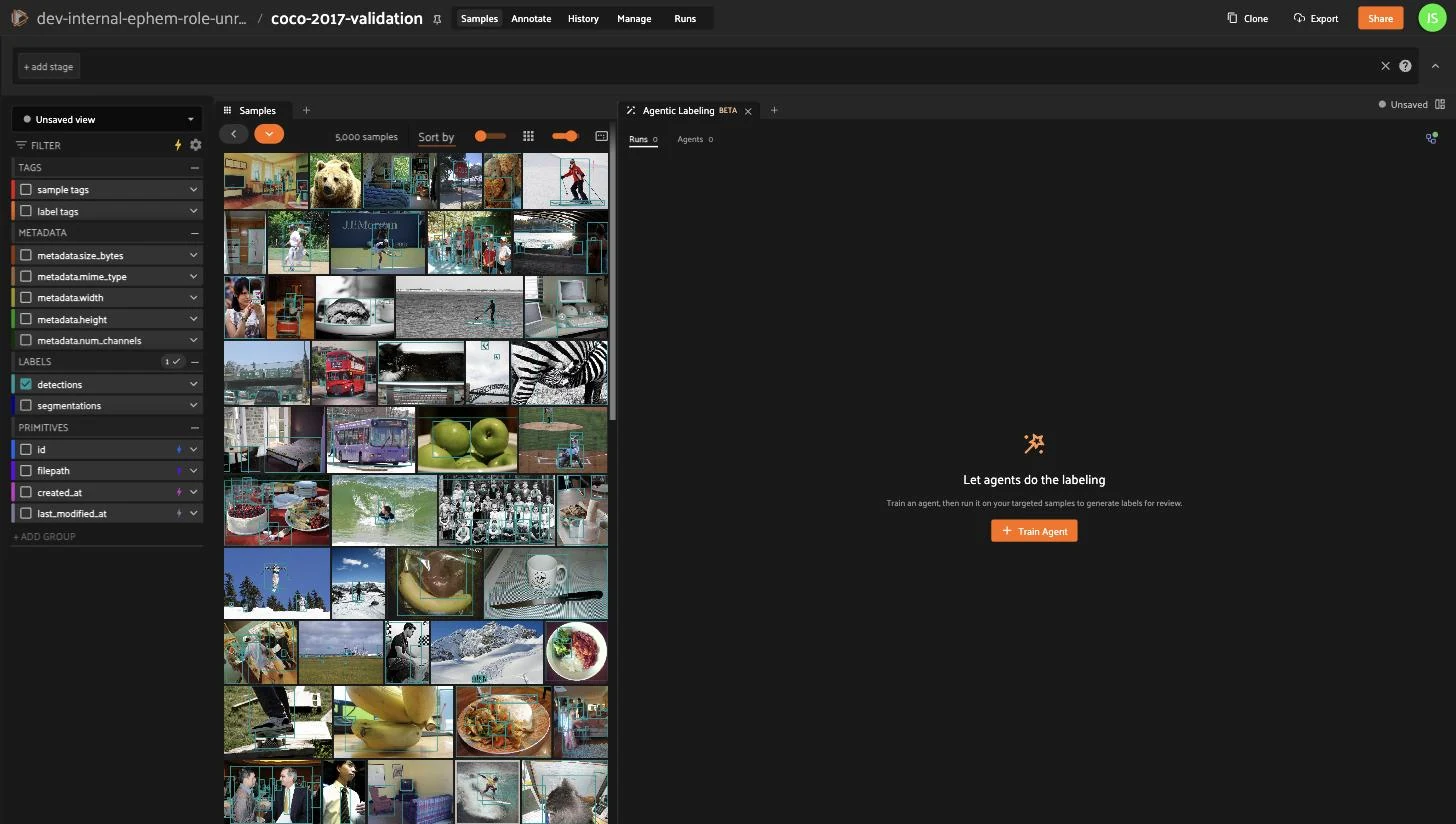
Dashboard#
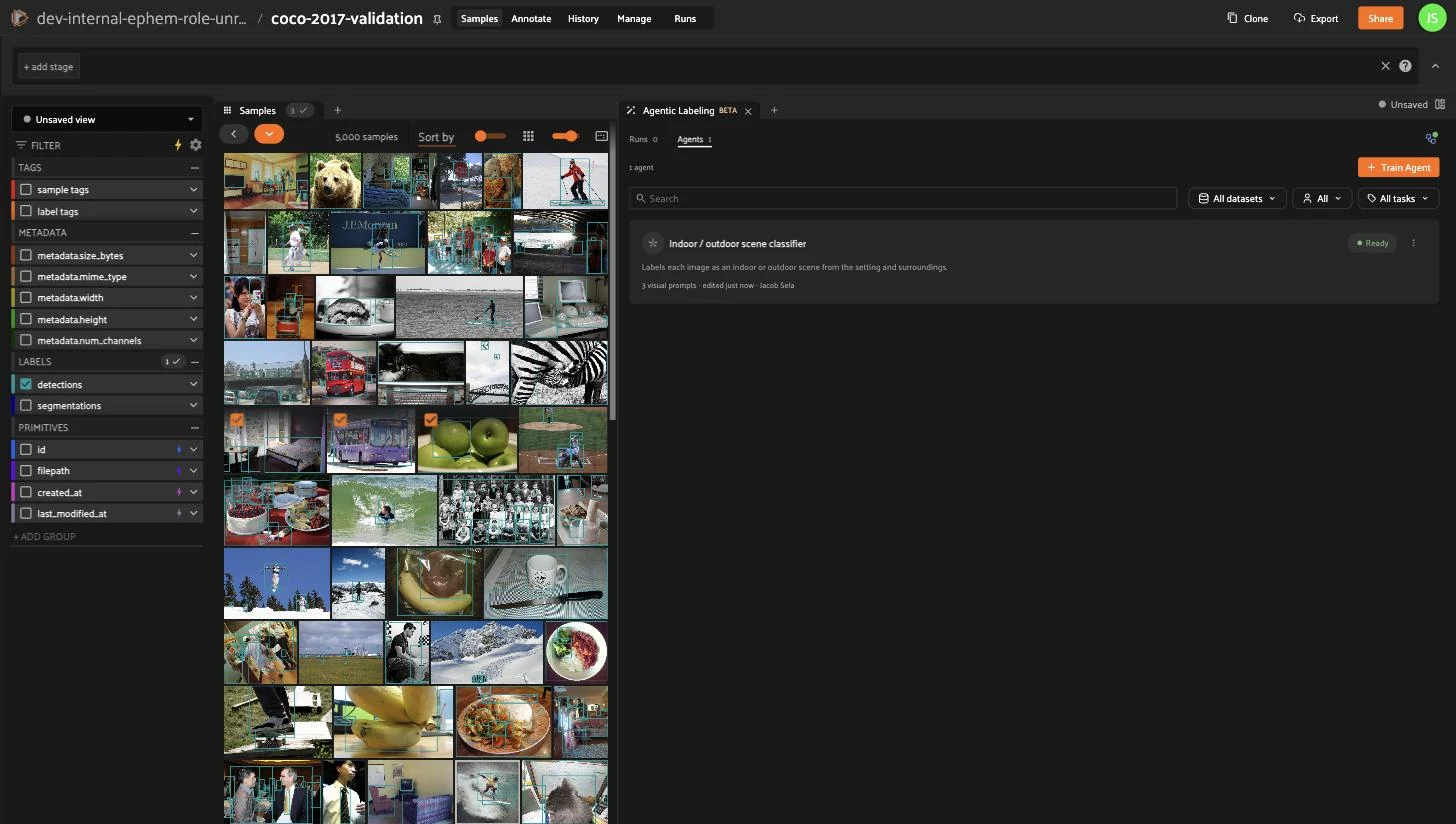
The Dashboard is the landing page with Runs and Agents sub-tabs. Click Train Agent to author your first agent.
Training an agent#
Training an agent consists of writing a Text prompt, picking a Task, optionally setting Allowed classes, and optionally adding a few visual Examples. This is an iterative process: test the agent on a few samples, refine the prompt and examples, and repeat until the agent produces the desired outputs.
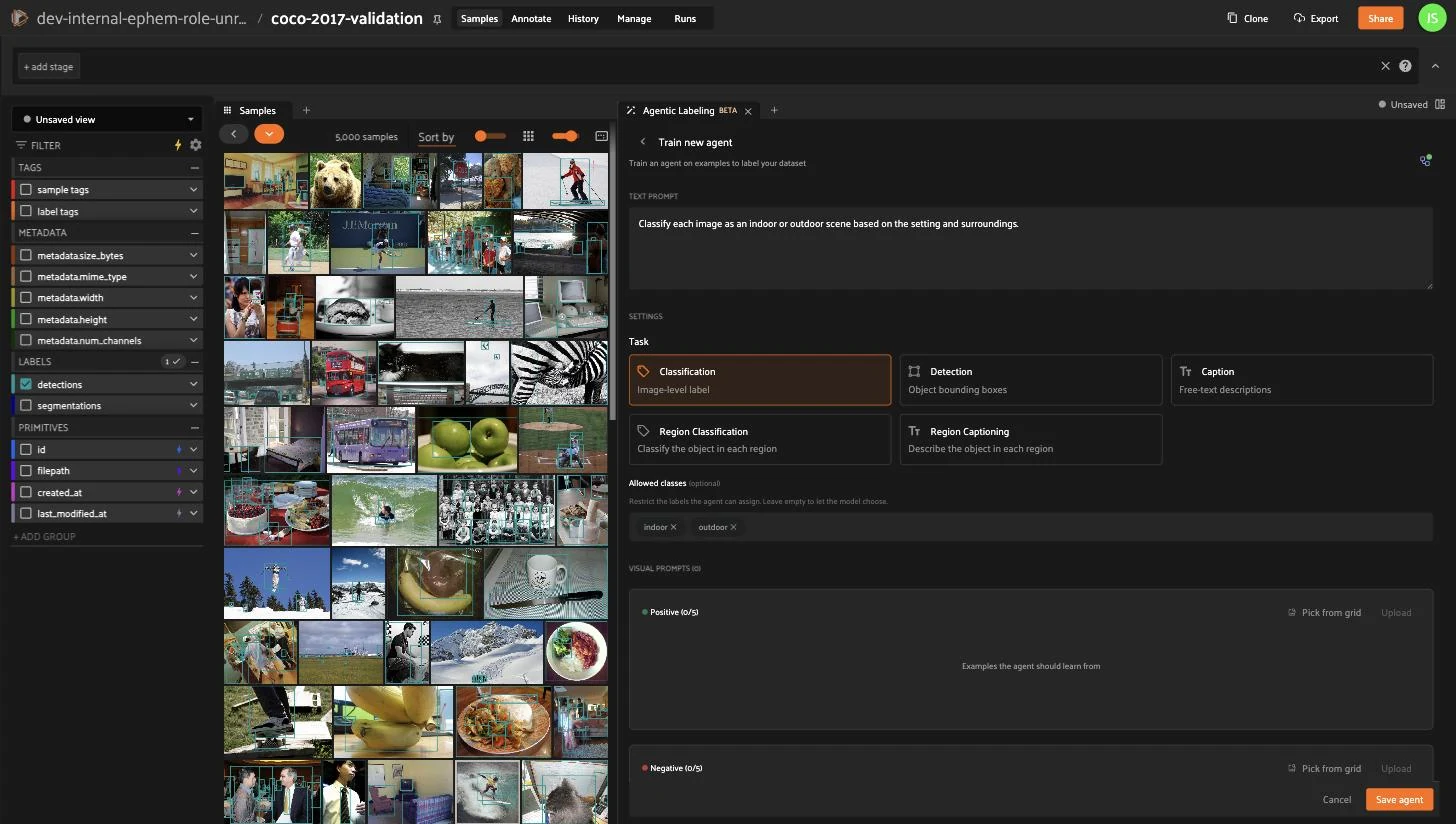
In Text prompt, describe what to label, and be specific. For example, frayed cables visible against the sky. Then choose a Task: Classification, Detection, Caption, Region Classification, or Region Captioning. See Labeling tasks for more information on the task types.

For Classification and Detection you can set Allowed classes to constrain the model’s output. Classification accepts multiple classes and Detection accepts exactly one. Leave the field empty to let the model choose any label. Allowed classes constrain the output only; define what each class means in the text prompt. See Prompting guidance.
Adding examples#
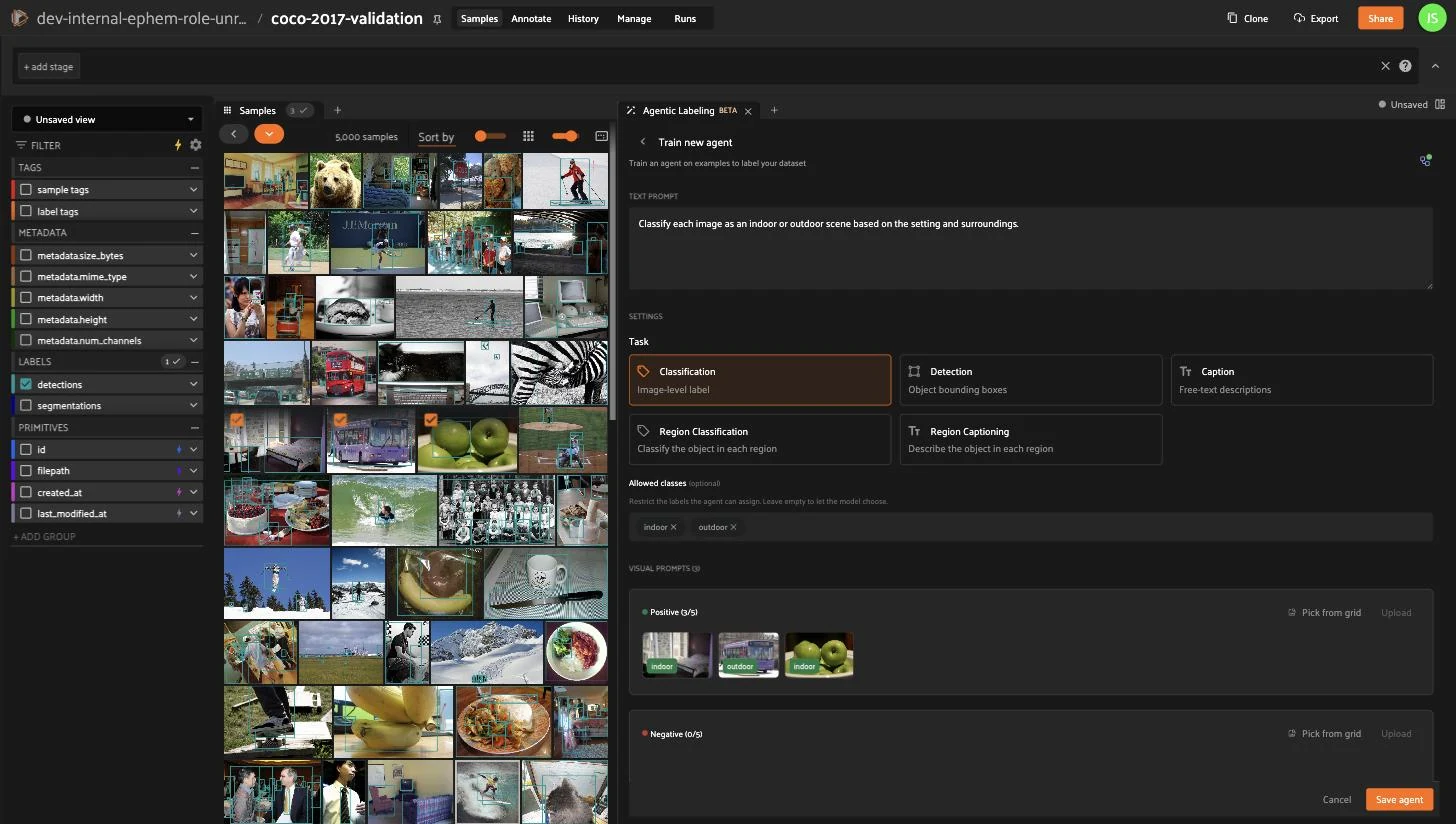
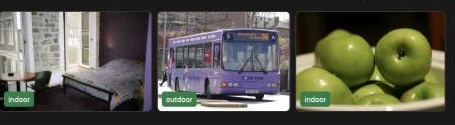
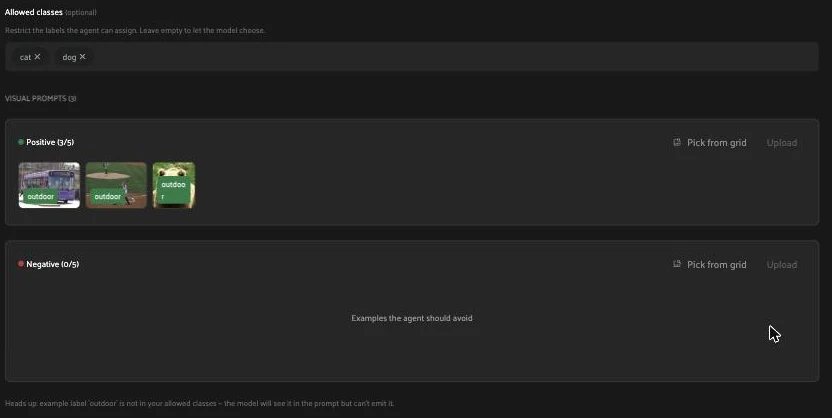
A few good examples sharpen the agent’s behavior. Select samples in the FiftyOne grid, then use the Visual prompts section. You can provide a max of 5 Positive and Negative examples each.
When you choose to Pick from grid, you can add selected samples from the grid. Additionally, you can provide existing labels on your dataset as prompts, or you can manually add example labels directly in the panel by clicking on the sample thumbnails.
Note
The Upload button next to Pick from grid is not yet available.
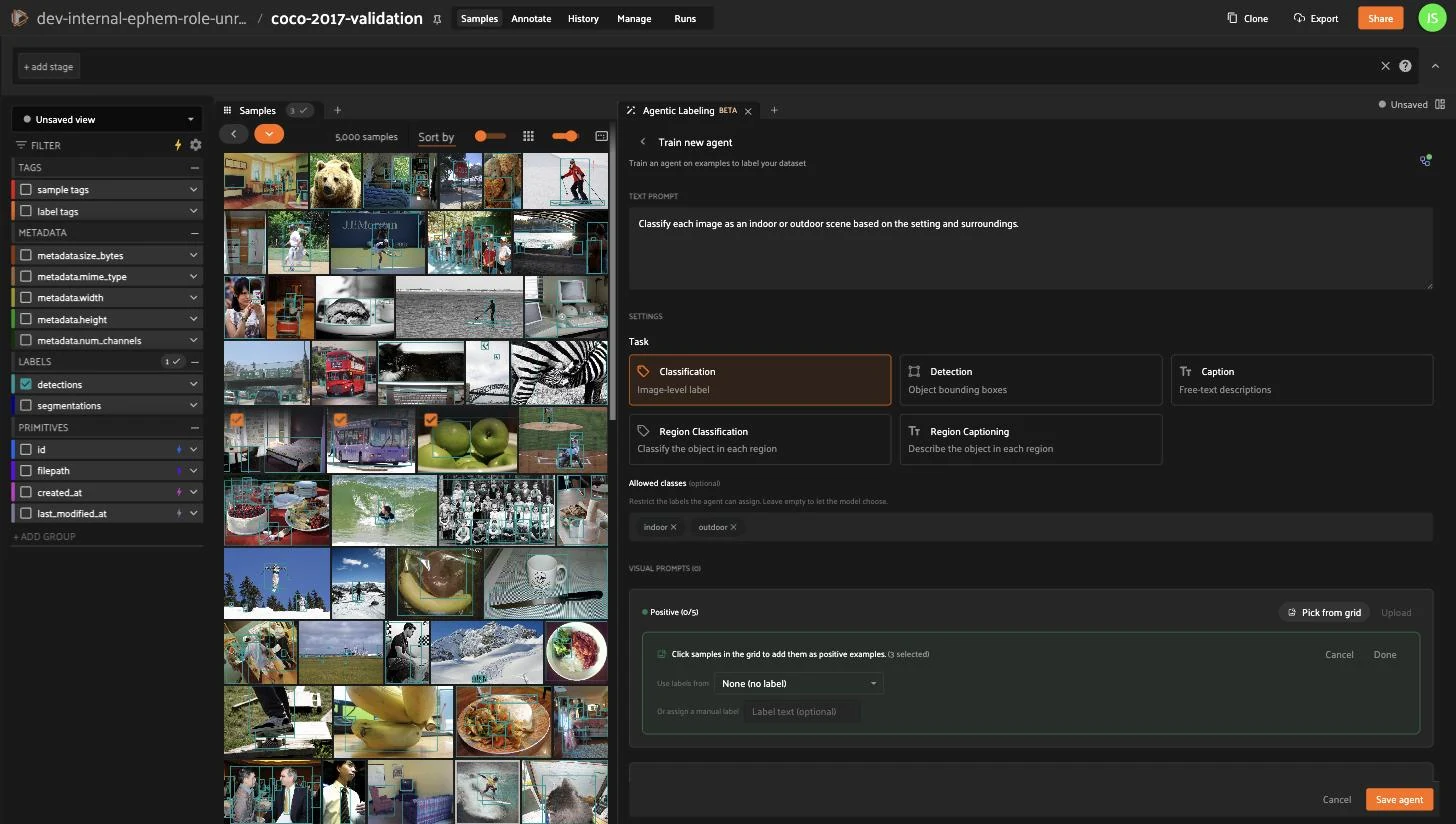
Committed examples appear as thumbnails in their row, with a running count such
as (2/5).
Note
Positive examples generally provide a greater benefit to results. See Prompting guidance.
Testing an agent#
With FiftyOne, you can quickly iterate on your prompts by testing your agent on a few samples at a time.
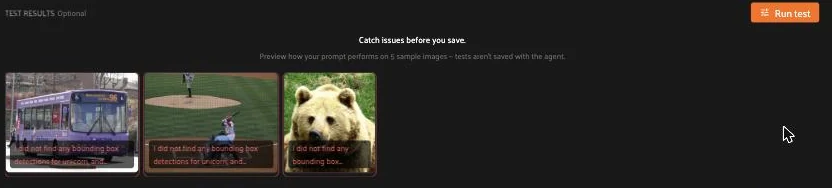
Scroll to Test results, select some representative samples in the grid, then click Run test. The agent runs on just those samples and previews the resulting labels of your selected Task. Test previews are never written to your dataset.
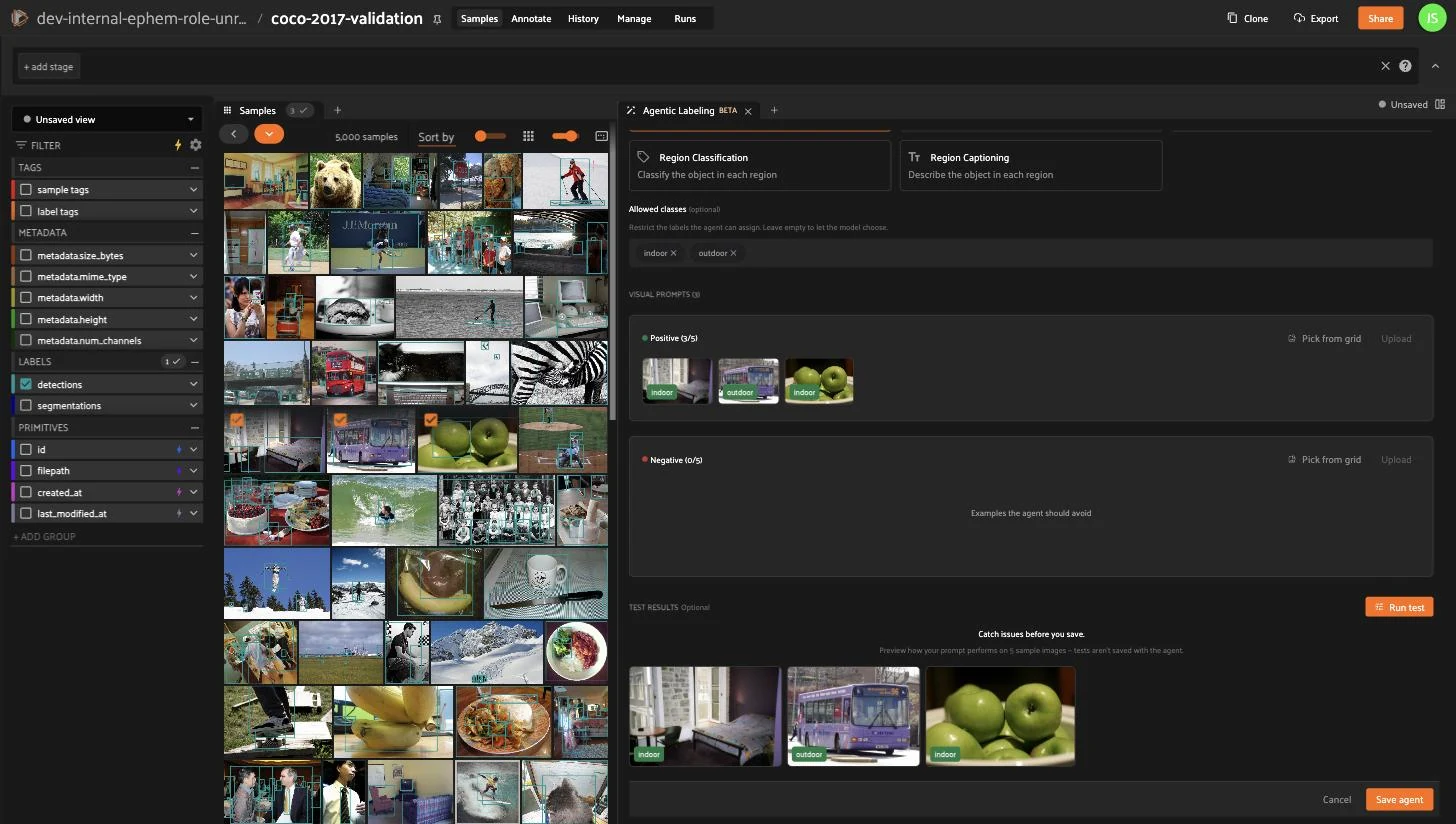
Click any thumbnail to open the prediction editor. Inspect or correct a prediction and step through the results with Previous and Next, drop one with Remove from results. Edits change only the preview; they do not persist to your dataset or modify the agent.
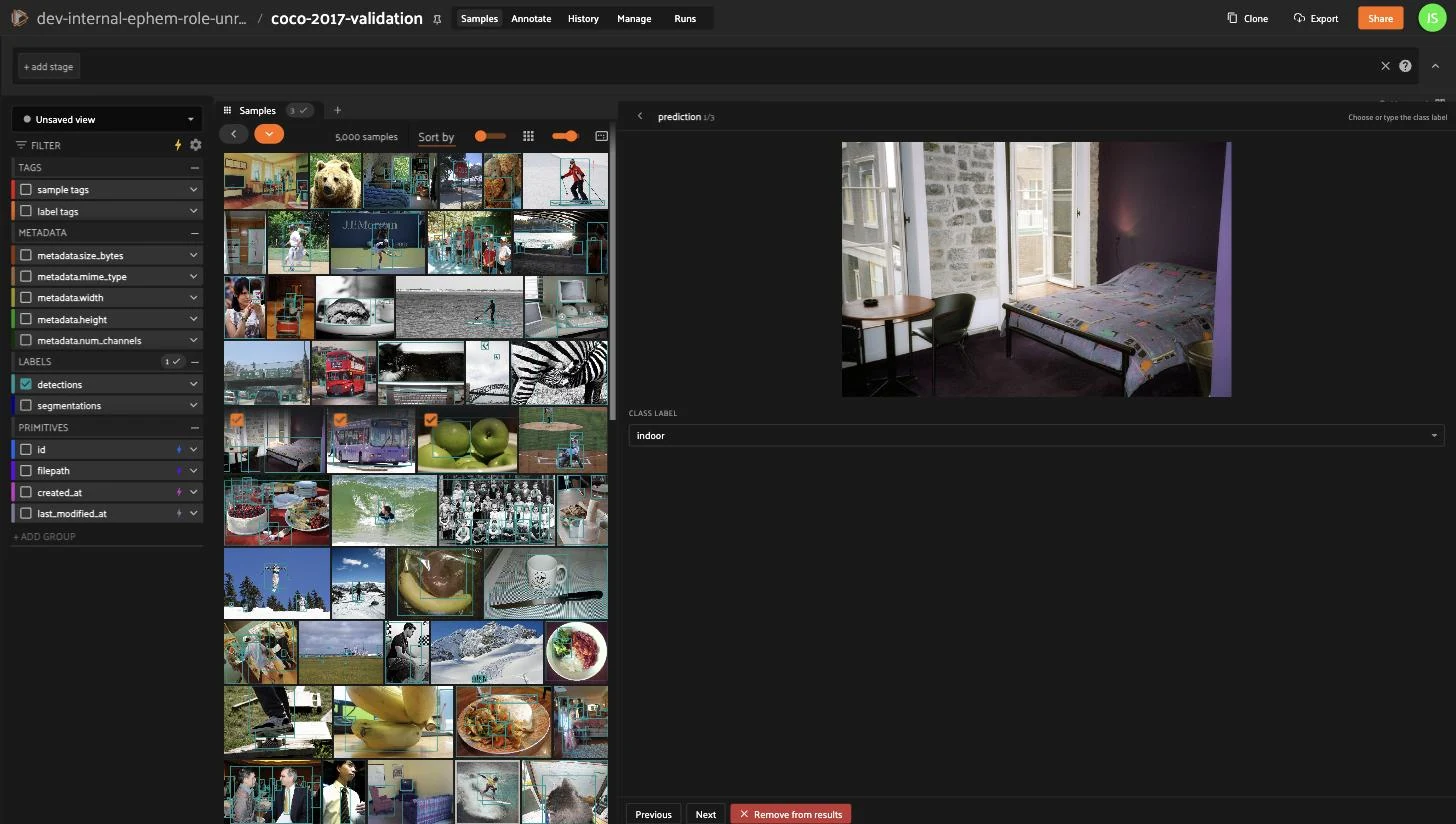
Refine the prompt, adjust allowed classes, add or remove examples, and run the test again until the previews are mostly correct on a representative handful.
Saving an agent#
When you’re satisfied with the agent’s behavior on test samples, click Save agent in the sticky footer to save your prompts and prepare the agent for a Run on the full dataset.
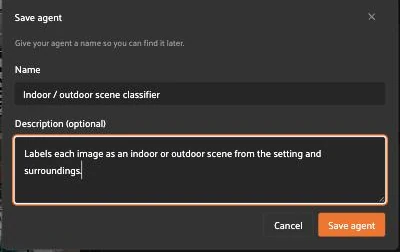
Saved agents appear on the Dashboard’s Agents tab with a menu offering Edit, New run, and Delete options.
Configuring and launching a run#
After training and saving an agent, launch a Run to label your data at scale.
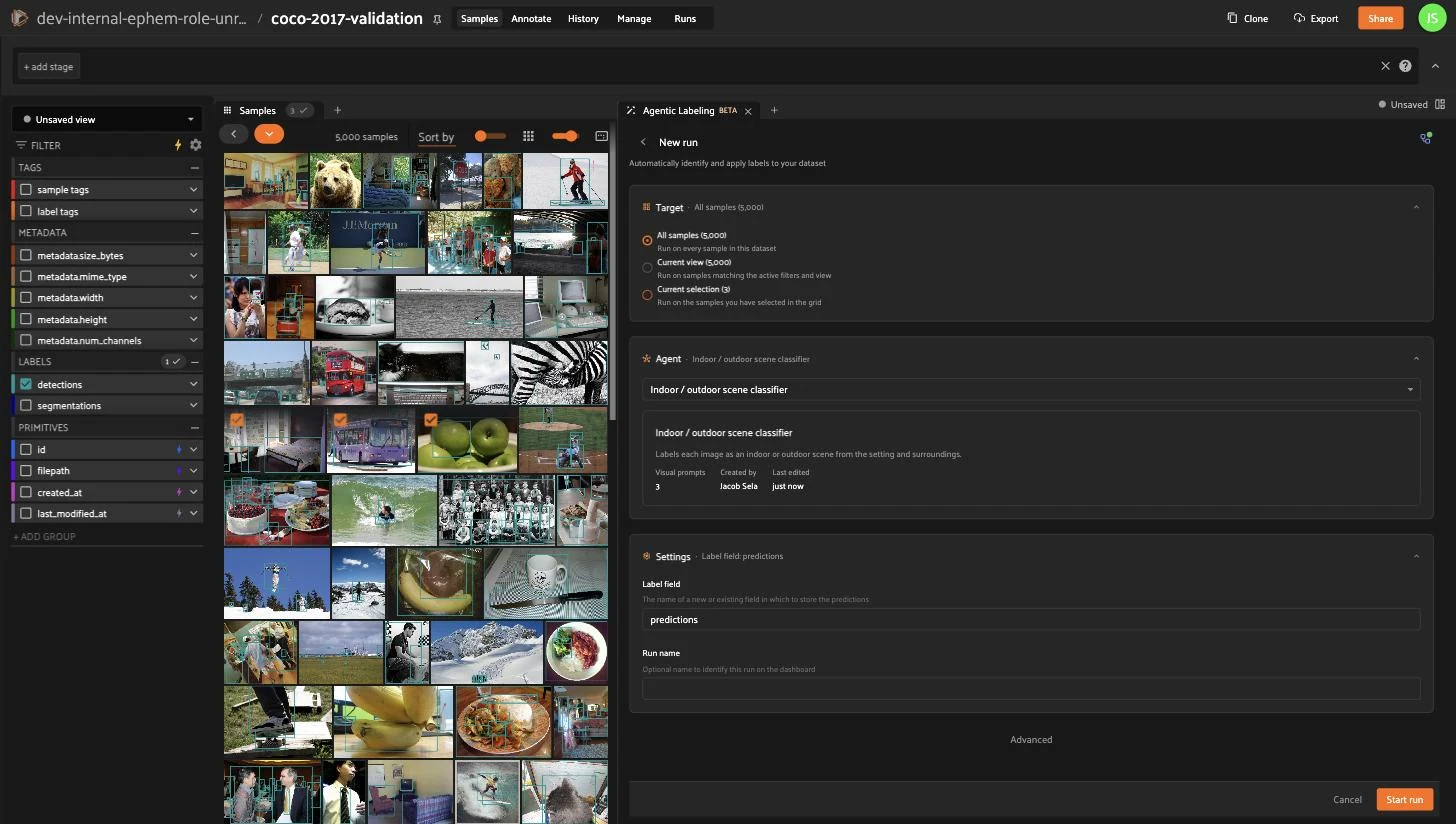
Open Run Config from the Dashboard’s New Run button or an agent row’s New run menu item, then configure the run:
Agent (required) — the saved agent to run.
Target — the scope to label: All samples, Current view (the current view), or Current selection (currently-selected samples).
Label field — the name of a new or existing field where predictions are written; use a new field name to avoid changing existing labels. On a patches target this becomes a Detection attribute selector instead — the attribute written onto each detection.
Run name (optional) — a human-friendly name for the run.
Advanced — Workers (default 16) and Batch size (default 32).
Monitoring a run#
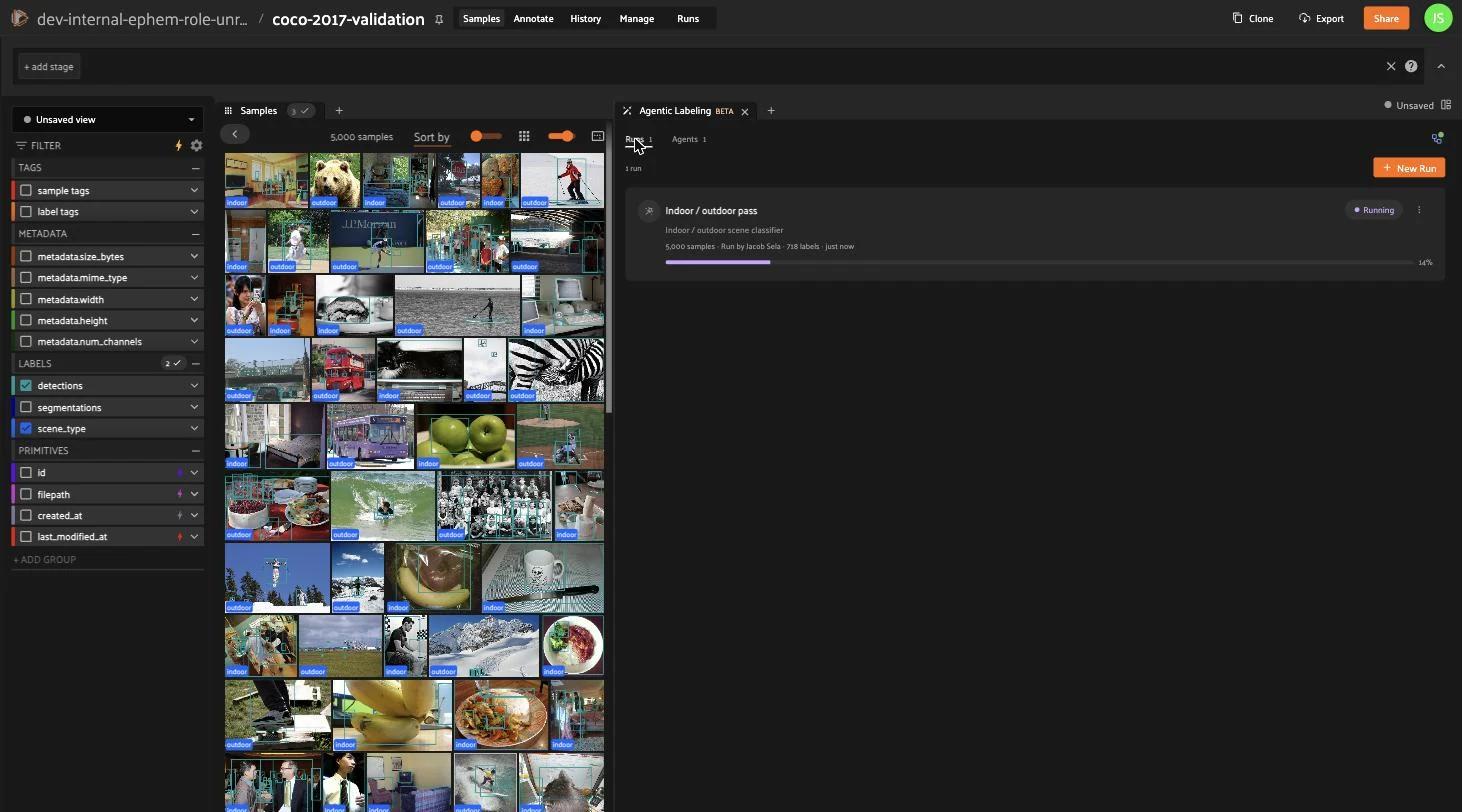
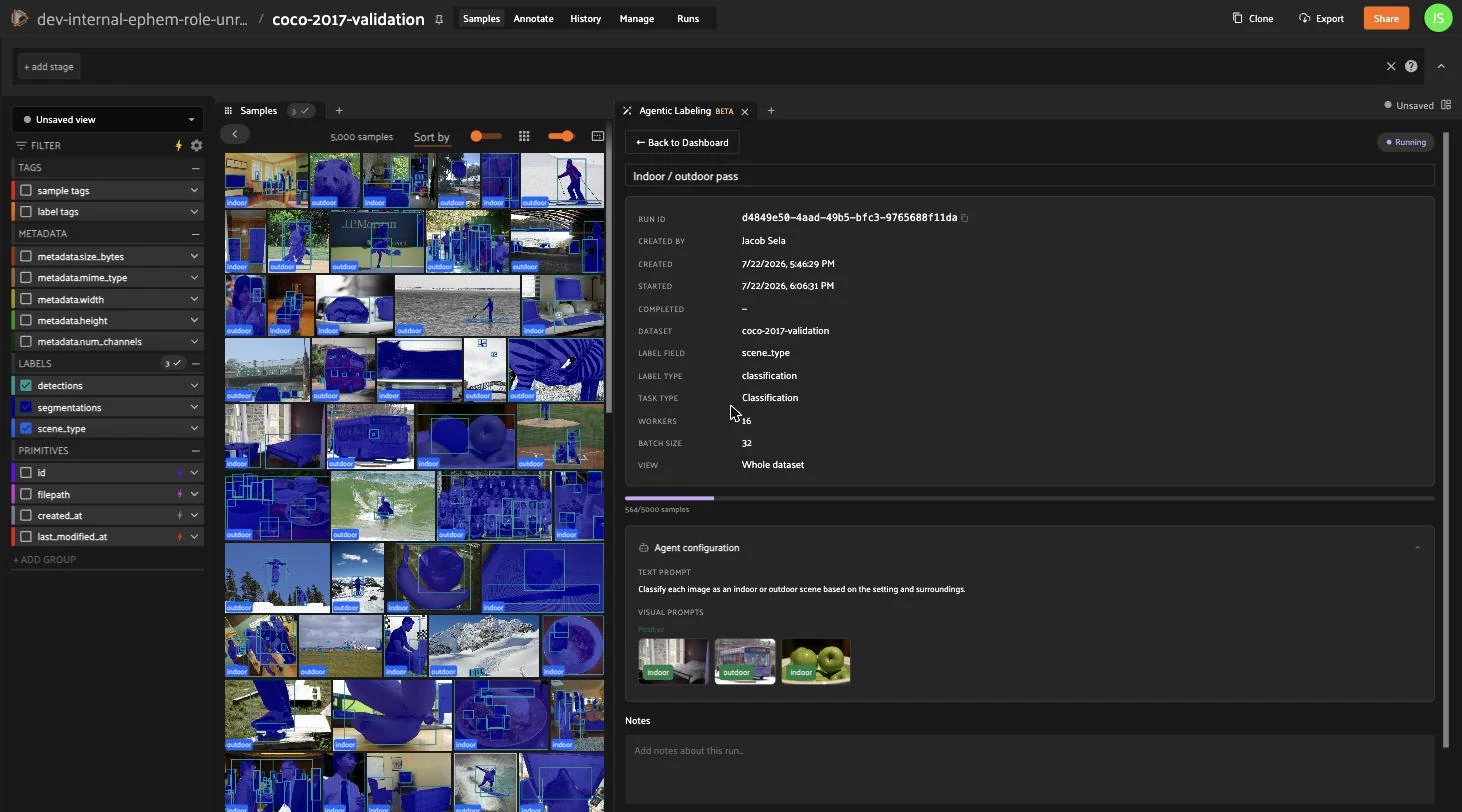
Starting a run returns you to the Runs tab, where each run is a card with a status badge and, while active, a progress bar. The card’s kebab menu offers Pause / Resume and Delete. Pausing stops issuing new work; a resumed run continues from where it left off rather than re-labeling completed samples.

Click a card to open Run Detail, which shows:
an editable name and the current status
a metadata card (dataset, label field, task, workers, batch size)
a progress bar with
completed / totaland parse-failure countsthe read-only Agent configuration — the prompt and example thumbnails the run uses
a Notes field
status-conditional actions: Pause, Resume, Cancel, Delete, and New Run.
If a run fails, a red banner shows the error and a collapsible Stack trace.
When the run completes, its labels are written to your chosen field, ready to review in the grid. Consider creating an annotation workflow for your annotators to review the results.
Labeling tasks#
The Task you pick under Settings decides what kind of label the agent produces and what the model is asked to do. The first three tasks label the whole image; the two region tasks label one object at a time.
Task |
Produces |
|---|---|
Classification |
One label for the whole image |
Detection |
Bounding boxes on the whole image |
Caption |
Free text for the whole image |
Region Classification |
One label per object |
Region Captioning |
A caption per object |
Classification#
Assign a single label to the whole image. Use the Text prompt to describe the classes and the decision you want. Use Allowed classes to hold the model to a fixed set of labels, or leave it empty to let the model choose freely.
Detection#
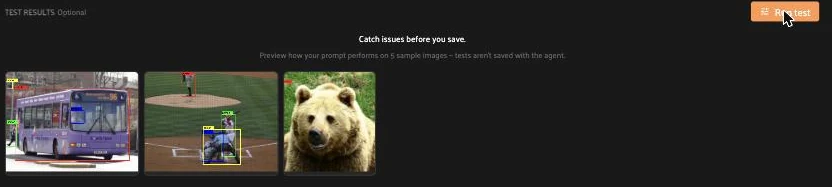
Find and box every object you ask for. Detection always returns boxes, so your Text prompt only needs to say what to find — for example, detect every forklift and pallet. You never describe the output format or the image size. Allowed classes here takes at most one class: set it and every box is relabeled to that class; leave it empty to keep the model’s own labels. Detection is whole-image only — on a patches view its card is greyed out.
Caption#
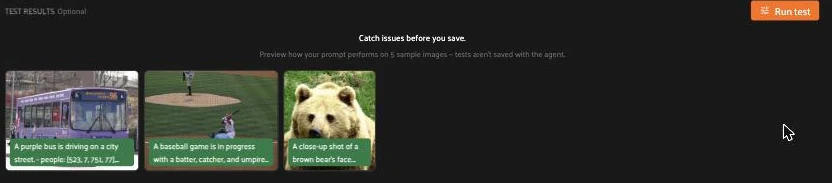
Produce a free-text description of the whole image. Your Text prompt fully controls the caption’s style, length, and focus. Be explicit, or you will get the model’s default.
Region tasks#
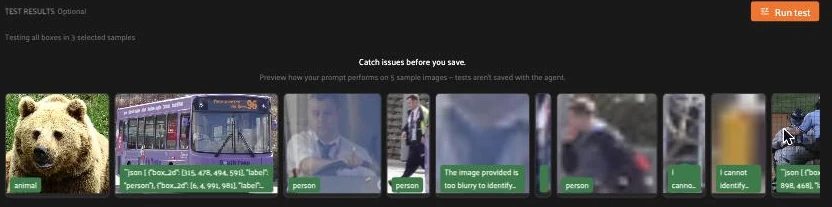
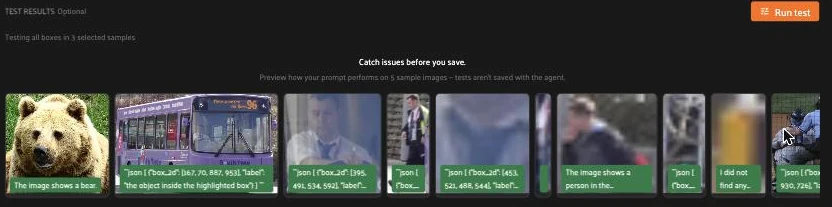
Region Classification and Region Captioning apply the same ideas as their whole-image versions, but to one object at a time. Region Classification gives each object a label, and Region Captioning gives each object a caption.
Region tasks require an existing Detections field on the dataset.
Both add two controls:
Regions from — where the objects come from. On a normal view, pick a source Detections field and each detection becomes one object to label. On a patches view this control is hidden, because the patches themselves are the objects.
Show region as — Cropped (the model sees only the object’s patch) or In context (the model sees the full image with the object highlighted). Use Cropped when the object stands alone; use In context when its surroundings matter.
Predictions attach to each object, so every object carries its own label or caption. Allowed classes for Region Classification works just like whole-image Classification.
Choosing a task#
Labeling the whole scene? Use a whole-image task — Classification, Detection, or Caption.
Labeling individual objects? Use a region task. It needs a source of objects: either a source Detections field or a patches view.
Want boxes plus per-object labels? Detection is whole-image only, so run Detection first to produce the boxes, then run a region task against that Detections field.
Working with video? Create a frames view first, then label each frame as a whole image — video cannot be labeled directly.
Prompting guidance#
Your labels come from three things you author on the Train Agent page: the Text prompt, the examples, and the allowed classes.
Writing the prompt#
Be specific and describe the visible evidence. Prefer concrete visual language (frayed cables against the sky) over abstract category names (cables).
Name and define your classes in the prompt. The allowed-classes list is not shown to the model, so if a class needs explaining, define it here.
Always write a prompt for Classification and Caption. With an empty prompt the model gets no instruction and simply guesses.
For Detection, define what counts as a target (only fully-visible vehicles, ignore partial ones). Do not ask for a custom output format.
For Caption, state the style and length you want (one sentence, under 12 words, main subject only).
Allowed classes#
The Allowed classes field means different things per task:
Classification — a hard constraint. The model can output only a class you listed. Leave it empty to let the model choose any label (open-world).
Detection — capped at exactly one class. Every returned box is relabeled to it; it does not filter what gets detected — narrow that in the prompt. Leave it empty to keep the model’s own label for each box.
If an expected Classification label never appears, confirm it is in the list.

Using examples#
Add up to 5 positive and 5 negative examples per agent.
Prefer positive examples — they do the heavy lifting. Negatives are sent to the model as examples to avoid; reach for a prompt fix before leaning on them.
Keep example labels inside your allowed classes. The panel warns you with a Heads up message when an example label is outside the allowed set; the model still sees it in the prompt but cannot emit it.
Keep the set small — a few clear examples beat a large, noisy one.
Troubleshooting#
Run a test on a few selected samples before saving, and match the symptom to a fix. When a prediction fails, the panel keeps the model’s raw output so you can inspect or hand-fix it in the prediction editor. Failed predictions are flagged with a marker in the result card and a red banner:
[PARSE ERROR]— the banner header reads Couldn’t parse model output. The model returned text the panel could not turn into labels. This almost always points at a Detection task; simplify the prompt and do not ask for a custom output format. Classification and Caption essentially never hit this error.[INFERENCE ERROR]— the banner header reads Inference error. The request was too large for the service; use fewer or smaller images.
Other common symptoms:
An expected Classification class never appears — add it to allowed classes, or clear the list to let the model choose freely.
Random-looking Classification or Caption output — the prompt is probably empty; write one.
The red banner shows the friendly header; the raw [PARSE ERROR] or
[INFERENCE ERROR] output is available in the banner’s expandable body.