|
|
|
|
Loading Depth Data#
In this tutorial, we will explore how to load and visualize depth estimation datasets in FiftyOne. We will work with two popular depth datasets that use different storage formats: DIODE (with NumPy arrays) and NYU Depth V2 (with image files).
Installation#
Some packages are required to load and process the depth data:
[ ]:
!pip install kagglehub pandas numpy Pillow tqdm
Representing Depth Data in FiftyOne#
FiftyOne’s Heatmap class is ideal for representing depth data:
fo.Heatmap(
    map=None,           # 2D numpy array containing the data
    map_path=None,      # OR path to the heatmap image on disk
    range=None          # Optional [min, max] range for proper visualization
)
There are essentially two ways you can load depth data:
Parsing a 2D numpy array
Pointing to a depth map on disk
The optional range parameter specifies the min/max values of the heatmap. By default:
Floating point arrays use [0, 1]
Integer arrays use [0, 255]
Image files use their native data type range
This tutorial will show you how to accomplish loading depth data for both scenarios using two datasets:
DIODE dataset
NYU Depth Dataset V2
DIODE Dataset#
DIODE (Dense Indoor and Outdoor DEpth) is a dataset of high-resolution color images with accurate, dense, far-range depth measurements. The DIODE dataset was created by researchers from TTI-Chicago, University of Chicago, and Beihang University, and is released under the MIT license. It was last updated on March 31, 2020.
It’s the first public dataset to include RGBD images of both indoor and outdoor scenes captured with a single sensor suite.
File Naming Conventions and Formats#
The dataset consists of RGB images, depth maps, and depth validity masks. Their formats are as follows:
RGB images (
*.png): RGB images with a resolution of 1024 × 768.Depth maps (
*_depth.npy): Depth ground truth with the same resolution as the images.Depth masks (
*_depth_mask.npy): Binary depth validity masks where 1 indicates valid sensor returns and 0 otherwise.
The relationship between depth maps and depth validity masks is quite important for working with depth data:
Depth Maps contain the actual distance measurements from the camera to surfaces in the scene. Each pixel value represents how far away that point is (usually in meters). However, depth sensors often have limitations.
Depth Validity Masks indicate which pixels in the depth map have reliable measurements:
A value of 1 means the depth value is valid and can be trusted
A value of 0 means the depth sensor couldn’t get a reliable reading at that pixel
These invalid readings typically occur because:
Some surfaces are too reflective, transparent, or absorptive
Areas may be too far away or outside the sensor’s range
Occlusions where one object blocks the sensor’s view of another
Motion blur during capture
Without the validity mask, you’d be treating unreliable depth values as real measurements, which would introduce significant errors in any algorithms or visualizations using the depth data.
Downloading the DIODE Dataset#
We will download and extract the validation split of the DIODE dataset. This contains the RGB images, depth maps, and validity masks we’ll need:
[ ]:
!wget http://diode-dataset.s3.amazonaws.com/val.tar.gz
!tar -xzf val.tar.gz
Downloading DIODE Metadata#
Next, download the metadata associated with this dataset and parse it to a Python dictionary:
[ ]:
!wget https://raw.githubusercontent.com/diode-dataset/diode-devkit/refs/heads/master/diode_meta.json
[ ]:
import json

with open('diode_meta.json', 'r') as f:
    diode_meta = json.load(f)

diode_meta = diode_meta['val']
[ ]:
import os
import numpy as np
from PIL import Image

import fiftyone as fo

from tqdm import tqdm
This is a helper function to iterate and parse the file paths:
[ ]:
def enumerate_paths(src, prefix=""):
    """Flatten nested metadata dictionary into a list of paths.

    This function recursively traverses a nested dictionary or list structure and
    builds file paths by joining keys/items with the provided prefix.

    Args:
        src: The source data structure to traverse. Can be either:
            - A list of path components to join with the prefix
            - A dictionary whose keys and values should be recursively traversed
        prefix: Optional string prefix to prepend to all generated paths.
               Default is empty string.

    Returns:
        list: A flattened list of complete file paths created by joining the prefix
              with all path components found in the source structure.

    Raises:
        ValueError: If src is neither a list nor a dictionary.

    """
    if isinstance(src, list):
        return [os.path.join(prefix, item) for item in src]
    elif isinstance(src, dict):
        results = []
        for k, v in src.items():
            new_prefix = os.path.join(prefix, k) if prefix else k
            results.extend(enumerate_paths(v, new_prefix))
        return results
    else:
        raise ValueError(f'Unexpected data type: {type(src)}')
Loading DIODE Depth Data into FiftyOne#
This code converts the DIODE depth dataset into a FiftyOne dataset for visualization and exploration.
Depth Maps as Heatmaps#
The function processes depth data in several important steps:
Loading the raw depth: The depth maps are loaded from NumPy files, containing metric distance values in meters.
Applying the mask: Not all pixels have valid depth measurements. The function applies the depth mask to zero out invalid measurements, ensuring we only visualize reliable data.
Computing visualization range: To create meaningful visualizations, the function calculates an appropriate min/max range based on the actual depth values present in each image. It uses the minimum value and the 99th percentile (capped at 300 meters) to avoid outliers skewing the visualization. This is informed by the source code for the DIODE Dev Kit.
Creating the Heatmap: The masked depth map is stored as a FiftyOne Heatmap with the calculated range, allowing for intuitive color-coded visualization when viewing the dataset.
Depth Masks#
The depth mask indicates which depth measurements are valid:
A mask value of 1 means the depth measurement is valid and trustworthy
A mask value of 0 indicates an invalid measurement (typically due to reflective surfaces, sensor limitations, or occlusions)
By storing both the masked depth map and the mask itself as separate fields, you can easily visualize which areas have valid depth readings and which don’t. This is particularly important for depth estimation tasks where you need to know which ground truth values you can rely on for training or evaluation.
Dataset Structure#
The resulting FiftyOne dataset contains:
RGB images as the primary media
Depth maps as heatmaps with appropriate visualization ranges
Binary depth masks indicating valid measurements
Metadata fields including scene type, split, scene ID, and scan ID
This structure makes it easy to filter, sort, and visualize the dataset based on different criteria, such as scene type or depth range.
[ ]:
def create_fiftyone_dataset(base_dir, diode_meta, dataset_name="DIODE"):
    """Create a FiftyOne dataset from the DIODE depth estimation dataset.

    The DIODE dataset (Dense Indoor/Outdoor DEpth) contains RGB images paired with
    depth maps and depth masks. It includes both indoor and outdoor scenes captured
    using professional scanning equipment to obtain high-quality ground truth depth.

    Args:
        base_dir (str): Root directory containing the DIODE dataset files
        diode_meta (dict): Metadata dictionary containing the dataset structure
        dataset_name (str, optional): Name for the created FiftyOne dataset.
                                    Defaults to "DIODE".

    Returns:
        fo.Dataset: A FiftyOne dataset containing:
            - RGB images (.png)
            - Depth maps (.npy) with metric depth values in meters
            - Binary depth masks (.npy) indicating valid depth measurements
            - Metadata on the sample level including scene type (indoor/outdoor),
              scene identifier, and scan number

    """
    dataset = fo.Dataset(dataset_name, persistent=True, overwrite=True)

    # Flatten the nested dictionary
    all_paths = []
    for split in diode_meta.keys():
        for scene_type in diode_meta[split].keys():
            paths = enumerate_paths(diode_meta[split][scene_type],
                                   prefix=os.path.join(split, scene_type))
            all_paths.extend(paths)

    # Add each sample to the dataset
    for file_path in tqdm(all_paths, desc="Creating dataset"):
        # Construct paths
        prefix = os.path.join(base_dir, file_path)
        rgb_path = f"{prefix}.png"
        depth_path = f"{prefix}_depth.npy"
        mask_path = f"{prefix}_depth_mask.npy"

        # Skip if any file is missing
        if not all(os.path.exists(p) for p in [rgb_path, depth_path, mask_path]):
            continue

        # Extract metadata from path
        parts = file_path.split(os.sep)
        if len(parts) >= 4:
            split, scene_type, scene, scan = parts[:4]

            # Create sample
            sample = fo.Sample(filepath=rgb_path)

            # Add metadata
            sample["split"] = split  # This is optional, and you can also add this as a tag
            sample["scene_type"] = scene_type
            sample["scene"] = scene
            sample["scan"] = scan

            # Load depth map and mask
            depth = np.load(depth_path).squeeze()
            mask = np.load(mask_path) > 0

            # Apply mask to depth map
            masked_depth = np.where(mask, depth, 0)

            # Determine depth range for better visualization
            valid_depths = masked_depth[masked_depth > 0]
            if len(valid_depths) > 0:
                min_depth = valid_depths.min()
                max_depth = min(300, np.percentile(valid_depths, 99))
                depth_range = [min_depth, max_depth]
            else:
                depth_range = [0, 1]  # Default fallback

            # Add depth map as a Heatmap
            sample["depth_map"] = fo.Heatmap(map=masked_depth, range=depth_range)

            # Add mask as a binary Heatmap
            sample["depth_mask"] = fo.Heatmap(map=mask.astype(float), range=[0, 1])

            # Add sample to dataset
            dataset.add_sample(sample)
    dataset.compute_metadata()
    print(f"Created dataset with {len(dataset)} samples")
    return dataset

# Example usage
base_dir = "val"

# Create the FiftyOne dataset
dataset = create_fiftyone_dataset(base_dir, diode_meta)
[ ]:
# Launch the app to visualize
session = fo.launch_app(dataset)
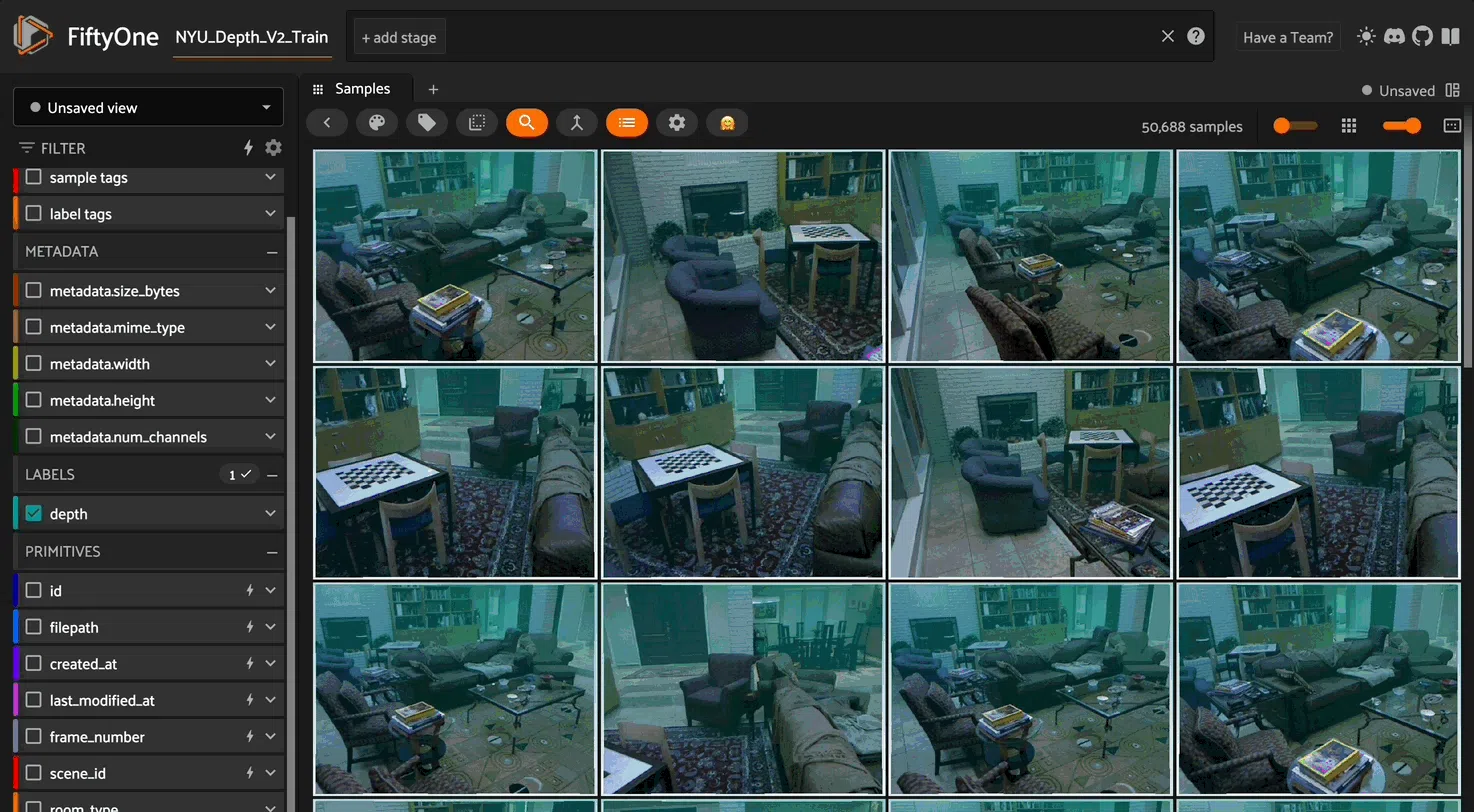
Loading NYU Depth V2 Dataset into FiftyOne#
The NYU Depth V2 dataset is another popular depth estimation dataset with RGB images paired with depth maps. Unlike the DIODE dataset where we loaded depth maps from NumPy arrays, the NYU dataset stores depth maps as PNG images.
When working with the NYU dataset, the main difference is how we access and load the depth information:
Depth Maps as Image Files#
In the NYU dataset, depth maps are stored as PNG image files rather than NumPy arrays. These PNG files typically store depth values as 16-bit grayscale images to preserve precision.
Unlike the DIODE example where we passed the depth array directly, we’ll now use the map_path parameter of the Heatmap class to reference the depth map files.
When using map_path, FiftyOne will:
Load the depth map image file when needed
Handle the conversion from image to array internally
Apply the provided range for proper visualization
Determining the Depth Range#
For PNG depth maps, you need to know how the depth values are encoded:
Some datasets store raw depth in millimeters or meters
Others normalize depth values to the 0-65535 range (for 16-bit PNGs)
The range may also be specified in the dataset documentation
You’ll need to specify the appropriate range based on the dataset’s depth encoding to ensure proper visualization. In this example I will load with default values for range, which in this case will be [0, 255] since the map values are integers.
Example Implementation Approach#
To create a FiftyOne dataset from your dataframe:
Iterate through each row in the dataframe
Create a sample with the RGB image path
Add the depth map as a Heatmap using the
map_pathparameterAdd any additional metadata (scene type, room, etc.)
Add the sample to your FiftyOne dataset
This approach allows you to work with image-based depth maps just as effectively as with the array-based approach used for DIODE.
Note, we will download a version of this dataset from Kaggle.
[ ]:
!pip install kagglehub
[ ]:
import shutil
import os

import kagglehub

# Download latest version
path = kagglehub.dataset_download("sohaibanwaar1203/image-depth-estimation")

# Get current working directory
current_dir = os.getcwd()

# To move everything from that directory to current directory
for item in os.listdir(path):
    source = os.path.join(path, item)
    destination = os.path.join(current_dir, item)
    shutil.move(source, destination)
Note: If the download fails, please rerun the dataset download cell. It’s important to ensure the dataset is fully and correctly downloaded in your environment.
We’ll parse the training datset. First, load the file nyu2_train.csv into a dataframe. This contains paired RGB and depth paths:
image_path: Points to RGB imagesdepth_path: Points to depth maps as PNG files
[ ]:
import pandas as pd

data_info = pd.read_csv(
    'data/nyu2_train.csv',
    names=['image_path', 'depth_path'],
    )
NYU Depth V2 Dataset in FiftyOne:#
This code creates a structured, browsable dataset in FiftyOne from the NYU Depth V2 dataset, which is a benchmark dataset for indoor depth estimation. The function takes a DataFrame containing paths to RGB images and their corresponding depth maps, and builds a FiftyOne dataset that allows for interactive visualization and analysis.
1. Dataset Organization#
The code creates a persistent FiftyOne dataset, meaning it will be saved to disk and can be reloaded in future sessions. It organizes the NYU Depth V2 data with meaningful metadata extracted from the file structure:
Room Types: Automatically extracted from directory names (e.g., “living_room”)
Scene IDs: Identifies specific room instances (e.g., “living_room_0038_out”)
Frame Numbers: Numeric identifiers for individual frames within a scene
2. Depth Map Handling#
The depth maps are integrated as FiftyOne Heatmap objects, which enables specialized visualization. The code uses the map_path parameter to reference the depth files directly.
3. Data Validation and Processing#
The code includes several validation steps:
Verifying required columns in the input DataFrame
Converting relative paths to absolute paths
Checking that files exist before processing
Extracting structured metadata from filenames and paths
4. Interactive Visualization#
Once created, this dataset can be explored in the FiftyOne App, where you can:
Browse through RGB-depth pairs
Filter by room type, scene, or frame number
Visualize depth maps with different colormaps
Sort and group samples based on metadata
[ ]:
import os
import fiftyone as fo
import pandas as pd
from tqdm import tqdm

def create_nyu_fiftyone_dataset(dataframe, dataset_name="NYU_Depth_V2_Train"):
    """Create a FiftyOne dataset from the NYU Depth V2 training dataset.

    Args:
        dataframe (pd.DataFrame): DataFrame containing image_path and depth_path columns
        dataset_name (str, optional): Name for the created FiftyOne dataset.
                                      Defaults to "NYU_Depth_V2_Train".

    Returns:
        fo.Dataset: A FiftyOne dataset containing RGB images and their corresponding depth maps
    """
    # Create a new dataset
    dataset = fo.Dataset(dataset_name, overwrite=True, persistent=True)

    # Check if the DataFrame has the required columns
    required_cols = ["image_path", "depth_path"]
    if not all(col in dataframe.columns for col in required_cols):
        raise ValueError(f"DataFrame must contain columns: {required_cols}")

    # Process each row in the dataframe
    for _, row in tqdm(dataframe.iterrows(), total=len(dataframe), desc="Creating dataset"):
        # Get paths
        image_path = row["image_path"]
        depth_path = row["depth_path"]

        # Convert to absolute paths if they are relative
        image_path_abs = os.path.abspath(image_path)
        depth_path_abs = os.path.abspath(depth_path)

        # Ensure paths exist
        if not (os.path.exists(image_path_abs) and os.path.exists(depth_path_abs)):
            print(f"Skipping sample: {image_path_abs} or {depth_path_abs} not found")
            continue

        # Create a new sample with the RGB image
        sample = fo.Sample(filepath=image_path_abs)

        # Extract metadata from the path
        # Example path: data/nyu2_train/living_room_0038_out/37.jpg
        parts = image_path.split('/')
        if len(parts) >= 3:
            # Get filename and extract frame number
            filename = parts[-1]
            # Extract frame number from filename (remove file extension)
            frame_number = os.path.splitext(filename)[0]
            try:
                # Convert to integer if possible
                frame_number = int(frame_number)
                sample["frame_number"] = frame_number
            except ValueError:
                # If not a number, just store it as string
                sample["frame_id"] = frame_number

            # Extract scene folder
            scene_folder = parts[-2]
            sample["scene_id"] = scene_folder

            # Extract room type
            scene_parts = scene_folder.split('_')
            if len(scene_parts) >= 3:
                room_type = "_".join(scene_parts[:-2])
                sample["room_type"] = room_type


        # Add the depth map as a Heatmap using map_path and explicit range
        depth_array = np.asarray(Image.open(depth_path_abs), dtype=float)
        valid_depths = depth_array[depth_array > 0]
        depth_range = [float(valid_depths.min()), float(valid_depths.max())] if valid_depths.size else [0.0, 1.0]

        sample["depth"] = fo.Heatmap(
            map_path=depth_path_abs,
            range=depth_range,
        )

        # Add sample to dataset
        dataset.add_sample(sample)
    dataset.compute_metadata()
    print(f"Created dataset with {len(dataset)} samples")
    return dataset
[ ]:
nyu_dataset = create_nyu_fiftyone_dataset(data_info)
[ ]:
fo.launch_app(nyu_dataset)
You may have noticed that each of these datasets are sequences of frames, thus they can be parsed as videos. However, converting frame sequences to MP4 videos is inefficient because:
The conversion process is time-consuming
High-resolution videos consume excessive storage space
Machine learning tasks typically process individual frames anyway, making video conversion unnecessary
Instead, you can use group_by() to create a view that groups the data by scene, ordered by frame number/timestamp. When you load a dynamic grouped view in the App, you’ll have the same experience as video datasets:
You can hover over tiles in the grid to animate scenes’ frame data
When you click on a tile, you’ll have familiar video player controls in the modal to navigate the scene
[ ]:
view = nyu_dataset.group_by("scene_id", order_by="frame_number")

# Save the view for easy loading in the App
nyu_dataset.save_view("scenes", view)