|
|
|
|
Step 1: Loading a Self Driving Car Dataset into FiftyOne#
Installation#
Before gettting started,it is highly suggested that you create a venv or conda environment to manage dependencies. This is a difficult one to nail right so here is the steps to be able to run the getting started experience
[ ]:
!conda create -n driving_workshop python=3.10
[ ]:
!conda activate driving_workshop
[ ]:
!pip install fiftyone transformers umap-learn \
torch torchvision nuscenes-devkit open3d numpy==1.26.4
[ ]:
!pip install matplotlib --upgrade
Exploring nuScenes in FiftyOne#
Due to the multi-sensor structure of self-driving car datasets, the dataset in FiftyOne will be a Grouped Dataset with some Dynamic Group Views thrown in there as well. We will be using nuscenes for our examples.
At a high level, we will group together our samples by their associated scene in nuScenes. At regular intervals of each keyframe or approximately every 0.5 seconds (2Hz), we incorporate data from every sensor type, including their respective detections. This amalgamation of data results in distinct groups, each representing the sensor perspective at a given keyframe. We do have each sensor input for every frame, but since only keyframes are annotated, we choose to only load those in.
Ingesting nuScenes#
To get started with nuScenes in FiftyOne, first we need to set up our environment for nuScenes. It will require downloading the dataset or a snippet of it as well as downloading the nuScenes python sdk. Full steps on installing can be found here.
We want two files, v1.0-mini.tgz (the mini version of the full v1.0 dataset) and nuScenes-lidarseg-mini-v1.0.tar.bz2 The tgz files sshould be dropped into the data/ folder and unpacked with:
[ ]:
cd data
tar zxf v1.0-mini.tgz
tar xf nuScenes-lidarseg-mini-v1.0.tar.bz2
Once your nuScenes is downloaded, we can kick things off. Let’s start by initializing both nuScenes as well as our FiftyOne dataset. We define our dataset as well as add a group to initialize the dataset to expect grouped data.
[ ]:
from nuscenes import NuScenes
import fiftyone as fo
# Make sure its absolute path!
dataroot='/path/to/Self-Driving-Dataset/data/'
nusc = NuScenes(version='v1.0-mini', dataroot=dataroot, verbose=True)
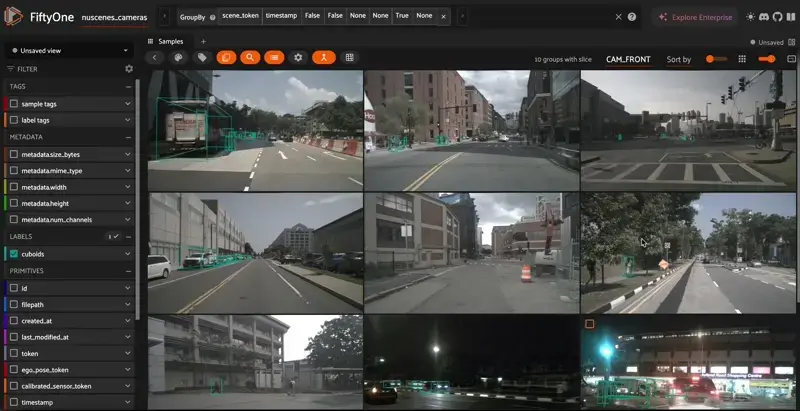
dataset = fo.Dataset("nuscenes_cameras",overwrite=True)
dataset.add_group_field("group", default="CAM_FRONT")
Loading Sensor Data#
It is recommended that you make helper functions to load in each sensor modality. These functions should take in path or token that points to sensor data file and any associated labels or metadata.
Camera Data#
Camera data is a bit more straightforward than the lidar data as there is no need to do any prep on the image or save it as a different format. We can go right ahead and grab the detections to add them. The only tricky part is these are no ordinary bounding boxes, they are 3D bounding boxes given in global coordinates!
Luckily for us, nuScenes provides some easy ways to convert their bounding boxes to our pixel space relative to what camera the image came from. For camera data, we load all of our boxes for our sample, check to see which ones are in the frame of our camera data, and then add the cuboids to the sample. In order to add a cuboid or a 3D bounding box, we use polylines and the from_cuboid() method. Let’s take a look at how it is done:
[ ]:
from nuscenes.utils.geometry_utils import box_in_image, view_points
import numpy as np
from nuscenes.utils.geometry_utils import  BoxVisibility
from nuscenes.scripts.export_poses import derive_latlon

def camera_sample(group, filepath, sensor, token, scene):
    sample = fo.Sample(filepath=filepath, group=group.element(sensor))
    data_path, boxes, camera_intrinsic = nusc.get_sample_data(token, box_vis_level=BoxVisibility.NONE,)
    image = Image.open(data_path)
    width, height = image.size
    shape = (height,width)
    polylines = []
    log = nusc.get('log', scene["log_token"])
    location = log["location"]
    ego = nusc.get('ego_pose', data["ego_pose_token"])
    ego_list = [ego]

    latlon = derive_latlon(location,ego_list)
    lat = latlon[0]["latitude"]
    lon = latlon[0]["longitude"]
    sample["location"] = fo.GeoLocation(
        point = [lon,lat]
    )
    for box in boxes:
        if box_in_image(box,camera_intrinsic,shape,vis_level=BoxVisibility.ALL):
            c = np.array(nusc.colormap[box.name]) / 255.0
            corners = view_points(box.corners(), camera_intrinsic, normalize=True)[:2, :]
            front = [(corners[0][0]/width,corners[1][0]/height),
                    (corners[0][1]/width,corners[1][1]/height),
                    (corners[0][2]/width,corners[1][2]/height),
                    (corners[0][3]/width,corners[1][3]/height),]
            back =  [(corners[0][4]/width,corners[1][4]/height),
                    (corners[0][5]/width,corners[1][5]/height),
                    (corners[0][6]/width,corners[1][6]/height),
                    (corners[0][7]/width,corners[1][7]/height),]
            polylines.append(fo.Polyline.from_cuboid(front + back, label=box.name))
    sample["cuboids"] = fo.Polylines(polylines=polylines)
    return sample
Adding Samples to the Dataset#
Next we need to add our camera samples to make our first dataset! Lets loop through all the scenes and add each camera angle, forming groups of 6 samples each.
[ ]:
from PIL import Image
from nuscenes.utils.geometry_utils import view_points, BoxVisibility, box_in_image
import numpy as np
import os

# Define our sensor groups
groups = ["CAM_FRONT", "CAM_FRONT_RIGHT", "CAM_BACK_RIGHT", "CAM_BACK",
           "CAM_BACK_LEFT", "CAM_FRONT_LEFT",]

samples = []

# Iterate over each scene
for scene in nusc.scene:
    my_scene = scene
    token = my_scene['first_sample_token']
    my_sample = nusc.get('sample', token)
    last_sample_token = my_scene['last_sample_token']

    # Iterate over each sample in the scene
    while not my_sample["next"] == "":
        scene_token = my_sample["scene_token"]
        group = fo.Group()
        # Iterate over each sensor in the sample
        for sensor in groups:
            data = nusc.get('sample_data', my_sample['data'][sensor])
            filepath = dataroot + data["filename"]

            # Check if the sensor is a camera
            if data["sensor_modality"] == "camera":
                sample = camera_sample(group, filepath, sensor, my_sample['data'][sensor],scene)

            # Add metadata to the sample
            sample["token"] = data["token"]
            sample["ego_pose_token"] = data["ego_pose_token"]
            sample["calibrated_sensor_token"] = data["calibrated_sensor_token"]
            sample["timestamp"] = data["timestamp"]
            sample["is_key_frame"] = data["is_key_frame"]
            sample["prev"] = data["prev"]
            sample["next"] = data["next"]
            sample["scene_token"] = scene_token


            samples.append(sample)

        token = my_sample["next"]

        my_sample = nusc.get('sample', token)

# Add the samples to the dataset, group by scene_token, and launch the app
dataset.add_samples(samples)
view = dataset.group_by("scene_token", order_by="timestamp")
session = fo.launch_app(view)
Loading Point Cloud Data#
[ ]:
# New dataset for all sensors including LIDAR and RADAR
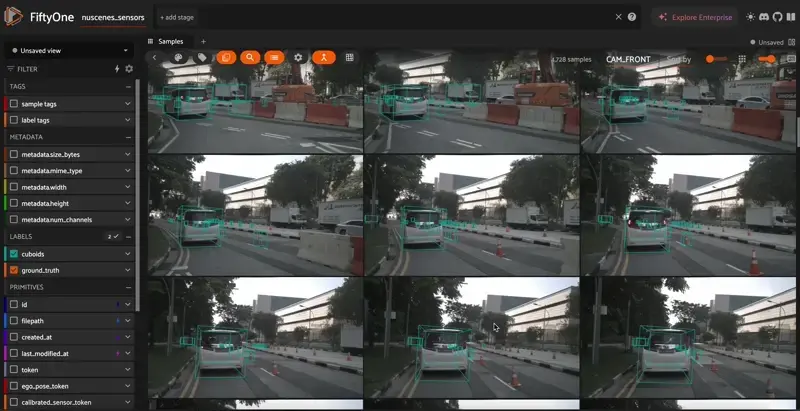
all_sensor_dataset = fo.Dataset("nuscenes_sensors",overwrite=True)
all_sensor_dataset.add_group_field("group", default="CAM_FRONT")
Loading a LIDAR sample from nuScenes is composed of two steps, generating the pointcloud and adding the detections. We must convert the binary point clouds to standard in order to ingest them. nuScenes also offers a LIDAR segmentation optional package that allows us to color each point cloud point a color corresponding to its class that we will be utilizing. We start with our lidar token, load in the color map and point cloud that corresponds to the token, and save them back to file with the new coloring and standard pcd point cloud file formatting.
[ ]:
from nuscenes.utils.data_io import load_bin_file
from nuscenes.utils.color_map import get_colormap
from nuscenes.lidarseg.lidarseg_utils import paint_points_label
from nuscenes.utils.data_classes import LidarPointCloud
import open3d as o3d
import os


def load_lidar(lidar_token):

    #Grab and Generate Colormaps
    gt_from = "lidarseg"
    lidarseg_filename = dataroot + nusc.get(gt_from, lidar_token)['filename']
    colormap = get_colormap()
    name2index = nusc.lidarseg_name2idx_mapping

    coloring = paint_points_label(lidarseg_filename,None,name2index, colormap=colormap)
    filepath = dataroot + nusc.get("sample_data", lidar_token)['filename']
    root, extension = os.path.splitext(filepath)

    #Load Point Cloud
    cloud = LidarPointCloud.from_file(filepath)
    pcd = o3d.geometry.PointCloud()
    pcd.points = o3d.utility.Vector3dVector(cloud.points[:3,:].T)
    colors = coloring[:,:3]
    colors.max()
    pcd.colors = o3d.utility.Vector3dVector(colors)

    #Save back Point Cloud
    o3d.io.write_point_cloud(root, pcd)

    return root
With our point cloud file now properly prepared for ingestion, we can move along to adding detections. To do so, we grab all the detections from the keyframe. We use nuScenes SDK’s builtin box methods to retrieve the location, rotation, and dimensions of the box. To match FiftyOne’s 3D detection input, we take box.orientation.yaw_pitch_roll for rotation, box.wlh for width, length, and height, and box.center for its location. Note too that fo.Sample(filepath=filepath, group=group.element(sensor)) will automatically detect the pcd file and ingest the sample as a point cloud as well! After the method is run and detections are added, we have our LIDAR sample with detections!
[ ]:
from nuscenes.utils.geometry_utils import  BoxVisibility
from nuscenes.scripts.export_poses import derive_latlon


def lidar_sample(group, filepath, sensor, lidar_token, scene):
    # Get the lidar data
    data_path, boxes, camera_intrinsic = nusc.get_sample_data(lidar_token, box_vis_level=BoxVisibility.NONE,)
    data = nusc.get('sample_data', lidar_token)
    log = nusc.get('log', scene["log_token"])
    location = log["location"]
    ego = nusc.get('ego_pose', data["ego_pose_token"])
    ego_list = [ego]
    latlon = derive_latlon(location,ego_list)
    lat = latlon[0]["latitude"]
    lon = latlon[0]["longitude"]

    # Create a sample
    sample = fo.Sample(filepath=filepath, group=group.element(sensor))

    # Add the coords to the sample
    sample["location"] = fo.GeoLocation(
        point = [lon,lat]
    )

    # Add detections to the pcd
    detections = []
    for box in boxes:

        x, y, z = box.orientation.yaw_pitch_roll
        w, l, h = box.wlh.tolist()

        detection = fo.Detection(
                label=box.name,
                location=box.center.tolist(),
                rotation=[z, y, x],
                dimensions=[l,w,h]
                )
        detections.append(detection)
    sample["ground_truth"] = fo.Detections(detections=detections)
    return sample
RADAR is an interesting case. Since we have already stored our 3d detections in the LIDAR sample and RADAR is laid on top of the LIDAR in the 3D visualizer, we don’t need to copy our detections for each point cloud. The simplifies loading RADAR to just:
[ ]:
from nuscenes.utils.data_classes import RadarPointCloud
from pyquaternion import Quaternion


def load_radar(filepath, data ):

    root, extension = os.path.splitext(filepath)

    #Load Point Cloud
    pc = RadarPointCloud.from_file(filepath)

    cs_record = nusc.get('calibrated_sensor', data['calibrated_sensor_token'])
    pc.rotate(Quaternion(cs_record['rotation']).rotation_matrix)
    pc.translate(np.array(cs_record['translation']))

    pcd = o3d.geometry.PointCloud()
    print(pc.points.shape)
    pcd.points = o3d.utility.Vector3dVector(pc.points[:3,:].T)

    #Save back Point Cloud
    o3d.io.write_point_cloud(root+"_NEW.pcd", pcd)

    return root+"_NEW.pcd"
Let’s run it back again except this time we are taking cameras, LIDAR, and RADAR samples!
[ ]:
groups = ["CAM_FRONT", "CAM_FRONT_RIGHT", "CAM_BACK_RIGHT", "CAM_BACK",
           "CAM_BACK_LEFT", "CAM_FRONT_LEFT","LIDAR_TOP", "RADAR_FRONT",
           "RADAR_FRONT_LEFT", "RADAR_FRONT_RIGHT", "RADAR_BACK_LEFT", "RADAR_BACK_RIGHT"]

samples = []

# Iterate over each scene
for scene in nusc.scene:
    my_scene = scene
    token = my_scene['first_sample_token']
    my_sample = nusc.get('sample', token)
    last_sample_token = my_scene['last_sample_token']

    # Iterate over each sample in the scene
    while not my_sample["next"] == "":
        scene_token = my_sample["scene_token"]
        lidar_token = my_sample["data"]["LIDAR_TOP"]
        group = fo.Group()
        # Iterate over each sensor in the sample
        for sensor in groups:
            data = nusc.get('sample_data', my_sample['data'][sensor])
            filepath = dataroot + data["filename"]

            # Check if the sensor is lidar
            if data["sensor_modality"] == "lidar":
                filepath = load_lidar(lidar_token)
                sample = lidar_sample(group,filepath, sensor, lidar_token, scene)

            # Check if the sensor is camera
            elif data["sensor_modality"] == "camera":
                sample = camera_sample(group, filepath, sensor, my_sample['data'][sensor],scene)

            # Else its radar
            else:
                radar_filepath = load_radar(filepath,data)
                sample = fo.Sample(filepath=radar_filepath, group=group.element(sensor))


            # Add metadata to the sample
            sample["token"] = data["token"]
            sample["ego_pose_token"] = data["ego_pose_token"]
            sample["calibrated_sensor_token"] = data["calibrated_sensor_token"]
            sample["timestamp"] = data["timestamp"]
            sample["is_key_frame"] = data["is_key_frame"]
            sample["prev"] = data["prev"]
            sample["next"] = data["next"]
            sample["scene_token"] = scene_token


            samples.append(sample)

        token = my_sample["next"]

        my_sample = nusc.get('sample', token)

# Add the samples to the dataset, group by scene_token, and launch the app
all_sensor_dataset.add_samples(samples)
view = all_sensor_dataset.group_by("scene_token", order_by="timestamp")
session.dataset = all_sensor_dataset
Awesome work! You now have a full fledged self driving dataset in FiftyOne! In our next step, we will look at some advanced techniques for curation and how to enhance self driving datasets with FiftyOne Brain and FiftyOne Zoo.